EXERCISE 7 TO PERFORM AGGLUTINATION REACTIONS WITH PURE CULTURES
2006SOM3TFEP002A AGENDA ITEM 3 APEC PANDEMIC RESPONSE EXERCISECARDS EXERCISE FACILITATOR GUIDANCE LEARNING OUTCOME TO GAIN
RECONCILE AND APPROVE PCARD TRANSACTIONS EXERCISES IN THIS
0 20120814 EXERCISES ZEMAX 3 ABERRATIONS 3 PROPERTIES OF
10 THE HÜCKEL APPROXIMATION IN THIS EXERCISE YOU WILL
109 JOURNAL OF EXERCISE PHYSIOLOGYONLINE AUGUST 2021 VOLUME 24
CHAPTER 9
EXERCISE 7
TO PERFORM AGGLUTINATION REACTIONS WITH PURE CULTURES OF RHIZOBIUM
The somatic agglutination reactions of whole cells with homologous antiserum are studied. The titer of the antiserum is determined using the tray, tube, and microscope-slide methods.
Key steps/objectives
1) Culture rhizobia
2) Harvest culture for antigen preparation
3) Prepare serial dilutions of antiserum and perform titration in trays, tubes, and on microscope slides
4) Read and record titers
(a) Preparation of somatic antigens from cultured cells
(Key steps 1 and 2)
Obtain a young broth‑ or agar‑slant culture of a strain from Exercise 6. Inoculate in duplicate, two YMA slopes in 500 ml flat culture bottles with inoculum from the broth or slant culture. If a broth culture is used, 1‑2 ml of the broth can be squirted onto the agar surface and spread with a loop.
Under aseptic conditions, harvest the culture in saline after 3‑5 days for fast‑growing and 7‑10 days for slow‑growing rhizobia. Wash the cells three times in filter‑sterilized saline by repeated resuspension and centrifugation (5000‑8000 rpm). To inactivate the flagellar antigens, heat treat the antigen preparation as in Exercise 6. Finally, visually adjust the concentration of cells to approximately 1 x 10⁹ cells ml‑1 with sterile saline, and use the McFarland barium-sulfate standards (Appendix 6). If a photoelectric nephelometer or spectrophotometer is available, the turbidity may be adjusted more precisely.
(b) Dilution of stock antiserum
(Key step 3)
Prepare the two‑fold dilutions of the antiserum as follows:
Arrange 10 test tubes (16 x 125 mm) in a row on a test tube rack. Label them 1 through 10. Pipette 9.6 ml of saline into Tube 1. Pipette 2.5 ml of saline into tubes 2‑10.
Accurately pipette 0.4 ml of the stock antiserum into Tube 1. Mix the saline and serum thoroughly by sucking the serum‑saline mixture into the pipette and then expelling the contents. Repeat this process five times. Expelling should be done gently to avoid frothing. This tube now contains antiserum of a 1/25 dilution.
Using a fresh pipette, remove 2.5 ml of diluted serum from Tube 1 and transfer to Tube 2. Mix well. (The dilution of the serum in Tube 2 will be l/25 x l/2 = 1/50.)
Using a fresh pipette each time, repeat the dilution down the series by transferring 2.5 ml of the diluted serum successively from the previous tube to the next until Tube 10. (Tube 10 should have a serum dilution of 1/12800).
Familiarize yourself with the identification system used for wells in the plastic agglutination tray.
(c) Performing agglutinations in microtiter trays
(Key step 3 and 4)
Start with the highest dilution (Tube 10) and a clean Pasteur pipette (calibrated to deliver 0.03 ml per drop). Place 2 drops of the diluted antiserum into well A‑10 of the plastic agglutination tray. Next, using the same Pasteur pipette (after blotting the tip dry), place 2 drops of the antiserum of the next highest dilution (Tube 9) into well A‑9 of the agglutination tray. Repeat until all the dilutions of the antiserum have been dispensed into the respective wells of Row‑A of the agglutination tray.
Next, with a clean, calibrated Pasteur pipette, dispense 2 drops of the homologous antigen (approximately 1 x 10⁹ cells ml‑1) into each of the wells from well A‑1 through A‑10. Avoid touching the antiserum in the well or the walls of the well with the tip of the antigen pipette. Discard the antigen pipette after use.
Work from the well containing the most to the least dilute antiserum. Using a clean glass applicator (a fine capillary tube sealed at both ends or a fine solid glass rod rounded and smooth at both ends), carefully stir the antigen‑antiserum mixture in each well. Avoid spillage into neighboring wells. Rinse the stirring rod in a beaker of water and wipe dry with tissue paper between each well. Change the rinsing water frequently. The same stirring rod may be used for each new well.
Place 2 drops of serum of l/25 dilution into well A‑11. Add 2 drops of saline with another calibrated Pasture pipette. This serves as the serum‑saline control.
Place 2 drops of saline into well A‑12. Add 2 drops of antigen. This serves as the antigen‑saline control.
Seal all wells (A‑1 through A‑12) with a strip of cellophane tape. Float the agglutination tray in a water bath at 52C for 4 h and then hold overnight in the refrigerator. Alternatively, the reaction mixture may be incubated in an incubator at 37C for 2 h and then transferred to a refrigerator before reading the reactions. Figure 7.1 shows the steps for the antiserum titer determination in wells. Read and record positive agglutinations at the highest dilution of the serum (Figure 7.2). Positive agglutination will appear as granular clumps with clear supernatant. Negative agglutinations are indicated by settling of the cells on the bottom of the well and turbid supernatant.
To calculate the titer, (serum titer is the reciprocal of the highest serum dilution at which positive agglutination occurs) multiply by two the highest dilution of the serum at which positive agglutination occurs. This is because equal volumes of the diluted serum and antigen were titrated in the well. (Example: if positive agglutination was detected at l/3200 dilution of the serum the true titer will be 3200 x 2 = 6400).
Further confirmation of a positive reaction can be made by gently stirring the reactants in the well with a sterile inoculating needle with a 2 mm loop. Stirring will cause the granular clumps to float in suspension. Observe with a stereo‑microscope or magnifying glass and note the granular clumps suspended in a clear suspending solution. Stir the antigen‑saline control and observe the turbid appearance showing no separation into granular clumps and no clear suspending solution. Flame the inoculating needle for reuse in other wells. Flaming will remove contaminating reactants and thus prevent carry over. The antigen‑saline control will help in distinguishing between positive and negative agglutinations. Record titer of antiserum and date of experiment.
(d) Performing agglutinations in tubes
(Key steps 3 and 4)
Prepare a two‑fold dilution series of the antiserum as described for tray agglutinations (10 dilutions ranging from l/25 through l/12800). Remaining diluted serum prepared previously for the tray method may be used, provided both methods are done on the same day.
Arrange 24 tubes in agglutination tube racks. Tubes with an internal diameter of 5 mm and length of 60 mm are suitable. Special tubes called Dreyer tubes, if available, are preferred. Label them adequately to facilitate reading the antiserum dilution in each tube. Alternatively, arrange the tubes systematically in a tube-rack to avoid labeling.
Dispense 10 drops (0.03 ml drop‑1) of each dilution into the series of agglutination tubes set up for the titration. Set up duplicate tubes for each antiserum dilution.
Add 10 drops of each antigen (approximately 1 x 10⁹ cells ml‑1) to each of the agglutination tubes with a clean Pasteur pipette. Avoid contact of the antigen pipette with the mouth or walls of the tubes containing the serum. Do not attempt to stir or mix the reaction mixture in the tubes. Also set up antigen‑saline and antiserum‑saline tubes as controls.
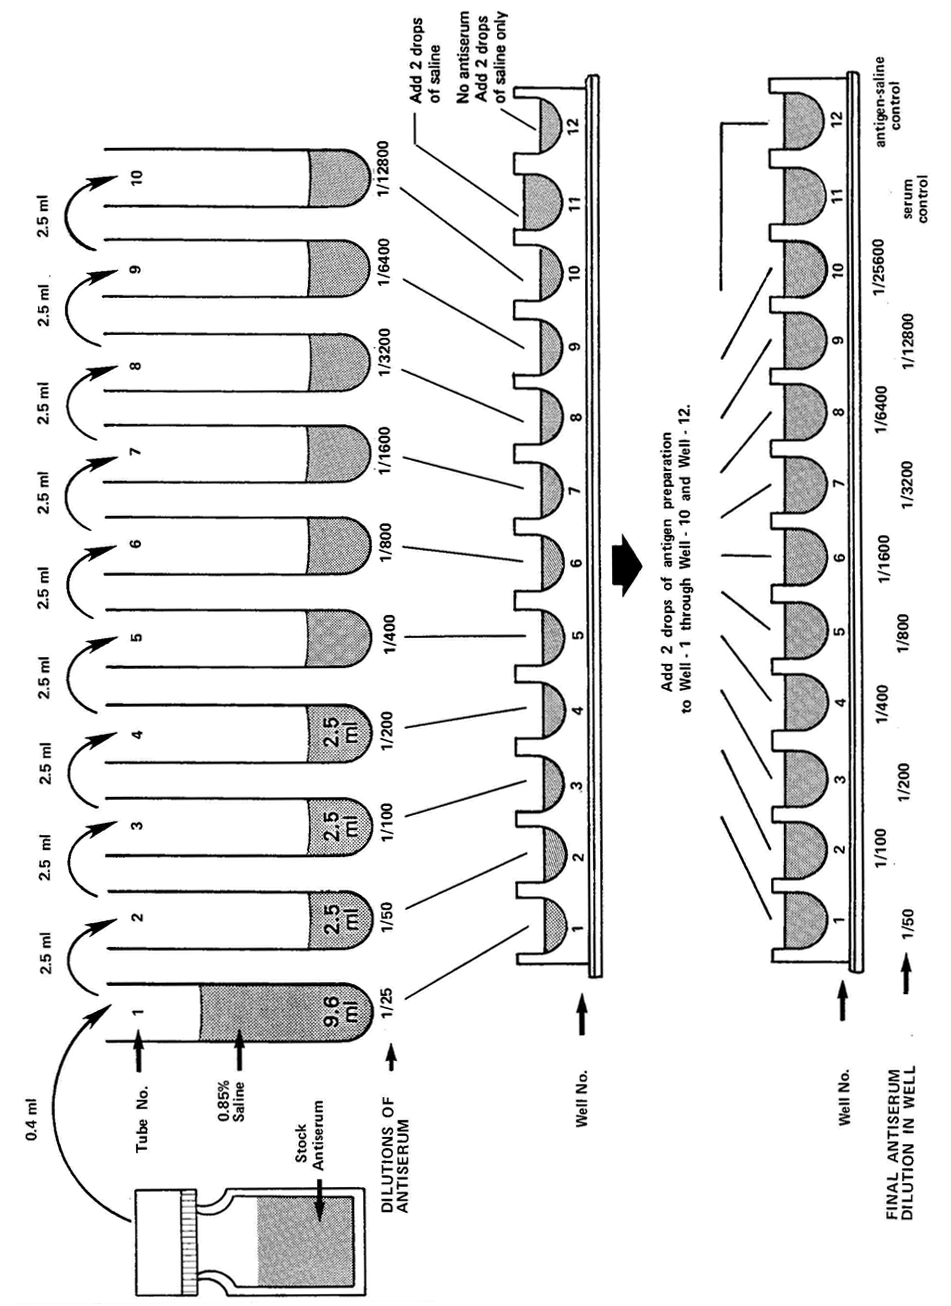
Figure 7.1. Scheme for antiserum titer determination in wells
Incubate the reaction mixtures in the tubes in a water bath at 52C for 4 h. Alternatively, the tubes may be incubated in a water‑bath at 37C for 24 h. Read the tubes after the initial incubation. Read the tubes again after keeping them overnight in the refrigerator (4C). Place glass beads of suitable size in the mouth of the tubes to prevent evaporation. "PARAFILM" can be substituted if glass beads are not available. Covering mouths of tubes is not necessary if the water bath is equipped with a lid/cover. The filled portion of the tubes should be immersed half‑way in the water bath thereby facilitating mixing of the antigen and antiserum through convection.
Record positive agglutinations. These appear as granular clumps in a clear supernatant. When spun gently, negative tubes will produce a "wisp of smoke" effect arising from the bottom of the tube, indicating the sediment is not granular. Calculate the titer as outlined for tray agglutination.
(e) Performing agglutinations on microscope slides
(Key steps 3 and 4)
This method has the advantages of using only small amounts of serum and giving results within minutes. There is, however, some loss of accuracy and a degree of subjectivity in interpretations. The method should not be depended on without some objective evidence (e.g. tube agglutination) to support interpretation.
Partition a microscope slide into two sections with melted vaseline or petroleum jelly. Prepare 10 slides and lay them in a row on black paper. One section is used for one dilution of the test serum and the other section for the antigen control. Label one section "T" for test‑serum and "C" for antigen‑control.
Using the remaining diluted serum prepared for the tray methods, place a drop (0.03 ml) of the serum with a calibrated Pasteur pipette (starting from the highest dilution) in the test‑serum section of each slide.
To each drop of serum add a drop (0.03 ml) of the antigen. Also place a drop of antigen on each control section.
Add a drop (0.03 ml) of saline to the antigen in the control section of the slides.
Stir the antigen‑antiserum mixtures with the loop of an inoculation needle.
Flame and cool the needle after each mixing to avoid "carry over" between tests.
Immediately after mixing, slowly rock the slide back and forth for 1‑2 min. With a high-titer antiserum, the agglutination should occur quickly and should be detectable with the naked eye or a dissecting microscope.
Record positive agglutinations and calculate the titer. Compare the results of this method with those from the tray and tube agglutination methods.
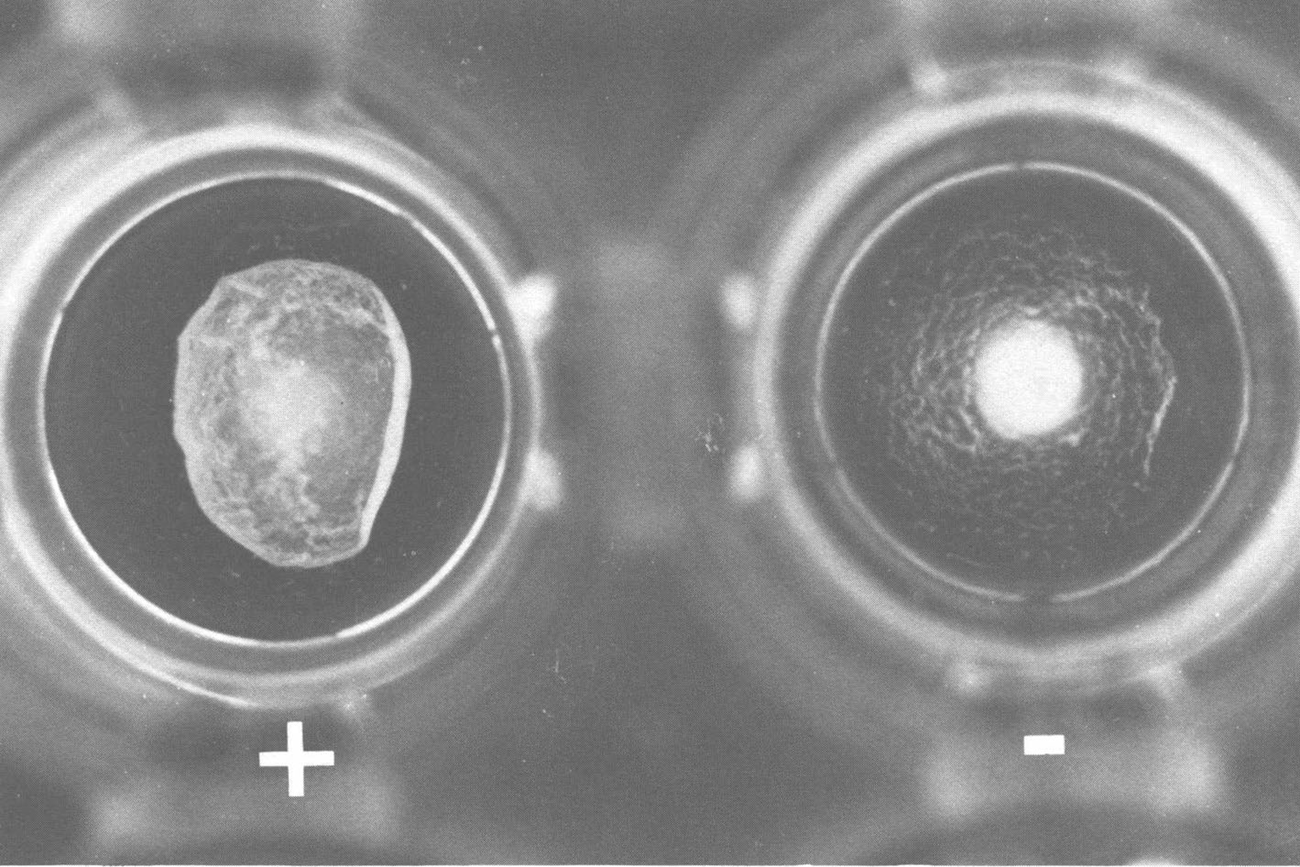
Figure 7.2. Agglutination reactions in wells of agglutination tray.
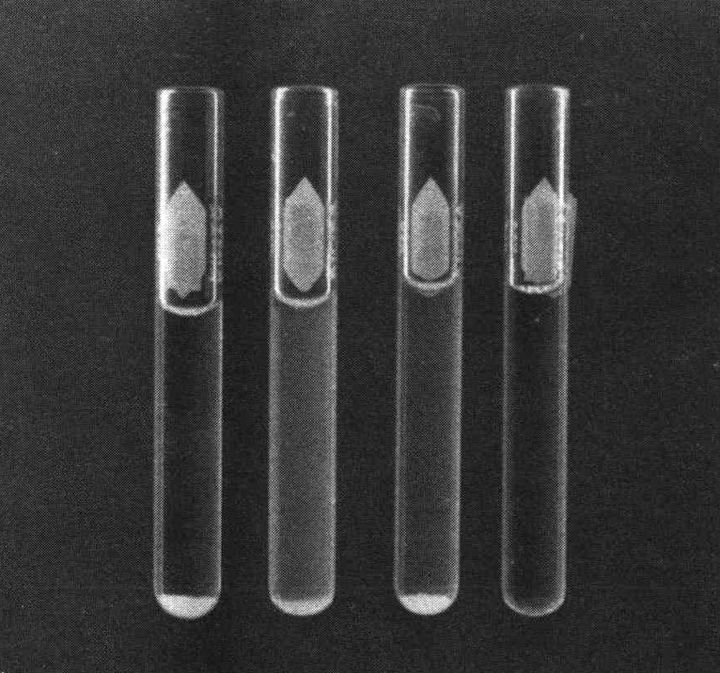
Figure 7.3. Agglutination reactions in agglutination tubes
Requirements
(a) Preparation of somatic antigens from cultured cells.
Centrifuge
McFarland barium sulfate standards (or photoelectric nephelometer)
Boiling water or steam bath
Centrifuge tubes
Test tubes
Serum vials with rubber stoppers
Sterile pipettes (1 ml) and Pasteur pipettes
Sterile glass beads
Sterile saline (100 ml)
YMA slopes in 500 ml flat culture bottles
Broth or agar slant culture of rhizobia
(b) Dilution of stock antiserum
Antiserum (1 ml) from Exercise 6
Sterile saline (200 ml)
1 ml sterile pipettes (two)
5 ml sterile pipettes (10)
Test tubes (10) and rack
(c) Performing agglutinations in microtiter trays
Plastic agglutination tray (rigid polystyrene "U" plate, Cooke Laboratory Products, Alexandria, VA, USA)
Calibrated Pasteur pipettes (0.03 ml/drop)
Glass applicator
Rubber bulb (1‑2 ml capacity)
Cellophane tape
Tissue paper
Diluted antiserum from (b)
Antigen suspension (1 x 10⁹ rhizobia ml‑1)
Binocular dissecting microscope
Magnifying glass (hand lens)
Water bath(52C), incubator (37C), refrigerator(4C)
(d) Performing agglutinations in tubes
Calibrated Pasteur pipettes
Agglutination tubes or other small tubes
Tube rack
"Parafilm"
Diluted antiserum from (b)
Antigen suspension from (c)
Water bath (52C), incubator (37C), refrigerator (4C)
(e) Performing agglutinations on microscope slides
Clean microscope slides
Calibrated Pasteur pipettes
Rubber bulb
Vaseline or petroleum jelly
Diluted antiserum from (b)
Antigen suspension from (c)
11 TRANSFORMATION EXERCISES COMPLETE THE SECOND SENTENCE OF
150 JOURNAL OF EXERCISE PHYSIOLOGYONLINE APRIL 2018 VOLUME 21
150080 INTRODUCTION TO INFORMATION SYSTEMS HMTL INCLASS LAB EXERCISE
Tags: agglutination reactions, pipettes agglutination, exercise, cultures, reactions, agglutination, perform
- 8 V EL BIEN MORAL 1 FORMAS DE BONDAD
- N° 7092 LEY DEL IMPUESTO SOBRE LA RENTA
- COLLOCATION PATTERNS IN ENGLISH ADJECTIVES VERBS +
- 8 LEY NO DE DE DE 2003 QUE REGLAMENTA
- DECLARACIÓ RESPONSABLE DECLARACIÓN RESPONSABLE DADES DEL BECARIA DATOS
- THIS GRANT AGREEMENT IS MADE THE DAY OF TWO
- LISTA PROIECTANŢILOR ATESTAŢI (SITUAȚIA 30 IUNIE 2017) NR CRT
- SGDI 617 14 DE ABRIL DE 2004 06
- PROPUESTA INICIAL DESCRIPCIÓN DEL TITULO TÍTULO TIPO DE ENSEÑANZA
- Wniosek-o-ponowne-wykorzystanie,691
- TANGGAPAN TERHADAP KAK TANGGAPAN TERHADAP KAK TANGGAPAN TERHADAP KAK
- T LAND USE PERMIT APPLICATION 2015 —————— FOR
- UNIT 12 (SOLUTIONS ACIDS AND BASES) CHAPTER 12 (SECTIONS
- 8 CHỦ TỊCH NƯỚC CỘNG HÒA XÃ HỘI CHỦ
- 17 ZARZĄDZENIE NR 3V2008 WÓJTA GMINY PRZYŁĘK Z DNIA
- DOC 906045DOC CHANGE REQUEST CHANGE REQUEST MEETING PRO24 SOURCE
- FELNŐTTKORBAN HALLÁSSÉRÜLTTÉ VÁLT EMBEREK KOMMUNIKÁCIÓS SEGÍTÉSE A SZOCIÁLIS ELLÁTÁSOKBAN
- DEAR [ENTER NAME OF MP] I AM WRITING TO
- 8 BỘ QUỐC PHÒNG CỤC ĐIỀU TRA HÌNH SỰ
- 8TH OF JUMADAH I 1436 AH IN THE
- HARDWARE PC – JULIOL 2005 MATERIALES DE FORMACIÓN COMPONENTES
- COUNCILS SHOULD DOWNLOAD THIS MODEL BYELAW SET AND ADAPT
- DUBLIN REPUBLICAN CLUB MEMBERSHIP APPLICATION FORM WWWDUBLINGOPORG INFODUBLINGOPORG
- REGIONALIZACIÓN CLIMÁTICA DE ESPAÑA FUENTE MARTÍN VIDE J Y
- ZAŁĄCZNIK DO ZAŁĄCZNIKA NR 9 DO PRZEWODNIKA BENEFICJENTA RPO
- SSSNB(10)06 SCHOOL SUPPORT STAFF NEGOTIATING BODY INFORMATION PACK
- REPORTED SPEECH SIMPLE STATEMENTS AND QUESTIONS EXERCISES
- ČESKÁ PRŮMYSLOVÁ ZDRAVOTNÍ POJIŠŤOVNA VĚNUJE DLOUHODOBĚ ZVÝŠENOU POZORNOST ZDRAVOTNĚ
- TVCC ADN NURSING PROGRAM CLINICAL OBJECTIVES LEVEL II &
- A LEI COMPLEMENTAR Nº 118 E O PRAZO PARA
BIL 3398 TYP GENERAL BILL GB INB HOUSE IND
SURVIVING THE FIRST WEEKS THESE TIPS SHOULD HELP YOU
TYPES AND CHARACTERISTICS OF TRADITIONAL LITERATURE FOLKTALES
 REPUBLICA MOLDOVA РЕСПУБЛИКА МОЛДОВА RAIONUL SOROCA СОРОКСКИЙ РАЙОН CONSILIUL
 ANEXO 7 DISEÑO DE NUEVOS CANALES ANEXO 7 DISEÑO
 PROCURADOR GENERAL CONCEPTO 5397 BOGOTÁ DC 27 DE JUNIO
 SLÁVNOSTNÉ VYHODNOTENIE PROGRAMU ČISTÝ BARDEJOV 2012 KOMUNITNÁ NADÁCIA BARDEJOV
 © TIRANT LO BLANCH 2003 © REYES ARANDA LAFFARGA
 TOWN OF BENTON 1279 CLINTON AVE BENTON ME 04901
EL PRIMER BALON FUE EN CHINA DE CUERO RELLENA
 POWERPLUSWATERMARKOBJECT334842877 NATIONAL ASSOCIATION OF REALTORS® JOB DESCRIPTION JOB TITLE
ADSB SITF12 ATTACHMENT TO WP9 CNSATM IMPLEMENTATION PLANNING MATRIX
 S OP 27 BLOODBORNE PATHOGEN CONTROL PLAN CONTENTS 1
 DZIAŁANIE WSPÓŁFINANSOWANE ZE ŚRODKÓW FUNDUSZU SPÓJNOŚCI Z PROGRAMU OPERACYJNEGO
CENTAR ZA BESPLATNO DRAGOVOLJNO POVJERLJIVO SAVJETOVANJE I TESTIRANJE NA
 RESUME NAME SANJAY KRISHNA PHONE 8464983143 MAIL
 I TRÄNINGSSKOLAN SÄTTS INTE BETYG UTVÄRDERING OCH AVSTÄMNING GÖRS
 DANA WEISER BORN 1979 BORN TAEJON SOUTH KOREA LIVES
NAME DALTON MR DALTON SUPERSIZE ME DISCUSSION QUESTIONS DIRECTIONS
 SGGTAFACIIDT 4 30 DE NOVIEMBRE DE 2009 A2 SEGUNDA
