POPSICLE STICK TRUSS BRIDGE INSTRUCTIONS AND PHOTOS STEP 1
CSCE INTERUNIVERSITY POPSICLE STICK BRIDGE COMPETITION PROPOSAL 10 INTRODUCTIONPOPSICLE STICK TRUSS BRIDGE INSTRUCTIONS AND PHOTOS STEP 1
Popsicle Stick Truss Bridge Instructions and Photos
Popsicle Stick Truss Bridge Instructions and Photos
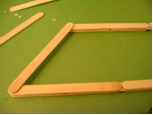
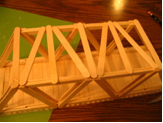
Step 1: Place 3 popsicle sticks along a straight edge. Cut one stick in half using a large scissors. Glue the halves to each end of the 3 sticks placed end to end and glue two popsicle sticks in the middle. Glue three more full sticks on top to create three layers with overlapping joints. Repeat this 3 more times to create four 3-popsicle stick beams. Create two 2-popsicle stick beams. (Glue halves to each end of 2 popsicle sticks laid end to end and glue one stick in the middle.)

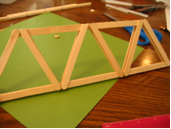
Step 2: Using one of the large 3 stick beams and one of the smaller two stick beams create a truss wall. With the flat side of the beams down on the table, arrange 6 popsicle sticks in a triangular pattern, cut off extra popsicle stick on both top and bottom to create flat surfaces and glue in place. Turn the truss wall over and repeat the process.
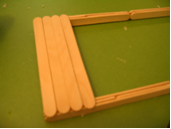
Step 3: This is an example of a completed truss wall. The last two 3 stick beams will be used to create the road. Lay them on the side and glue 33-35 sticks onto them.
Step 4: Glue the two truss walls to the road. Add extra glue to the joints between the road and the truss wall.
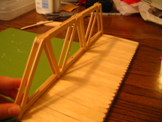
Step 5: Using 9 sticks, glue crossbeams to the top of the bridge. Note the pattern in the picture below. You can add paint and signs to complete your bridge!

2009 Board of Regents University of Nebraska
Tags: bridge instructions, popsicle, truss, bridge, instructions, stick, photos
- VFT045 FASTIGHETSEKONOMI HT 2008 ÖVNING 20080909 1 KASSAFLÖDESMETOD I
- QUESTIONS REGARDING THIS MOA? PLEASE CONTACT ? 7827??? SAN
- RENCANA STRATEGIS (RENSTRA) PROGRAM STUDI S1 TEKNIK INFORMATIKA UNIVERSITAS
- CALL FORINDEE+POSTDOCTORAL FELLOWSHIP (IPDF) INTERESTED RESEARCHERS CAN SUBMIT THEIR
- HOW CHILD SUPPORT IS CALCULATED (AND OTHER FREQUENTLY ASKED
- PERFIL PROFESIONAL DEL PROTÉSICO DENTAL 1 EL PROTÉSICO DENTAL
- PROGRAMA DE FIESTAS VIRGEN DEL CARMEN EL CAMPELLO 2009
- GRUPA 3 ZAŁĄCZNIK NR 2 NUMER PROCEDURY ZKPOWR12017 OŚWIADCZENIE
- SCHOOL DISTRICT NAME SCHOOL DISTRICT ADDRESS SCHOOL DISTRICT CONTACT
- ОДАБРАНИ И НАГРАЂЕНИ РАДОВИ НАГРАДНОГ КОНКУРСА ЗА ИДЕЈНО РЕШЕЊЕ
- 2 82012 (X 26) FVB FŐVÁROSI VÁLASZTÁSI BIZOTTSÁG 1052
- QUÍMICA 2º BACHILLERATAO CINÉTICA EQUILIBRIO Y ACIDOBASE 1) SE
- CLOWN (BÁSICO) DEL 22 DE AGOSTO AL 10 DE
- PRODROP AND PRONOMINAL SUBJECTS REANALYZING FEATURES IN THE HISTORY
- PROJECT NAME RISK MANAGEMENT PLAN TEMPLATE VERSION 11 DRAFT
- APPEL D’OFFRE MONITORING DANS LES MICI IBD MONITORING
- PRUEBA DE HABILIDAD PARA SEGUIR INSTRUCCIONES 1 LEE TODAS
- DA PRESENTARE SU CARTA INTESTATA DEL SOGGETTO PROPONENTE SPETTLE
- SUMMARY OF PROPOSED CHANGES TO COLLECTIVE BARGAINING AGREEMENT ARTICLE
- HTTPAPRIMAES XVII CONCURSO DE PRIMAVERA DE MATEMÁTICAS LA RIOJA
- WEST VIRGINIA DEPARTMENT OF TRANSPORTATION DIVISION OF HIGHWAYS CONSULTANT
- REGOLAMENTO DI TIROCINIO APPROVATO DAL CONSIGLIO DEL CORSO DI
- SCH 1 FORM 1 AMENDED BY SR NO 12016
- INTERNATIONAL BIODIVERSITY DAY 2007 BIODIVERSITY AND CLIMATE CHANGE THE
- ALTAR SERVERS ROSTER – JULY TO SEPT 2017 MONTH
- WYZNACZ DZIEDZINĘ WYRAŻENIA WYMIERNEGO I UPROŚĆ JE A) 13X3(3X3+X2)
- 23 Nº TEMA PÁGINAS CALIFICACIÓN 1 CONCEPTOS FUNDAMENTALES DE
- L20 DOORSSHUTTERSHATCHES 490 AUTOMATIC DOORS MANUFACTURER BESAM LIMITED WASHINGTON
- NO ES NECESARIA AUTENTICACIÓN NOTARIAL NI LEGALIZACIÓN CONSULAR CUBA
- DEUTSCH INFOBLATT INFORMATIONSBLATT FÜR DIE ARBEITER AM BAUERNHOF
 THE WHITECHAPEL CENTRE EQUAL OPPORTUNITIES MONITORING FORM THE WHITECHAPEL
ALBINIZMAS IR MELANIZMAS MECHANIZMAI BEI REIKŠME BIOCHEMIJOS I KURSAS
COLEGIO DE PROFESIONALES EN SERVICIO SOCIAL DE LA PROVINCIA
 MANUAL DE BIOQUÍMICA I BQ1LQ01 PRACTICA 10 CINÉTICA ENZIMÁTICA
 PART 1 READ AND KEEP THIS PART EXPRESSION OF
 ESTUDIO DE PROTEÍNAS EN BIOQUÍMICA CLÍNICA II BQ4 (PROTEÍNAS
 FORSCHUNGS UND ENTWICKLUNGSDIENSTLEISTUNG GRUNDLAGENFORSCHUNG INDUSTRIELLE FORSCHUNG EXPERIMENTELLE ENTWICKLUNG INHALT
 ROZLICZENIE KOSZTÓW ZAGRANICZNEJ PODRÓŻY SŁUŻBOWEJ 1
 LA ENFERMEDAD LAS FIEBRES HEMORRÁGICAS VIRALES (FHV) HACEN REFERENCIA
 UNIVERSIDAD DE LAS PALMAS DE GRAN CANARIA BIBLIOTECA UNIVERSITARIA
 ORDEN SAN2962020 DE 11 DE MARZO POR LA QUE
 PRESS RELEASE VIENNA 10 JULY 2008 AGRANA
  GROUP 211 OBJECTIVE A HIGHLY FOCUSED AND KNOWLEDGEABLE MIDWIFE
 VEILIGHEIDSPLAN INHOUDSOPGAVE INHOUDSOPGAVE 1 SOCIALE VEILIGHEID OP SBO DE
 OMPIPIJULAC0434 PÁGINA 13 S OMPIPIJULAC0434 ORIGINAL ESPAÑOL FECHA 22
 IES SIERRA PALOMERA C PARTIDA DEL CARRO SN 44370
ÖĞRENIM HEDEFLERI •EPIDEMIYOLOJIK YÖNTEMLERIN KULLANILMASI ILE BULAŞICI HASTALIKLARIN KONTROLUNU
 V EGESA – SKOPJE 50TA DIVIZIJA BR 20 122126
 STRAIPSNIO PAVADINIMAS STRAIPSNIO PAVADINIMAS STRAIPSNIO PAVADINIMAS JONAS JONAITIS VAKARŲ
Recommendation Form kdi School of Public Policy and Management
