PAINT CURE THE FOLLOWING TESTS ARE REQUIRED AS PART
034 CLEANING AND PAINTING EXISTING BEARING PLATES (12512)1 S TART 2 SEE ALIEN 3 SHE PAINT
13 SPAN 6639M PAINTING AND POETRY IN THE SPANISH
2 NAME RWP (PAINTED ON BASE OF RWP)
6 INTRODUCCIÓN A MICROSOFT PAINT 1 INFORMACIÓN GENERAL
6 LEADBASED PAINT DISCLOSURE ADDENDUM SELLER HAS RECORDS OR
PAINT CURE
The following tests are required as part of Quality Control for cure testing of paint.
All Non - conformance must be recorded on check sheets, including any corrective repairs done. If repairs are not documented, it will be understood that no corrective action was taken!
When checklists are used the following information needs to be included:
Cure oven temperature
Dry-off temperature
Cure oven cycle time
TAPE TEST (HATCH TEST) - ASTM D-3359-90
To be done on powder and liquid paint.
1. Equipment required:
. Cutting tool: Sharp razor blade, knife or hatch testing tool (2mm space between cuts)
. Tape: One-inch transparent pressure-sensitive tape.
. Rubber eraser or end of pencil
. Illumination/magnifier tool
. Ruler or straight edge to ensure straight cuts (when using a knife)
2. Test areas:
. Can be performed anywhere on any painted surface.
. Must only be performed on a metal substrate which is cool to the touch or tape will fail to adhere to the surface.
. The area being tested will determine the equipment needed and procedure used.
. Flat even surfaces: The hatch test knife is a good tool and procedure 3a should be used.
. Tight spots, corners, round surfaces and film thicknesses greater than 5 mils: A sharp knife should be used and procedure 3b followed.
3. Testing procedures:
Use one of the following two procedures:
. Cross-cut using a hatch test knife/cutter
When testing film thicknesses of 2-5 mils, there must be a 2mm space between cuts. Film thicknesses between 0-2 mils, a 1mm space between cuts are required .
. Check over hatch tester blade. Replace if damaged.
. Select an area free of major blemishes and make parallel cuts as follows:
Make all cuts about 3/4" (20mm) long. Cut through the film to the substrate in one steady motion using sufficient pressure on the cutting tool to make the cutting edge reach the substrate. When making successive single cuts with the aid of a straight edge, place the straight edge on the uncut area.
. After making the required cuts brush the film lightly with a soft brush or tissue to remove any detached flakes or ribbons of coatings.
. Make the additional number of cuts at 900 to and centred on the original cuts.
. Brush the area as before and inspect the incisions for reflection of light from the substrate. If the metal has not been reached make another grid in a different location. Do not attempt to deepen a previous cut as this may affect adhesion along the incision.
. Remove a length of tape about 3" (75mm) long. (If the tape is a new roll remove the first two laps and discard.)
. Place the centre of the tape over the grid and in the area of the grid, smooth into place by a finger. To ensure good contact with the film, rub the tape firmly with the eraser on the end of a pencil. The colour under the tape is a useful indication of when good contact has been made.
. Within 90 (+/-30) seconds of application, remove the tape by, seizing the free end and with a rapid, smooth motion, pulling it off at as close to an angle of 1800 as possible.
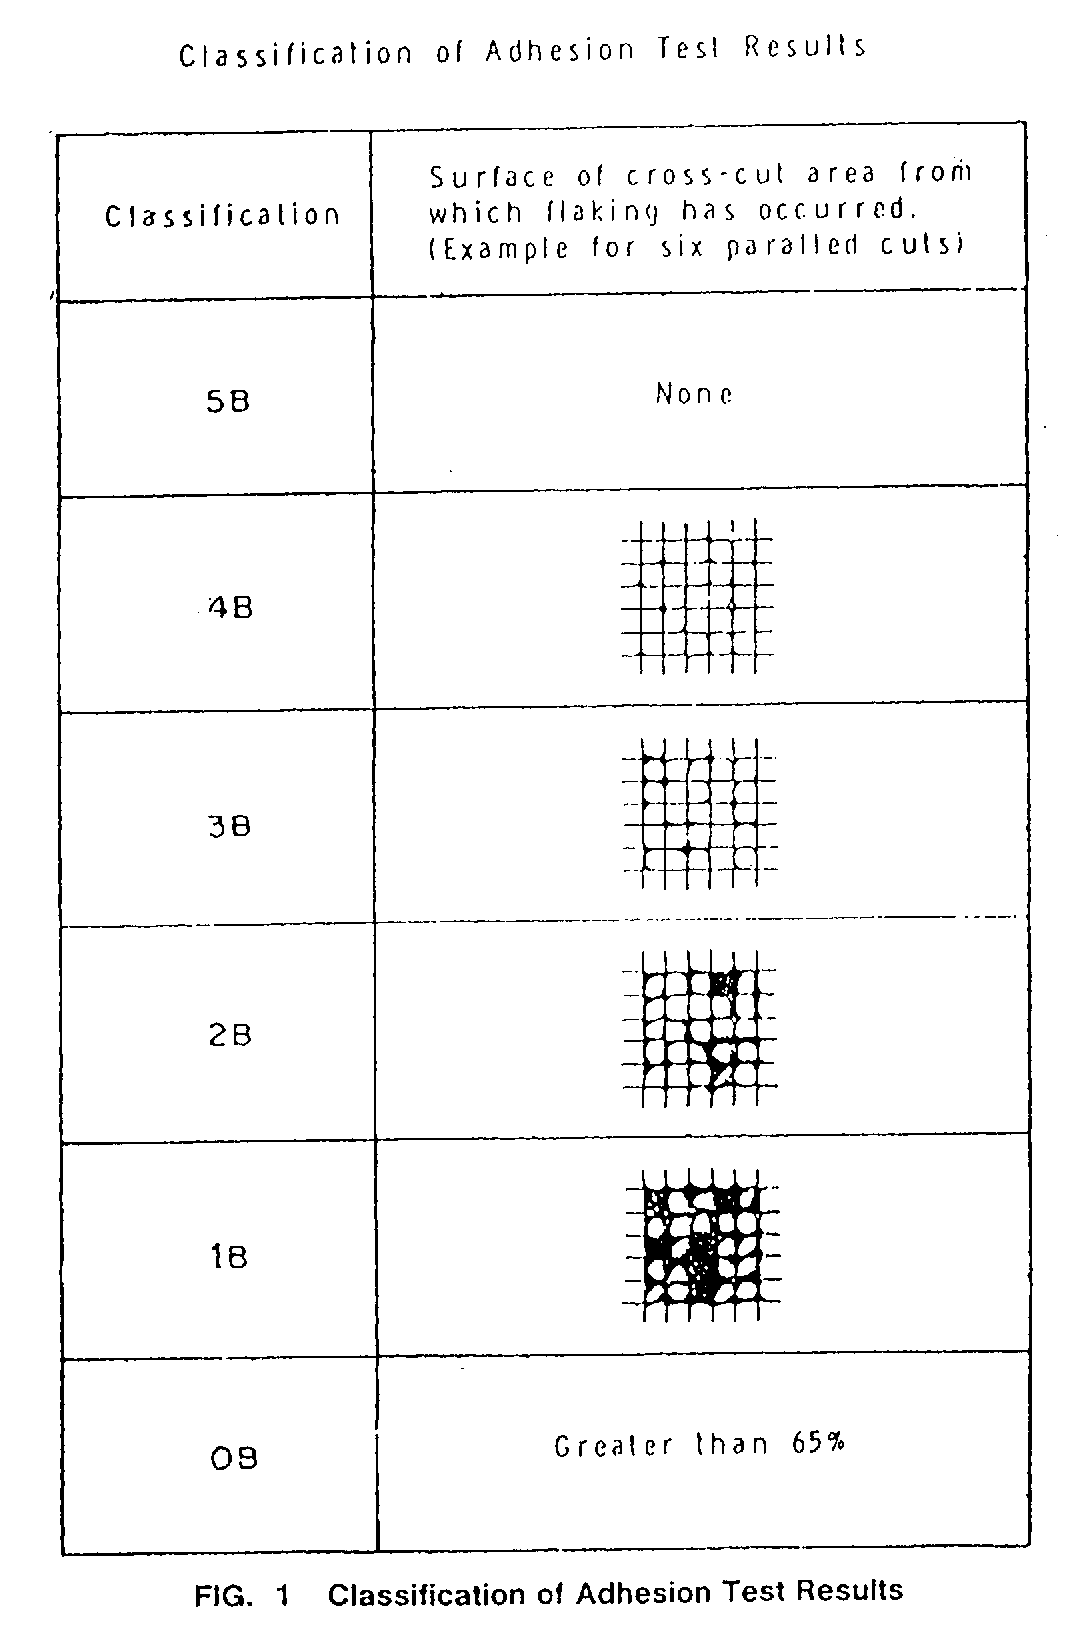
. Inspect the grid area on the substrate for removal of coating from the substrate or from a previous coating using the illuminated magnifier. Rate the adhesion in accordance with the following scale.
5B the edges of the cuts are completely smooth; none of the squares of the lattice are detached.
4B Small flakes of the coating are detached at intersections; less than 5% of the area is affected.
3B Small flakes of the coating are detached along edges and at intersections of cuts. The area affected is 5 to 15% of the lattice.
2B the coating has flaked along the edges and on parts of the squares. The area affected is 15 to 35% of the lattice.
1B the coating has flaked along the edges of cuts in large ribbons and whole squares have detached. The area affected is 35 to 65% of the lattice.
0B Flaking and detachment worse than Grade 1.
Note: A rating of 3B or less is a non-conformance.
. X-cut using a sharp knife.
Select an area free of blemishes and make intersecting cuts as follows:
Make two cuts in the film, each about 1.5" (40mm) long that intersect near their middle with a smaller angle of between 30 and 450. When making the incisions, use the straight edge and cut through the coating to the substrate in one steady motion.
. Inspect the incisions for reflection of light from the metal substrate to establish that the coating film has been penetrated. If the substrate has not been reached make another X in a different location. Do not attempt to deepen a previous cut as this may affect adhesion along the incision.
. Remove a length of tape about 3" (75mm) long. (If the tape is a new roll remove the first two laps and discard.)
. Place the centre of the tape at the intersection of the cuts, with the tape running in the same direction as the smaller angles. Smooth the tape into place by finger in the area of the incisions and then rub firmly with the eraser on the end of a pencil. The colour under the transparent tape is a useful indication of when good contact has been made.
. Within 90 (+/-30) seconds of application, remove the tape by seizing the free end and pulling it off rapidly (not jerked) back upon itself at as close to an angle of 1800 as possible.
. Inspect the X-cut area for removal of coating from the substrate or previous coating and rate the adhesion in accordance with the following scale:
5A No peeling or removal.
4A Trace peeling or removal along incisions or at their intersection.
3A Jagged removal along incisions up to 1/16" (1.6mm) on either side.
2A Jagged removal along most of incisions up to 1/8" (3.2mm) on either side.
1A Removal from most of the area of the X under the tape.
0A Removal beyond the area of the X.
. Repeat the test in two other locations on each test panel. For large structures make sufficient tests to ensure that the adhesion evaluation is representative of the whole surface.
. After making several cuts examine the cutting edge and replace it if dull or damaged. Discard cutting tools that develop nicks or other defects that tear the film.
4. Reporting classifications and quality assurance.
Scratching the crosshatch area rather than applying the tape is not sufficient. If you like scratching the cross hatch do so after the tape has been used, however the classification recorded is to be based on the tape system with an added note if scratching demonstrated a lesser cure.
- Record the classification on the appropriate report (see Figure 1 for classification visuals).
- A classification of 3 or less must be reported as a non-conformance, the cause of failure determined and appropriate corrective action taken. If corrective action cannot be taken the Paint Production Supervisor must determine whether or not it will go into production.
5. All hatch marks should be sanded smooth prior to touch up, especially areas that get a decal affixed on top of the hatch marks. Touch up with liquid paint (mixed 5:1 with catalyst).
MEK SOLVENT RUB CURE TEST (POWDER COATING INSTITUTE)
To be done on powder paint only.
1. Equipment required:
. Reagent B (a solution mix of 10% MEK and 90% Xylene by volume). Store solution in a MEK squeeze bottle (make sure it is properly labelled).
. 2 lb. ball peen hammer.
. Soft cloth or folded into a 3" x 3" pad, 1/2" thick.
. Fastening device to attach pad to ball end of hammer.
2. Procedure:
. Fold the cloth into a 3" x 3" approximately 1/2" thick. (Approximately 4 - 6 layers of folded cloth.)
. Attach the 3" x 3" cloth to the ball end of the ball peen hammer using an O-ring or wire to secure it.
- this cloth should be changed with each test, as paint build-up will affect the test
. Saturate the pad in Reagent B.
Caution: Reagent B is flammable - use with adequate ventilation.
. Select a test area that is flat and free of blemishes.
. Holding the handle of the hammer parallel to the test piece, stroke/slide the saturated pad approximately 1 ½” on the test piece using only the weight of the hammer as pressure. Look for obvious signs of fatigue. Do 100 double rubs (i.e.: forward and back equals 1 rub).
Warning: Do not rub too hard or too quickly as this will result in an inaccurate rub.
3. Interpretation:
. Results of this test must be compared with your previous observation of test results on parts from the system under evaluation.
. Rating as follows:
1 - Dissolve to metal: No cure. (NC)
3 - Some film removal and softening: Partial cure. (PC)
5 - Gloss reduction only with no or minimal effect on the paint: Cure. (C)
(As per known cure sample)
. A rating of anything less than "Cure" requires a non-conformance and the appropriate corrective action taken. All parts must "Cure" before being released into production.
4. Touch up the rub mark with liquid paint (mixed 5:1 with catalyst).
IMPACT TESTING
1. Equipment required:
. 2 lb ball peen hammer.
. Illuminated magnifying glass.
2. Procedure:
. Using the ball end of the hammer, hit the surface of the paint with moderate force.
. Inspect the damaged area for shattering or breaking of paint.
3. Interpretation:
. Interpretation as follows:
Cure: No shattering or breaking of paint - a simple divot.
Part cure: Some shattering or splitting of paint.
No cure: Breaking away of paint exposing metal.
. A rating of anything less than "Cure" requires a non-conformance and the appropriate corrective action taken. All parts must "Cure" before being released into production.
VISUAL INSPECTIONS
Solvent Popping (Liquid Paint):
-this is a visual judgement call based on the following scales:
5: Perfect - 0 pinholes
4: Excellent; very little pin holing - 0-10% of surface.
3: Good - 10-30% of surface has pinholes.
2: Fair - 30-60% of surface has pinholes.
1: Poor - 60-100% of surface has pinholes.
-This rating is evaluated by inspecting the overall part.
Pinholes (Powder):
-this is a visual judgement call based on the following scales:
4: Excellent; very little pin holing - 0-25% of surface.
3: Good - 25-50% of surface has pinholes.
2: Fair - 50-75% of surface has pinholes.
1: Poor - 75-100% of surface has pinholes.
-This rating is evaluated by inspecting the overall part.
Distinction of image/Over-bake:
Based on the following guide a general visual inspection is to be done:
5: Perfect - very shiny; great reflection
3: Some reduction in shine but still good reflection
1: Reject - little to no reflection
Gloss
It is extremely difficult to visually inspect for gloss on a part, as the paint may appear shiny and reflective (good distinction of image) but have very low gloss; or it may appear matte and dull but have high gloss (80 units plus on a gloss meter). If there is any question as to the appearance of the coating, call Maintenance and/or your Supervisor.
Also note any hazing or blooming on painted parts.
Miscellaneous:
-note any defects, contamination, rusting etc.
DATA PAQ
This method of testing is used to confirm that the metal temperature is reaching "x" temperature for "y" amount of time. Thereby confirming a cure for that particular piece or location of probes.
Maintenance is responsible for performing these tests and a copy will be distributed to the Supervisor and engineering.
Documentation - Paint Cure
Select the correct drawing for the part you are inspecting.
Perform all required Q.A. tests as per procedure.
Complete tests in all required areas on the drawing. Indicate hatch and MEK test areas on the diagram.
When complete, file the drawings in the Test Results Binder.
For parts that have no drawings, complete the Test Results - Paint Cure log sheet in the binder with all required information.
If any non-conformance is discovered, document the information on the drawing or log sheet and report it to your Supervisor immediately.
TEST RESULTS
PAINT CURE
|
Date |
Time |
Emp. # |
Part # |
Hatch Test |
MEK Test |
Pinholes |
D.O.I. |
Mil Avg. |
|
|
|
|
|
|
|
|
|
|
|
|
|
|
|
|
|
|
|
|
|
|
|
|
|
|
|
|
|
|
|
|
|
|
|
|
|
|
|
|
|
|
|
|
|
|
|
|
|
|
|
|
|
|
|
|
|
|
|
|
|
|
|
|
|
|
|
|
|
|
|
|
|
|
|
|
|
|
|
|
|
|
|
|
|
|
|
|
|
|
|
|
|
|
|
|
|
|
|
|
|
|
|
|
|
|
|
|
|
|
|
|
|
|
|
|
|
|
|
|
|
|
|
|
|
|
|
|
|
|
|
|
|
|
|
|
|
|
|
|
|
|
|
|
|
|
|
|
|
|
|
|
|
|
|
|
|
|
|
|
|
|
|
|
|
|
|
|
|
|
|
|
|
|
|
|
|
|
|
|
|
|
|
|
|
|
|
|
|
|
Comments:
TECHNICAL TRAINING DEPARTMENT
ABBEY AWARDS SCHOLARSHIP & FELLOWSHIPS IN PAINTING 20202021 NAME
AIRBRUSHING WITH JO SONJA ACRYLIC PAINTS AIRBRUSH PAINT MUST
ANNUAL COMMUNITY PAINTATHON CONFIDENTIAL HOMEOWNER APPLICATION RETURN APPLICATION BY
Tags: following tests, the following, paint, following, tests, required
- E1281 JAMAICA SOCIAL INVESTMENT FUND JAMAICA JAMAICA INNER CITY
- 25022014 S39 PAŃSTWA CZŁONKOWSKIE ZAMÓWIENIE PUBLICZNE NA USŁUGI
- INTERVJU NAVN HILDE ALVER SELVNES FAGYRKE HELSEARBEIDERFAG BEDRIFT HEMNE
- PRESS RELEASE INSIDER DEALING ON CHINNEY ALLIANCE GROUP LIMITED
- CAROLINA PEDIATRICS 2113 ADAMS GROVE SUITE 101 COLUMBIA SC
- SECRETARÍA TÉCNICA DE LA CONFERENCIA REGIONAL SOBRE MIGRACIÓN TECHNICAL
- 11 KUJAWSKA SZKOŁA WYŻSZA WE WŁOCŁAWKU WYDZIAŁ NAUK PEDAGOGICZNYCH
- SAMPLE ENROLLMENT REQUIREMENT GROUPS SINGLE COURSE PREREQ EXAMPLE ACCTG
- SUCCESS MEASURES RESPONSE TO THE GOVERNMENT GREEN PAPER ON
- V ESTAGDER FYLKESKOMMUNE 0 AV 1 SØGNE VGS TURREGLEMENT
- FORMACIÓN DE ALUMNOS EN SERVICIO SOCIAL ESTANCIA BÁSICA E
- ORZECZENIE LEKARSKO – WETERYNARYJNE W SPRAWIE (OKREŚLENIE ODBIERANEGO ZWIERZĘCIA)
- REGLEMENTĂRILE ANTIDOPING ALE ANAD MOLDOVA INTRODUCERE PREFAŢĂ ACESTE
- APPLICATION FOR PURCHASE NAME STREET ADDRESS
- ASZÓD VÁROS ÖNKORMÁNYZAT POLGÁRMESTERÉTŐL 2170 ASZÓD SZABADSÁG TÉR 9
- EL ACROSPORT 1 ORIGEN DOCUMENTOS GRÁFICOS SOBRE EL ANTIGUO
- UNIVERSIDAD MAYOR DE SAN SIMÓN FACULTAD DE HUMANIDADES
- MOKINIŲ PRIĖMIMO Į ŠV KRISTOFORO GIMNAZIJĄ PAGAL PAGRINDINIO UGDYMO
- TAO ESPARRUAN BIZI DIRENENTZAKO TXARTELA TARJETA DE RESIDENTE EN
- ОБРАЗАЦ 5 ССУ 2021 ПАКЕТ УСЛУГА ЗА МЛАДЕ
- NZQA UNIT STANDARD 327 VERSION 8 PAGE 3 OF
- GUIDELINES FOR COMITE DE PILOTAGE MEETINGS 070524 1 BACKGROUND
- ESPAÑA PERMANENT OBSERVER FECHA DE ENTRADA 2 DE FEBRERO
- PRAVILNIK O ZABRANJENIM POSTUPANJIMA ZAPOSLENIH U SOCIJALNOJ ZAŠTITI (SL
- DATE OF SUBMISSION PUBLIC CONSULTATION ON THE REQUEST TO
- ANEXO 1 ESTRUCTURA FORMATO EDIFACTIFTMCS CABECERA DE INTERCAMBIO (1)
- KOMIM – KOMITET ZA MEĐULABORATORIJSKA ISPITIVANJA MATERIJALA BEOGRAD BULEVAR
- W GÓRNEJ CZĘŚCI PLAKATU ZNAJDUJE SIĘ NAPIS ŚWIATOWY DZIEŃ
- CAMARA NAC APELAC EN LO CONTENCIOSO ADMINISTRATIVO FEDERAL CAPITAL
- 3 PREFEITURA MUNICIPAL DO NATAL SECRETARIA MUNICIPAL DE EDUCAÇÃO
 JAVNI RAZPIS ZA FINANCIRANJE ŠPORTNIH PROGRAMOV V OBČINI SLOVENSKA
CLINICAS Y CONSULTORIOS DE LA PROVINCIA DE TERUEL CENTRO
“DVADESET TREĆE OTVORENO PRVENSTVO DALMACIJE U DALJINSKOM PLIVANJU
 LITERATURE NOTES MIND MAP (GRADES 10&11) CONCEPT MAPPING (OR
APPLYING A COMMON CONCEPTUAL FRAMEWORK TO THE PRACTICUM EXPERIENCE
ZAŁĄCZNIK NR 5 DO SIWZ NR SPRAWY TI –
NOVÉ KURSY OTEVÍRÁME V ZÁŘÍ 2009 TĚŠÍME SE NA
CERUMEN REMOVAL PROTOCOL PURPOSE TO ESTABLISH GUIDELINES BY
 INTELLECTUAL PROPERTY DISCLOSURE PATENT COPYRIGHT TRADEMARK ANDOR TANGIBLE RESEARCH
 DIVERSE SUPPLIERS GO GREEN 1 CREATING A BASIC GREEN
23 WORLDS OF PAPER AN INTRODUCTION ISABELLE CHARMANTIER THE
 MKÖZIGAZGATÁS ÉS MÜGYMENET MODELLEK AZ MKÖZIGAZGATÁS HELYE
  CORRUPTIE INTEGRITEIT EN GOED BESTUREN IN SURINAME BIJDRAGE
DISPOSICIONES PARA LA IMPORTACIÓN NO COMERCIAL A ITALIA DE
 MAXGO084102020 MAXIGRA GO NA EREKCJĘ 8 TABLETEK
 D OCUMENTO APROBADO POR COMISIÓN PERMANENTE CLOMIPRAMINA CLORHIDRATO DE
DESCRIPTION OF RULES FORMAT THE DESCRIPTION OF RULES MUST
NA TEMELJU ČLANKA 58 STAVAK 2 ZAKONA O OBRTU
 IMÁGENES GRÚA CONSTRUCCIÓN TORRE TRAVESAÑO SISTEMA ELEVADOR RESULTADO
POLITYKA OCHRONY DANYCH OSOBOWYCH 1 NINIEJSZY DOKUMENT ZATYTUŁOWANY „POLITYKA
