CREATING STORAGE CONTAINERS IN OPENSPECIMEN PURPOSE STORAGE CONTAINERS ARE
EXEEXE A SIMPLE TOOL FOR CREATING SEQUENCES15 Instructions for Creating a File to Upload Inventory
195 DOCUMENT TYPE DEFINITIONS (DTDS) CREATING A DOCUMENT TYPE
2 CREATING A DATASET OF PHASE SPACE DENSITY AND
200 CREATING A CULTURE OF RESPECT AND RAPPORT
A CTIVITY CSS NAVIGATION 5 CREATING A HORIZONTAL
Creating Storage Containers in OpenSpecimen
Creating Storage Containers in OpenSpecimen
Purpose: Storage containers are used to record the location of specimens with a repository. Storage containers are created by selecting a series of Storage Types. Start with the largest container and work towards smallest container (Freezer>Rack>Box) when adding storage containers in OpenSpecimen
User Privilege: User must have a user role of Administrator to create storage containers in OpenSpecimen.
Pre-requisites- A Site must be created as a Repository in order to have storage containers assigned to them. Storage Types must exist in the system. All fields with a * are mandatory fields that must be completed.
Creating a “Parent Container”- This container is the assigned to the Repository and contains sub containers (i.e. Repository A has Freezer 1 that contains 48 racks)
Login to OpenSpecimen
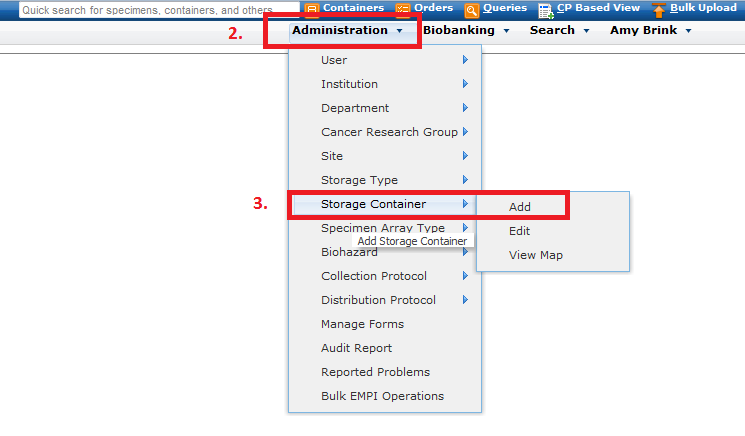
Select the Administration Tab
Select Storage Container> Add
Select the appropriate Type
Select the Parent Location Details. This will be a Site since the largest container, such as Freezer, is being created.
Enter a Name for the container. The name must be unique and not exist in the system in another Repository.
Enter the Number of Containers that need to be created. Often for a parent container a 1 is selected. (i.e. create 1 freezer)
Review the Rows and Columns, as these fields will populate based on the Container Type that was selected. The user can edit these fields if necessary.
Select a labeling scheme for Dimension One and Two.
In Restrictions section, Collection Protocol and Specimen class are not typically used when creating the patent container. Restriction such as these are placed at the smallest container that is actually holding the specimen (i.e. Box)
Review the Can Hold section to ensure the sub containers are highlighted that will be held in the container being created. (i.e. Rack)
C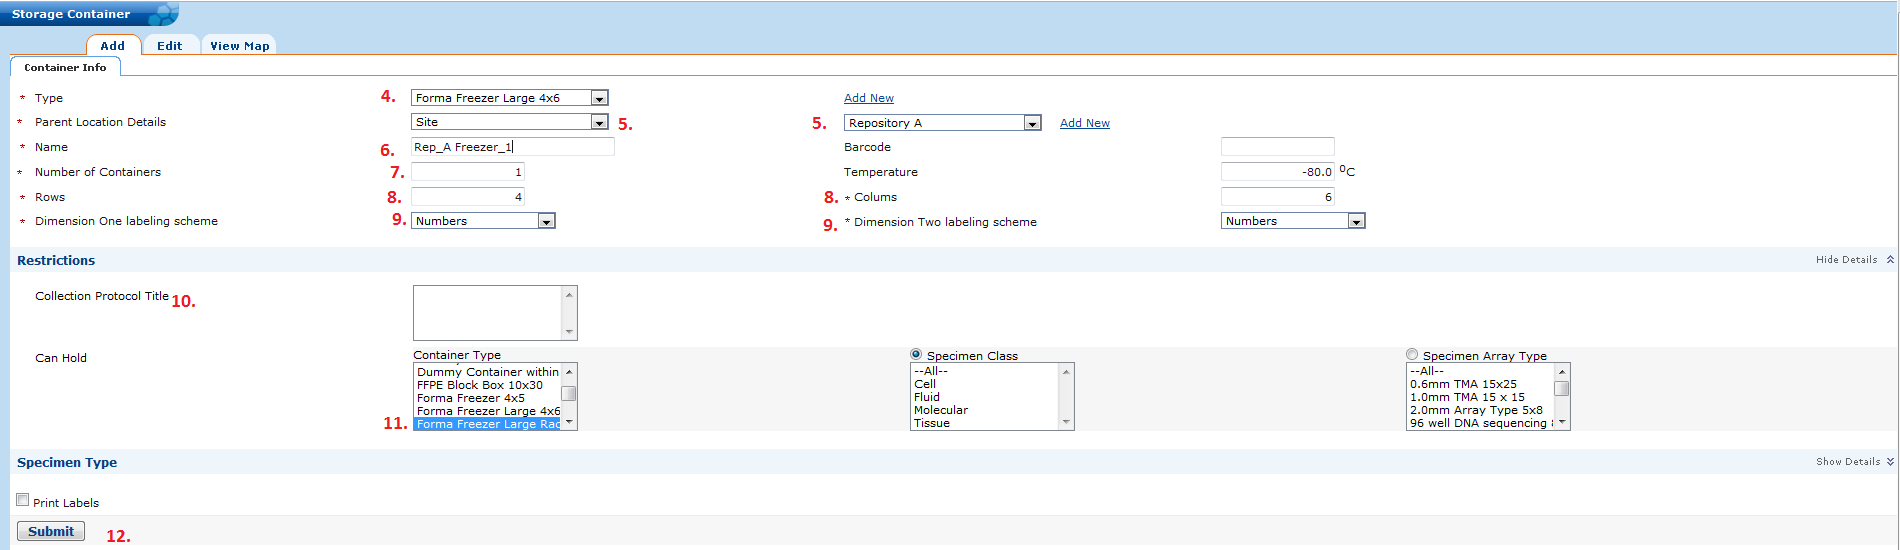 lick
Submit
lick
Submit
Creating containers for within a Parent container- These are containers within a larger container, such as racks in freezer or boxes with a rack.
Select the Administration Tab
Select Storage Container> Add
Select the appropriate Type
In the Parent Location Details change the drop down from Site to Container (Manual)
Next either type in the name of the parent container (NOTE: the name must be types exactly as it is OpenSpecimen) or use the map to select parent container. If using the map to select the container, the system will auto fill the name and positions.
E nter
the Number of Containers that are to be created. For example, the
freezer holds 24 racks, the user will enter 24 if all 24 racks need
to be created
nter
the Number of Containers that are to be created. For example, the
freezer holds 24 racks, the user will enter 24 if all 24 racks need
to be created
Review the Rows and Columns, as these fields will populate based on the Container Type that was selected. The user can edit these fields if necessary.
Select a labeling scheme for Dimension One and Two.
In Restrictions section, Collection Protocol and Specimen class are used when creating the smallest container that is actually holding the specimen (i.e. Box).
Review the Can Hold section to ensure the sub containers are highlighted that will be held in the container being created. (i.e. Box)
Click Submit
I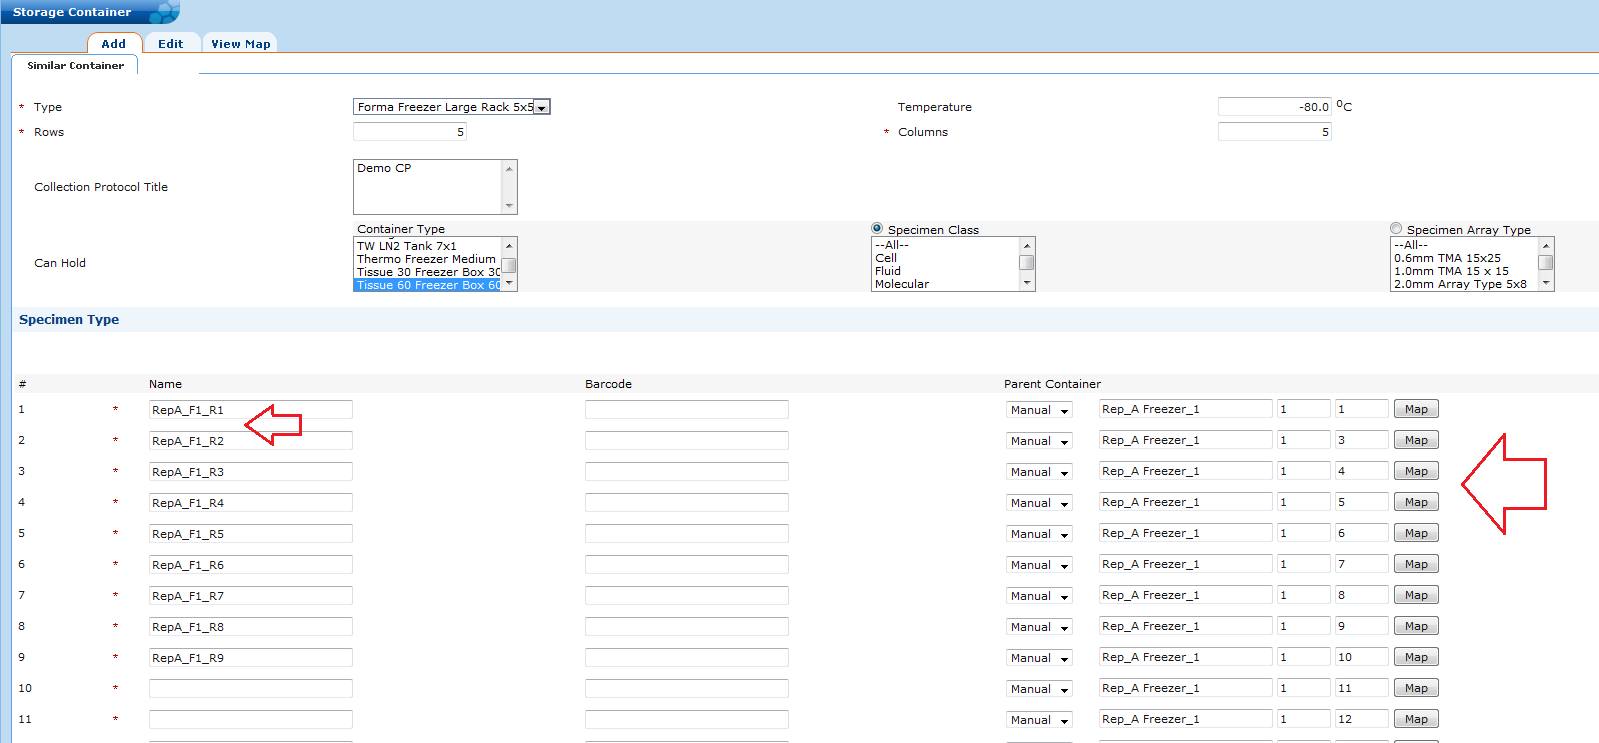 f
the user selected to create more than one container, the screen will
refresh to allow the user to now name each container. NOTE: Be sure
to review the Parent container for each of the containers about to
be created.
f
the user selected to create more than one container, the screen will
refresh to allow the user to now name each container. NOTE: Be sure
to review the Parent container for each of the containers about to
be created.
Click Submit
Summary of all containers created is displayed
Creating containers with restrictions- This is usually done for the container that is actually holding the specimens, such as a Box
Select the Administration Tab
Select Storage Container> Add
Select the appropriate Type
In the Parent Location Details change the drop down from Site to Container (Manual)
N ext
either type in the name of the parent container (NOTE: the name must
be types exactly as it is OpenSpecimen) or use the map to select
parent container. If using the map to select the container, the
system will auto fill the name and positions.
ext
either type in the name of the parent container (NOTE: the name must
be types exactly as it is OpenSpecimen) or use the map to select
parent container. If using the map to select the container, the
system will auto fill the name and positions.
Enter the Number of Containers that are to be created. For example, the Rack holds 24 boxes, the user will enter 24 if all 24 boxes need to be created
Review the Rows and Columns, as these fields will populate based on the Container Type that was selected. The user can edit these fields if necessary.
Select a labeling scheme for Dimension One and Two.
If the container is to hold specimens from a specific collection protocol, select the CP by clicking on the CP short title displayed in the box.
If the container is to hold a specific class, select the class by clicking on it
If the containers is to hold a specific Specimen Type complete the following
Leave all specimen types that are not needed highlight, then click Remove
Type the name of the specimen type needed in the appropriate class section, and select from the list
C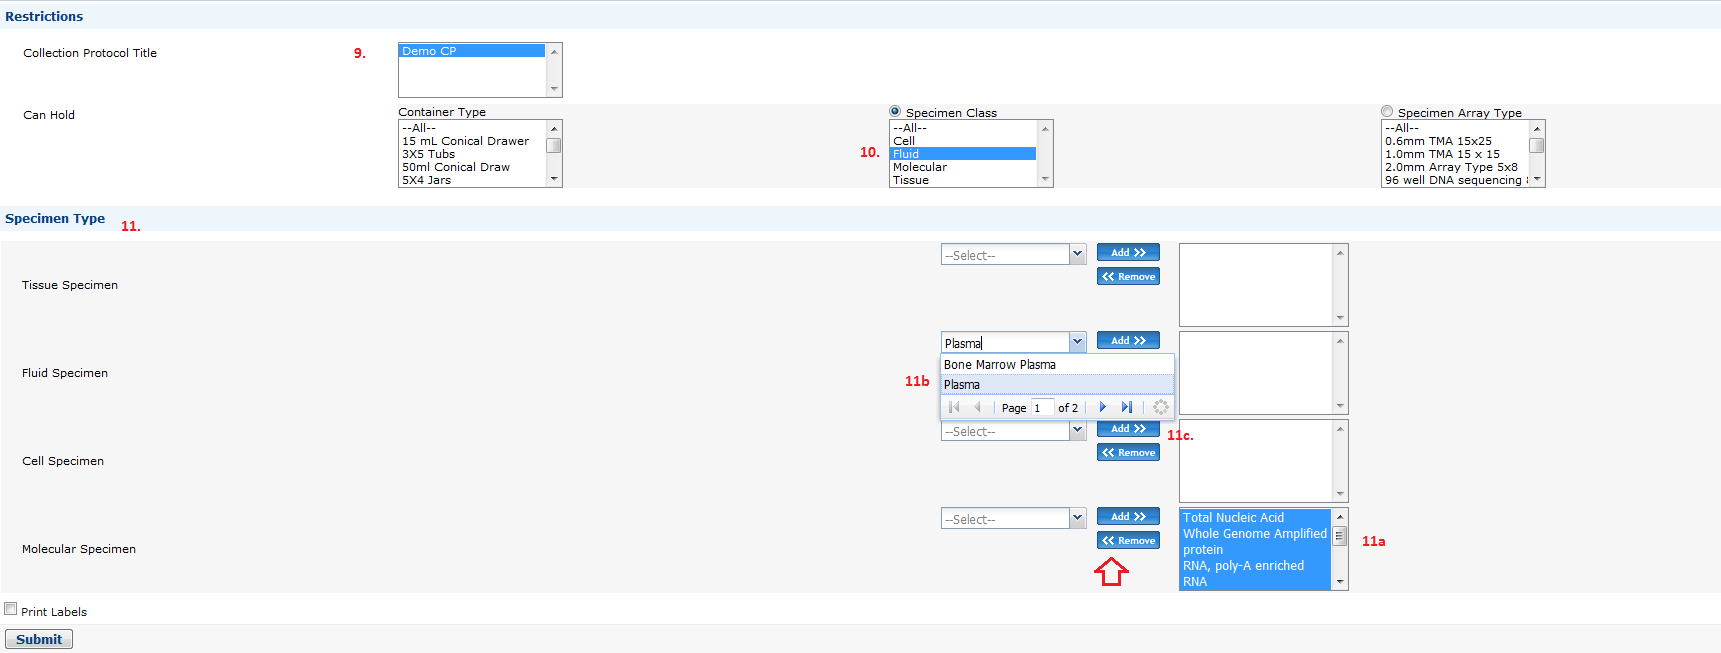 lick
Add
lick
Add
Click Submit
If the user selected to create more than one container, the screen will refresh to allow the user to now name each container. NOTE: Be sure to review the Parent container for each of the containers about to be created
Click Submit
Summary of all containers created is displayed
A GUIDE TO CREATING AN ENERGY BOOSTING SMOOTHIE A
A GUIDE TO CREATING TEXT DEPENDENT AND SPECIFIC QUESTIONS
ADAPTED FROM CREATING THE THOUGHTFUL CLASSROOM BY ANN J
Tags: containers in, all containers, containers, storage, creating, purpose, openspecimen
- DÉFINIR LES TIC POUR MIEUX COMPRENDRE LEUR IMPACT SUR
- 170909go70protocolo
- DETALJERET AKTIVITETSBESKRIVELSE GENNEMGANG AF DE ENKELTE PROJEKTER RESSOURCEANVENDELSEN FREMGÅR
- NOTICE OF CLAIM FORM IMPORTANT INFORMATION PLEASE TAKE
- COMPLAINT REGARDING GRADES AWARDED – RIGHT TO EXPLANATIONS IMPORTANT
- THE COCHRANE PRIZE REGULATIONS 1 PURPOSE THE FACULTY OF
- AN ROINN TALMHAIOCHTA BIA AGUS MARA DEPARTMENT OF
- NÁZEV (VŠECHNA VELKÁ TUČNĚ TIMES NEW ROMAN VELIKOST 10P)
- ANEXO 2 ROTEIRO PARA ELABORAÇÃO DE PROJETO DE ESTÁGIO
- FILOZOFSKI FAKULTET NOVI SAD DOKUMENTA ZA PRIJAVU KANDIDATI PRILIKOM
- NO COST EXTENSION REQUESTS BY AGENCY AGENCY – REFERENCE
- CONCEJALÍA COMERCIO Y TURISMO CAMPAÑA DE APOYO Y PROMOCIÓN
- BABĪTES NOVADA PAŠVALDĪBA REĢ NR 90000028870 CENTRA IELA
- OŚWIADCZENIE O STANIE KONTROLI ZARZĄDCZEJ DYREKTORA ARESZTU ŚLEDCZEGO W
- AL CONSEJERO DE MEDIO AMBIENTE DEL GOBIERNO DE CANTABRIA
- NIETZSCHE Y LA FILOSOFÍA INTRODUCCIÓN1 «EN EL ORIGEN DE
- ROUTE 15 NEWBURYBRADFORD AM KRHSKRMS UPDATED 9220 SF 625
- MODULE 97 CHECK DIGITS DECOMPOSE AND COMPOSE
- Formd02 t c Erzurum Tekni̇k Üni̇versi̇tesi̇ fen Bi̇li̇mleri̇ Ensti̇tüsü
- B S IN CONSTRUCTION MANAGEMENT TABLE 1 OUTCOMES ASSESSMENT
- Spitalul Clinic DE Boli Infectioase SI Pneumoftiziologie „victor –
- MOTHER TONGUEBASED MULTILINGUAL EDUCATION KAGAMITAN NG MAGAARAL SINUGBUANONG BINISAYA
- SECTION BAC PRO SYSTÈME ELECTRONIQUE NUMÉRIQUE ETUDE FONCTIONNELLE ET
- B EYAN VE TAAHHÜTNAME ÜNIVERSITEMIZIN ……………………………………… FAKÜLTESI …………………… PROGRAMI
- THE PROVIDENCE CENTER FOR BIBLICAL COUNSELING 2020 GIBB
- EINSCHREIBEN BEI NICHT ERFOLGREICHER ZUSTELLUNG ZURÜCK PER BPOST REFERENZAKTENZEICHEN
- XXII CERTAMEN LITERARIO INFANTIL Y JUVENIL ANTONIO MACHADO EL
- UCHWAŁA NR 1608 IX ZJAZDU KRAJOWEGO WODNEGO OCHOTNICZEGO
- CONSEJERÍA DE FOMENTO DIRECCIÓN GENERAL DE VIVIENDA SJ4W 020017
- 76 N P 23 007 85 C DU 63315
3GPP TSG GERAN MEETING NO 38 MALAGA SPAIN 12TH
PŘÍKAZNÍ SMLOUVA PRO INŽENÝRSKOU ČINNOST VE VÝSTAVBĚ EV Č
8 INTERVJU SLOBODAN PETROVIĆ ZAMJENIK PREMIJERA KOSOVA I PREDSJEDNIK
 CONSEJOS QUE AYUDAN PARA TODOS LOS EDUCADORES DE ESTUDIANTES
COMPETENCIAS EN ORIENTACIÓN LABORAL DESDE LA PERSPECTIVA DE LOS
 FINALIZATION OF SUPERVISOR(S) INDIAN INSTITUTE OF TECHNOLOGY ROORKEE 1
EL RITMO ES UN PRINCIPIO ORGANIZATIVO QUE REGULA EL
 BIOLOGY PLANT PIGMENTS AND CHROMATOGRAPHY LAB MRS DOUMA 2017
HAFTUNG BEI UNTERNEHMENSNACHFOLGE EIN BESONDERES AUGENMERK MÜSSEN SIE
MINUCIUS FELIX OCTAVIUS DER HISTORISCHE HINTERGRUND WENIGE JAHRE NACH
 STAKEHOLDER ANALYSIS DEFINITION STAKEHOLDERS ARE PERSONS GROUPS OR BUSINESS
RSEA JULY 2122 2007 RADIOTHERAPY SERVICE ENGINEERS ASSOCIATION (RSEA)
 UPUTE ZA RAZMJENU DATOTEKA NA ZAŠTIĆENOM DIJELU HZZO PORTALA
UTM TITAN BIOTERRORISM TRAINING REGISTRATION NAME DAYTIME PHONE
 PUBLIC NOTICE IS HEREBY GIVEN THAT THE MORGAN COUNTY
 A FRAMEWORK FOR CONCEPTUALIZING THE DIDACTICS OF ICT AT
SBC TEXAS SBC MISSOURI SBC OKLAHOMA SBC ARKANSAS AND
 EDEBÉ COMUNIDAD VALENCIANA PROGRAMACIÓN ANUAL 3AÑOS ÍNDICE 1 COMPETENCIAS
NAZWA PLACÓWKIPIECZĄTKA ……………………………… PROCEDURA MYCIA I DEZYNFEKCJI TWARDYCH ZMYWALNYCH
 CLIMATE SUMMARY OF TONGA CLIMATE INFORMATION SERVICES TELEPHONE 35
