P3 LABORATORY MANUAL BIOL 160 TRANSPIRATION PROCEDURE YOU WILL
BASES LABORATORY ACCREDITATION GUIDELINES RATIONALE AN ACCREDITEDGENERAL RISK FORM ASSESSMENT GUIDANCE – LABORATORY INTRODUCTION
0 HELSINKI UNIVERSITY OF TECHNOLOGY SYSTEMS ANALYSIS LABORATORY RESEARCH
1 BIOLOGY LABORATORY LABORATORY SAFETY OBJECTIVE LEARN SAFETY
1 INTRODUCTION 11 SCOPE OF THE LABORATORY THE DUBLIN
1 SOFTWARE ENGINEERING LABORATORY SIGNUP SHEET CS 2002
Transpiration Procedure
P
Transpiration Procedure
You will be working in pairs for this experiment.
1) Obtain a plastic tub and fill it full of water.
2) Push the tip of a 1 ml pipette into one end of the rubber tubing.
3) Take the rubber tubing-pipette combination and place the free-end of the tubing into the basin. Using a pipette bulb, pull water up into the pipette through the tubing. Watch for any bubbles. If bubbles form, you will need to flush out the water and start over.
4) Fill the pipette up to the 0 ml mark and leave the pipette bulb on the pipette.
VERY IMPORTANT: During the following steps, the cut end of the plant must always be under water and not exposed to air. If the end comes out of the water, a small air bubble will be trapped in the end and the plant will not be able to draw up water as efficiently. If this happens, you must cut off the end again about an inch up the stem.
5) Select a bean seeding. These plants have been growing for about three weeks. Try to find a plant with a stem about the inside diameter of the rubber tubing, and pull the plant out by the roots, if possible.
6) Rinse the dirt off the roots in the bucket indicated by your instructor.
7) Place the roots in your basin of water.
8) While keeping the roots and lower stem of your plant under water in the basin, cut off the stem at an angle (Fig. 1), approximately 1 inch from the roots.
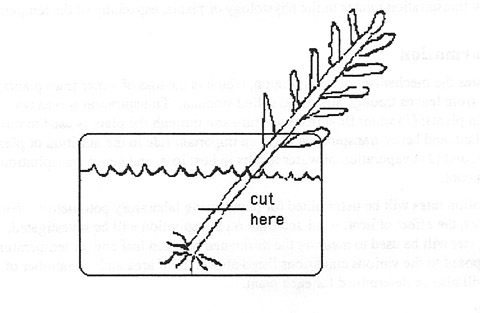
Fig. 1. Diagram of how to cut the plant stem.
LEAVE THE CUT END OF THE PLANT UNDER WATER!
9) Stick the stem of the bean plant into the submerged rubber tubing. The diameter of your plant stem should just fit into the rubber tubing.
10) Remove the rubber tubing-pipette-plant apparatus from the basin. Quickly smear a layer of lubricant around the area where the plant’s stem and the rubber tubing come together. This procedure will produce a watertight seal.
11) Tighten the rubber tubing-plant connection in one clamp and the rubber tubing-pipette connection in the other clamp, bending the tubing into a “U” shape as in Figure 2. During this set up, make sure that the stem of the plant is always in contact with water. In addition, make sure that the water column is not moving up into the pipette bulb.
12) Remove the pipette bulb and watch the water level. If you have a watertight seal, the level of water in the pipette should not change. If the water level drops, check with your instructor to see what you should do next. You may have to return to step 8.
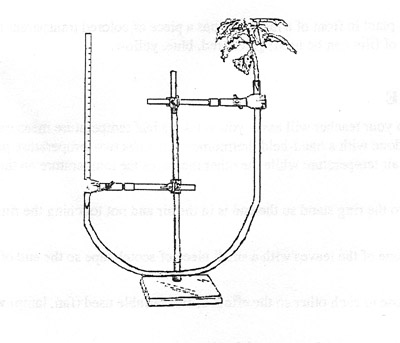
Fig. 2. Diagram of potometer set up.
13) If you have a watertight seal, expose your plant to the experimental conditions your group is working with, and allow the potometer to stabilize for about 5 minutes before you begin your readings.
a) Control – place the potometer on the lab bench away from direct light or heat.
b) Wind – place the potometer in front of a small fan that is on low speed
c) Heat & intense light – place the potometer in front of a desk lamp
d) Dark – place the potometer in a dark closet or cabinet
e) Colored light – place the potometer in front of a lamp that has a piece of colored transparent film in front of it. Different colors of film can be used; green, red, blue, yellow.
14) Read the water level in the pipette at time zero and continue recording readings every 10 minutes for 60 minutes.
15) After you have completed your measurements, remove the plant from the tubing.
16) Hold a piece of transparent graph paper over a leaf and count the number of squares it
covers. If the leaf covers at least half of the square, then that square is counted (see Figure 3). NOTE: do not include the area contributed by the petiole.
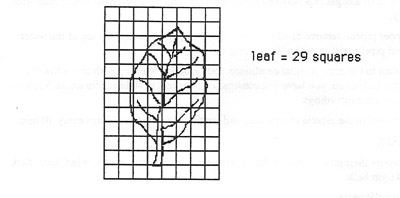
Figure 3. Diagram of leaf area measurement protocol.
17) Repeat this procedure for ALL leaves on your plant to get the total leaf area of your plant.
18) Gather data from the other groups.
10122021 26 SEDIMENT LABORATORY PROCEDURES REDWOOD SCIENCES LABORATORY USDA
117 ACCREDITATION NO ISO 15189 TESTING LABORATORYMEDICAL DEPARTMENT 11704
12 ĆWICZENIE LABORATORYJNE NR 4 (W24) 4 022010
Tags: laboratory manual, manual, procedure, laboratory, transpiration
- REGULATORY IMPACT STATEMENT THRESHOLD FOR LIQUID FOSSIL FUELS OPTIN
- ANNOUNCEMENTS OCTOBER 15 & 16 2016 PRAY FOR THESE
- REGISTRES MUNICIPALS (UIAP UNITAT D’ATENCIÓ INTEGRADA AL PÚBLIC)
- ISPITNA PITANJA IZ FIZIOLOGIJE BILJAKA ŠKOLSKA 201920 GODINA 1
- DRUK NR 1076 PROJEKT „P” Z DNIA UCHWAŁA NR
- ELECCIONS A RECTORA O RECTOR 2020 ELECCIONES A RECTORA
- KLASIFIKACIJA DJELATNOSTI UDRUGA REDNI BROJ I RAZINE REDNI BROJ
- 4 DEPARTAMENTUL DE CERCETARE ŞI MANAGEMENT AL GRANTURILOR 2A
- 5 BULLETIN OFFICIEL DES DOUANES CONTRIBUTIONS INDIRECTES ¾¾
- ICH ERKLÄRE HIERMIT DASS ICH DIE SEMINARARBEIT OHNE FREMDE
- PENINHAVERDE COMBR PENINHA VERDE ESCOLA & BEROÇÁRIO CUIABÁ MT
- ÁREA DE FOMENTO Y EMPLEO FERIA IS COMING! DEL
- BRADFORD HOLIDAY PLAY & ACTIVITY SCHEMES COORDINATED BY THE
- C HEHALIS TRIBAL LAW ENFORCEMENT 30 NIEDERMAN RD
- javna_nabavka_2016_03_poziv
- ZERGEN PREZIO PUBLIKOEN BEHIN BEHINEKO AUTOLIKIDAZIOA AUTOLIQUIDACIÓN PROVISIONAL
- SOBEYS GIFT CARD FUNDRAISER 201920 GIFT CARDS CAN BE
- FORMULARIO DE COMPRA COMPLETE ESTA SOLICITUD Y RECIBA LA
- S INDICATO DE TRABAJADORES DE LA ADMINISTRACIÓN DE JUSTICIA
- SUSTAINABLE PROCUREMENT IN THE AUSTRALIAN GOVERNMENT REPORT 2013 CONTENTS
- PRAVILNIK O UVJETIMA KRITERIJIMA I POSTUPKU DODJELE STIPENDIJA REDOVITIM
- UNA SEMANA UNIVERSITARIA FESTIVA PÁGINA 20 COSTARRICENSES REINVENTAN SU
- ‘SUGAR AND SPICE AND ALL THINGS NICE’ IN CENSUSATSCHOOL
- TIÊU CHUẨN NGÀNH 14 TCN 831991 QUY TRÌNH XÁC
- 11 (PRIMERA SECCIÓN) DIARIO OFICIAL LUNES 1 DE SEPTIEMBRE
- ỦY BAN NHÂN DÂN T ỈNH SƠN LA CỘNG
- MÜZİKSEN DENETİM KURULU RAPORU (MÜZİKSEN) MÜZIK VE SAHNE SANATÇILARI
- NOME KOMMUNE HÅNDBOK SIST ENDRET NOV 2007 I
- NATIONAL SECURITY PRESS ADVERTISEMENT—TEXT ONLY VERSION PROTECTING THE
- ALMA MATER STUDIORUM UNIVERSITÀ DI BOLOGNA (9067) 2ND
FEEDBACK DEFINICIÓN CONSISTE EN COMUNICAR EN FORMA VERBAL YO
 INTRODUCCIÓN AL ANÁLISIS DE DATOS TEMA 4 INTRODUCCIÓN
 RESERVAS HABITACIONES II CONGRESO DE CATALANIDAD HISPÁNICA “EL FEDERALISMO
DUBROVAČKONERETVANSKA ŽUPANIJA PRED DVOROM 1 20000 DUBROVNIK OIB 32082115313
 351 n Dekora Woods Blvd po box 80018 Saukville
 L OCAL PARK GRANT PROGRAM ENVIRONMENTAL IMPACTS OF THE
MINERA LAYTARUMA SA HTTPWWWLAYTARUMACOMPE DIRECCIÓN JR TIZIANO 301 SAN
COMMON INTERVIEW QUESTIONS WHY ARE YOU INTERESTED IN WORKING
COMO FAZER UMA RESENHA COMO UM GÊNERO TEXTUAL UMA
 ČESKÁ POŠTA SP OBJEDNÁVKA AUTORIZOVANÉ KONVERZE DOKUMENTŮ NA ŽÁDOST
 OZNACZENIE SPRAWY PN1–2016DOPZ LUBLIN DN 07032016R WYKONAWCY UCZESTNICZĄCY W
 BVA PLAYING OPTIONS BVA PLAYS TWO NIGHTS A WEEK
 APRIL 2015 PROTOCOL FOR RESPONDING TO ALLEGATIONS OF CHILD
SPHERE SUPPORT FOR PEOPLE WITH A HANDICAP EXPLORING THE
STATE OF CALIFORNIA DEPARTMENT OF SOCIAL SERVICES NOA MSG
 CURSO INTENSIVO DE CUIDADOS PALIATIVOS ORGANIZA CONSEJO DE CUIDADOS
MARCIN JACHIMOWICZ NIEZGŁOSZENIE DO UBEZPIECZENIA SPOŁECZNEGO MARCIN JACHIMOWICZ
 DCF4181Spanishdoc
 2 CÓMO VENDER TU COLEGIO RECURSOS MATERIAL DE
 EXPEDITION ROUTE CARD (USE ONE PER DAY) AIM OF
