CHANGING PLOT LINES USING A PEN TABLE FILE
1 CHANGING UPDATING AND CHECKING METADATA WITH XML155-Changing_central_IV_Dressings
2015 DENISE MONTELL LAB CHANGING FLY STOCKS AUTHORS WEI
26 A PROCESS FOR CHANGING ORGANIZATIONAL CULTURE KIM CAMERON
29 CHILDREN’S PREDICTIONS AND RECOGNITION OF INCLINE MOTION CHANGING
2ND CARIBBEAN CONFERENCE ON COMPREHENSIVE DISASTER MANAGEMENT “THE CHANGING
Changing Plot Lines Using a Pen Table File
Changing Plot Lines Using a Pen Table File
Pen Assignments Explanation
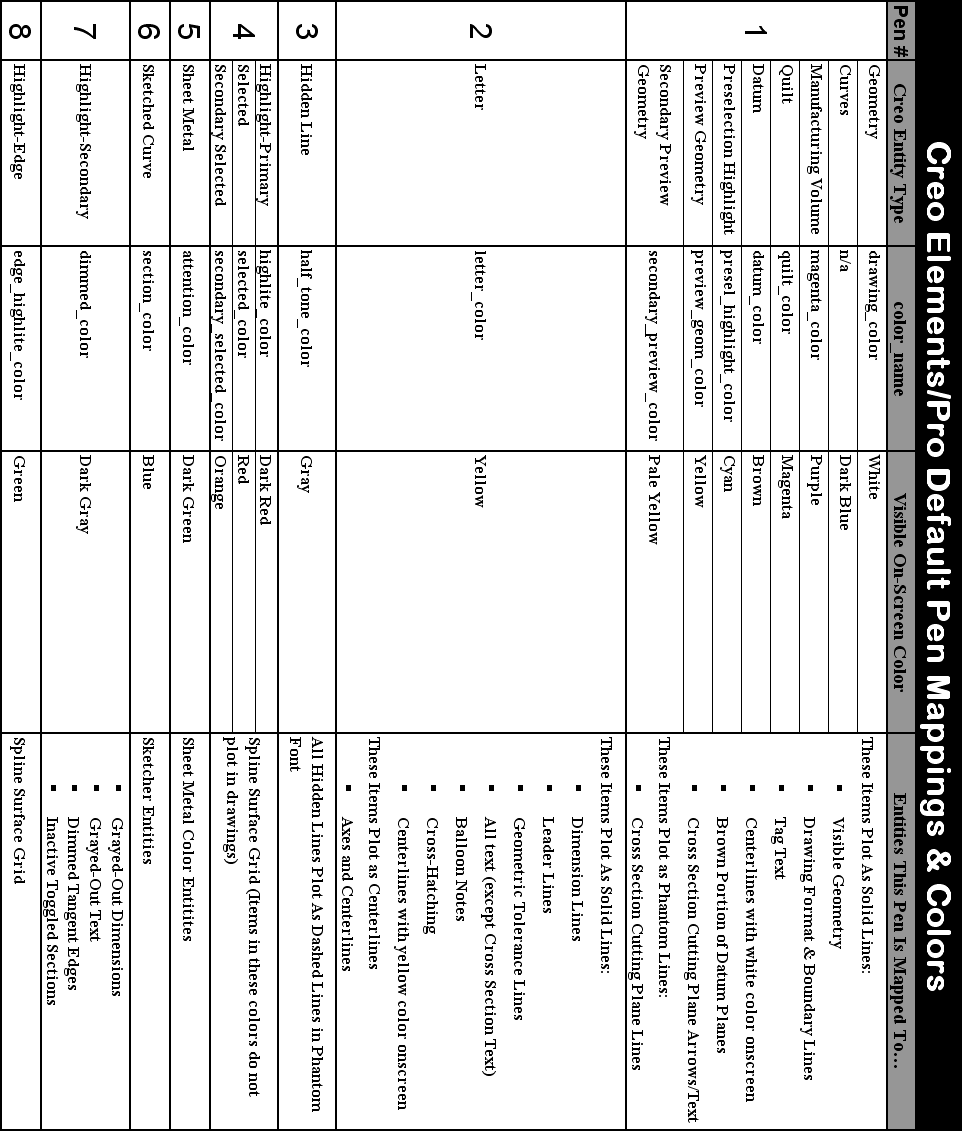
By default, Creo Elements/Pro plots drawing entities with one of eight different pens (numbered 1-8) assigned by entity color.
Each pen has a line width and line style (also called line “font”) associated with it as well as a color. The colors for various entities and the corresponding pen those entities are plotted with are shown on the chart below (next page).
Note the column labeled color_name in the chart. Each entity type (except “curves”) has a special color_name parameter associated to it as well as a visible on-screen color. The visible on-screen color is what you’ll see in Creo by default for each entity type. However, it is important to note that entities are plotted by their color_name, not by the visible on-screen color.
Although you can change the on-screen colors by altering them using ViewDisplay SettingsSystem Colors, the system will continue to plot them according to their color_name.
For example, if you change the visible color for all lettering to be GREEN, the system will still plot letters using pen #2. Even though the visible color was changed, the system still associates lettering to the color_name called letter_color which is plotted with Pen #2.
To plot letter_color with another pen, you must reassign the color_name within a pen table file.
The system uses the pen table file located at <loadpoint>/text/table.pnt as its default pen table file. This file may be edited or modified to create new variants based on your needs. Users may elect to have one or more different pen table files to control the line sizes, weights, and fonts for all specific printers.
Details on how to edit and modify a pen table file follow the chart on the next page.
Construction of a Pen Table File
Pen definitions occur inside the pen table file. This simple text file which applies attributes to each pen. The text entries must adhere to two rules. The pen number must be the first entry on a line and the color_name (if used) must be the last entry. Other attributes can be in any order.
Basic Nomenclature:
Lines beginning with a “!” are comments.
Use “\” at the end of a line to continue the entry on the next line.
Use “;” when specifying more than one attribute to separate them.
Units may be specified in inches (in) or centimeters (cm). They may also be mixed in the same entry. Examples are provided below.
Possible attributes with examples of each are shown below:
thickness
thickness 0.2 cm – produces .2 centimeter thick lines
thickness .005 in – produced .005 inch thick lines
thickness .010 in – produces .010 inch thick lines
pattern
0.1, 0.1 in – produces two dashes of .1 inch width (the pattern repeats)
0.2, .01, .01 cm – produces a dash of .2 cm width followed by two shorter dashes of .01 cm length (the pattern repeats)
color
color 0.0 0.0 0.7 – using the RGB palette, this produces a medium blue color
color 1.0 0.0 0.0 – using the RGB palette, this produces a bright red color
color_name – (this value comes from the chart on previous page)
pen 1 letter_color – specifies that all lettering be drawn with pen #1 instead of the default pen #2 (from the table on the previous page)
pen 3 datum_color – specifies that all datums be drawn with pen #3 (as dashed/hidden lines) instead of the default pen #1
Examples:
The following example sets pen 1 to be .005 inches thick. It also sets a pattern with two longer dashes followed by a single shorter dash (the pattern repeats). The plot color for pen 1 will be a medium green/blue (color 0 .5 .5). Note that the units are different for the thickness and pattern. Note that there is not a “color_name” parameter added to the end of the line. This leaves the defaults in place per the table on the previous page.
pen 1 thickness .005 in; pattern 0.2, 0.2, 0.1 cm; color 0 .5 .5;
The next example re-maps the attention_color to pen #6 (instead of the default pen #5).
pen 6 attention_color
Configuring a Pen Table File for Use
The config.pro option pen_table_file sets the master/default pen table for Creo Elements/Pro. If this configuration option is not present, the system uses the default pen table file located at: <loadpoint>/text/table.pnt Users may choose to edit the default file if permissions allow. Otherwise, setting pen_table_file in config.pro and specifying the fully qualified pathname to the file will override the default.
For example, the config.pro entry below would override the default pen table file with one contained in a Windows XP directory under the users’ home:
pen_table_file C:\documents and settings\<username>\my documents\prowork\table.pnt
Pen table files may also be specified inside the plotter configuration file (.pcf) for each specific printer. This allows specific control of line weights and fonts rather than overriding default values for all printers.
Sample Pen Table File
A sample pen table file containing basic line weights is shown below. This will create very thin lines from all pens. By starting with this file and slowly tweaking the thicknesses, you can dial in the plot characteristics you desire from your printer.
! All pens are set to .005 in this file. This is a basic setting.
! To vary thickness, tweak individual values for different pens.
!
! Other options are available. Refer to documentation on "pen table files"
!
!
!
pen 1 thickness .005 in
pen 2 thickness .005 in
pen 3 thickness .005 in
pen 4 thickness .005 in
pen 5 thickness .005 in
pen 6 thickness .005 in
pen 7 thickness .005 in
pen 8 thickness .005 in
A CHANGING WINTER CLIMATE HAS A MAJOR IMPACT ON
ADAPTING TO MAINE’S CHANGING CLIMATE A WORKSHEET FOR MUNICIPALITIES
ARMY NATIONAL GUARD TRANSFORMATION AND IT’S CHANGING ROLE IN
Tags: changing plot, lines, changing, using, table
- PRINCIPLE TWO TRAINING CHECKLIST THIS CHECKLIST TRACKS THE REQUIREMENTS
- MINISTRY OF HEALTH OF UZBEKISTAN DEVELOPMENT CENTRE OF MEDICAL
- SECOND PART WORD FORMAT APPLICATION APPOINTMENTS HRC 19 HUMAN
- CORRESPONDE A LIBRO SEGUNDO TITULO V FILIACION PONENCIA LAS
- URBANISME ACTIVITATSAS LA 19172356 ANUNCI PER
- ZESTAW PYTAŃ EGZAMINACYJNYCH NA EGZAMIN DYPLOMOWY MAGISTERSKI (II STOPNIA)
- ELECTRICIDADE DE MOÇAMBIQUE EP RP518 V 2 MOZAMBIQUE –
- ATEŞLİ SİLAH RUHSATI İÇİN BAŞVURAN KİŞİLERİN PSİKİYATRİK MUAYENE KILAVUZU
- LANDKREIS ODERSPREE EINGANGSDATUM DEZERNAT I JUGENDAMT KINDERTAGESBETREUUNG BREITSCHEIDSTR
- WILDLIFE HABITAT MANAGEMENT ON STATE FOREST AND WILDLIFE LANDS
- REDUCED REPRESENTATION SHOTGUN SEQUENCING (RRS) GENOMIC DNA WAS ISOLATED
- EKONOMIKA – MĀJSAIMNIECĪBA (KSENOFONTS) EKONOMIKA TAUTSAIMNIECĪBA EKONOMIKA –
- DEPARTMENT OF SPANISH AND PORTUGUESE STUDIES DOCTORAL COMMITTEE CREATION
- GUIDE FOR GSAXCESS® UPLOAD MULTIPLE ICN PICTURES CUSTOMERS CAN
- UNIDAD DIDÁCTICA “TU BARRIO MIL ROSTROS DIFERENTES” REDPAZ (RED
- COMANDO DE ADIESTRAMIENTO Y ALISTAMIENTO DEL EJERCITO DEPARTAMENTO ADMINISTRATIVO
- CANINE HOUSESOILING WHY IS MY DOG SOILING THE
- LAYANAN BERBASIS WEB “ESERVICE” UNIVERSITAS NEGERI YOGYAKARTA DEFINISI
- ARBEIDSREGLEMENT HOOFDSTUK I – ALGEMENE INLICHTINGEN ARTIKEL 1
- HOMEWORK 2 DUE SEP 23 2010 1) SHOW THAT
- APPENDIX II RECEPTION TRAINING PLAN DESCRIPTION OF TRAINING DATE
- CLOSE TO NATURE FORESTRY AND HARVESTING OPERATIONS HANNS H
- CONDITIONS FOR SCAFFOLDING HOARDINGS CHERRY PICKER
- GINÉS CIUDADREAL Y MARIBEL MARTÍNEZ PSICOMOTRICIDAD ACTIVIDADES PARA MEJORAR
- PAGE 22 UNIVERSITY GRANTS COMMISSION APPLICATION FOR APPROVAL OF
- ORIENTACIONES GENERALES PARA EL DESARROLLO COGNITIVO OBJETIVOS
- DOCUMENT TYPE DEPARTMENT OF ENVIRONMENTAL AFFAIRS INFORMATION FORM TITLE
- INFORMACIJA DĖL LR SUSIRINKIMŲ ĮSTATYMO PAKEITIMO LIETUVOS RESPUBLIKOS SEIMAS
- Automatización Industrial Unsl Práctico n°6 Automatizacion Industrial Práctica
- UNIT TITLE 241 CREATE DECORATIVE EFFECTS ON HANDCRAFTED FURNITURE
TEKST UJEDNOLICONY ZARZĄDZENIA NR 6102020 PREZYDENTA MIASTA STOŁECZNEGO WARSZAWY
 CIVIL WAR NEWSLETTER POWERPOINT OBJECTIVE DESIGN THE FRONT PAGE
 VERIFICATION OF PENSION OR WORKERS COMPENSATION THIS SECTION TO
TARJETA DE VOTO A DISTANCIA EBRO FOODS SA JUNTA
 UNCLASSIFIED GIVING EVIDENCE THROUGH VIDEOLINKS TO PAROLE BOARD ORAL
 CTCOREARINCOMPLETEDEPOSITS PURPOSE OF QUERY AR DEPOSITS NOT POSTED
  MURAL ARTISTS BRIEF EXPRESSIONS OF INTEREST FOR LYNEHAM TOILETS
SATUAN ACARA PERKULIAHAN (SAP) MATA KULIAH SINYAL DAN
REGULAMIN KONKURSU W RAMACH PRZEGLĄDU INNOWACJI I TWÓRCZOŚCI W
 VSKONTRAKT VERNEREGLER ORDENSREGLEMENT ØKONOMISK ANSVAR DOKID
 AYUNTAMIENTO DE ALHABIA (ALMERIA) CIF P0401000E TLF 950643001
  ABSTRAK MUTOHAR 2010 “PELAKSANAAN PEMERIKSAAN PERKARA CEPAT PELANGGARAN LALU
REQUERIMIENTO A EMPRESA COMERCIALIZADORA DE GAS BIZKAIA AYUNTAMIENTO DE
MIKA SHINDO KYOTO UNIVERSITY (JAPAN) CONTACT EMAIL ADDRESS MIKASHINDOGMAILCOM
SANT SILVESTRE DÍA 31122015 HORA DE COMIENZO NIÑOS 1630H
 STRATEGIA ROZWIĄZYWANIA PROBLEMÓW SPOŁECZNYCH POWIATU TRZEBNICKIEGO SPIS TREŚCI WPROWADZENIE
PSICOLOGÍA DEL DOLOR Y DE LAS ENFERMEDADES CRÓNICAS
 ACCESS 2 COMPETENCIAS BÁSICAS ÁREA DE LENGUAS EXTRANJERAS
FASTLEGGING AV EIERFORHOLD I EKTESKAP OG SAMBOERFORHOLD
 APENDICE DESDE EL FALLECIMIENTO HASTA EL INICIO DE LAS
