2 ADD A DATABASE INSTANCE ON THE NEW NODE
ARTIST REGISTRATION FORM BOW ARTS ARTIST DATABASEREBASE THE RESTRICTION ENZYME DATABASE HTTPREBASENEBCOM COPYRIGHT (C)
1 FORMAT SURAT PERMOHONAN PENDATAAN DALAM DATABASE ORMAS KOP
11 GEODB EXTENSION (DATABASE MANAGER) THIS EXTENSION ALLOWS USERS
2 ADD A DATABASE INSTANCE ON THE NEW NODE
2 SEARCHING DATABASES USING WILD CARDS TRUNCATION & PHRASE


Add a Database Instance on the New Node
To add an instance on the new node, make sure that the Global Services Daemon (GSD) is running on all the existing nodes as well as on the new node. If the GSD is not running, then from any of the nodes execute the gsdctl start command from the following platform-specific locations:
Then go to one of the existing nodes and perform the following steps:
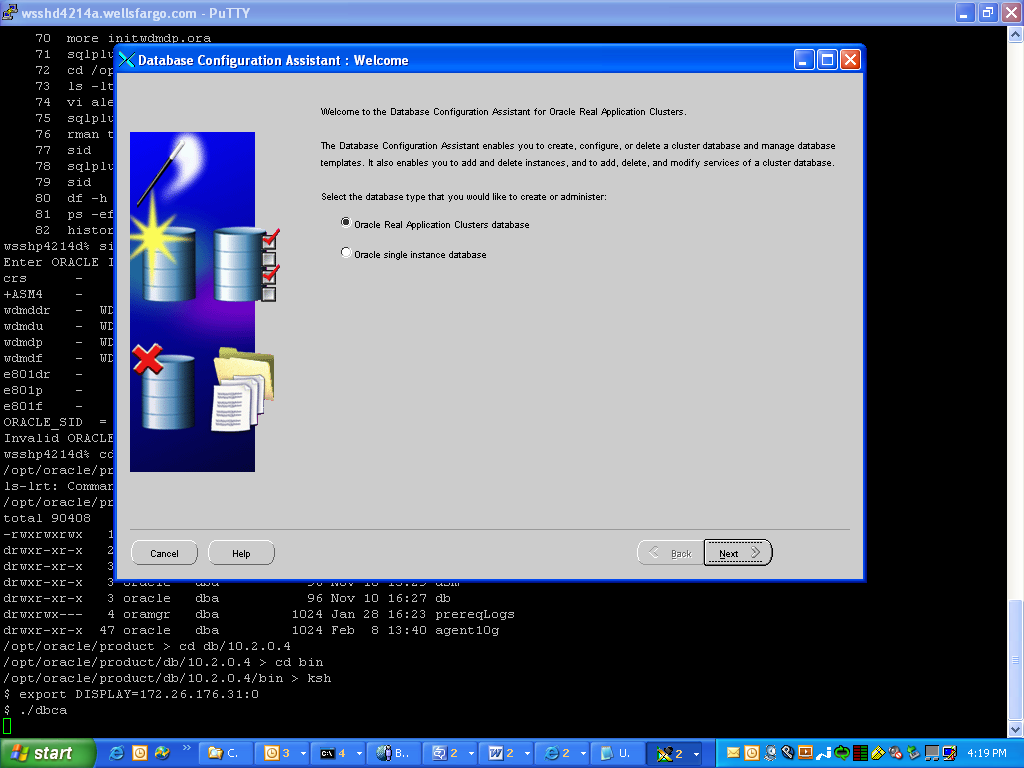
The DBCA wizard starts and displays the Welcome page for Real Application Clusters shown in Figure 8-1.
Figure 8-1 DBCA Welcome Page for Real Application Clusters
Text description of the illustration welcome.gif
|
If the Welcome page for Real Application Clusters does not display, then the DBCA was unable to: Communicate with the Cluster Manager (CM) software on Windows NT or Windows 2000 Detect the Global Cache Service (GCS) software or the lists of nodes in the cluster on UNIX operating systems To resolve this, refer to your vendor's operating system-dependent documentation to correct the problem and restart the DBCA.
|
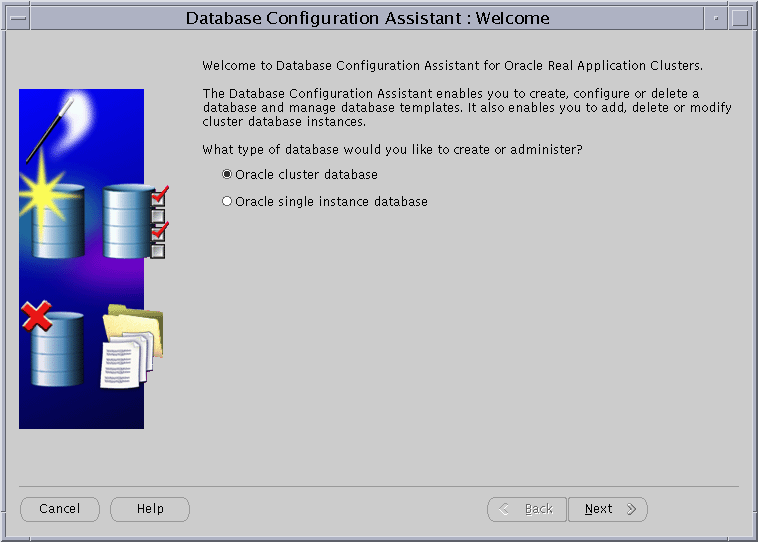
Select Oracle cluster database and click Next. After you click Next, the DBCA displays the Operations page as shown in Figure 8-2:
Figure 8-2 Database Configuration Assistant Operations Page

Text description of the illustration instmgt.gif
After you click Next, the DBCA displays the Instance Management page shown in Figure 8-3.
Figure 8-3 Database Configuration Assistant Instance Management Page

Text description of the illustration addinst.gif
After you click Next, the DBCA displays the List of Cluster Databases page that shows the databases and their current statuses, such as ACTIVE, or INACTIVE, as shown in Figure 8-4.
Figure 8-4 Database Configuration Assistant List of Cluster Databases Page
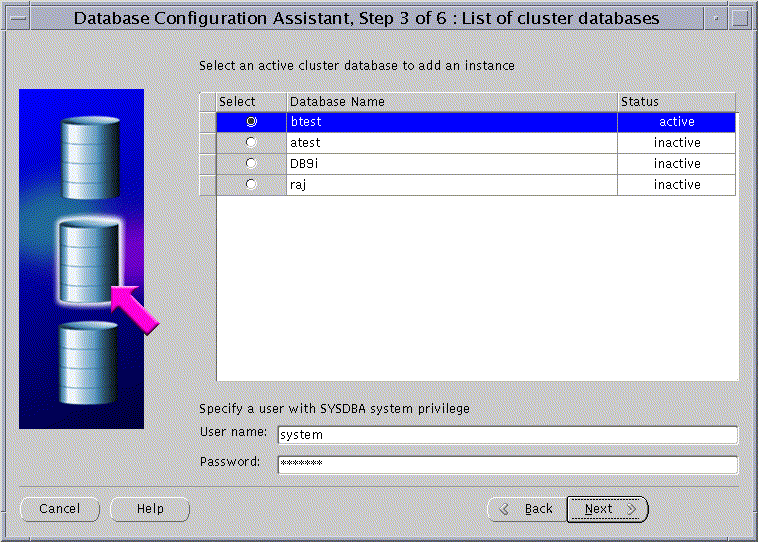
Text description of the illustration ldbadd.gif
Select an active Real Application Clusters database to which you want to add an instance from the List of Cluster Databases page. If your user ID is not operating-system authenticated, then the DBCA also prompts you for a user ID and password for a database user that has SYSDBA privileges. If the DBCA prompts you, then enter a valid user ID and password and click Next.
After you click Next, the DBCA displays the List of Cluster Database Instances page showing the names of the instances for the Real Application Clusters database that you selected as shown in Figure 8-5.
Figure 8-5 Database Configuration Assistant List of Cluster Database Instances Page

Text description of the illustration lofadd.gif
After you click Next, the DBCA displays the Adding an Instance page shown in Figure 8-6.
Figure 8-6 Database Configuration Assistant Adding an Instance Page
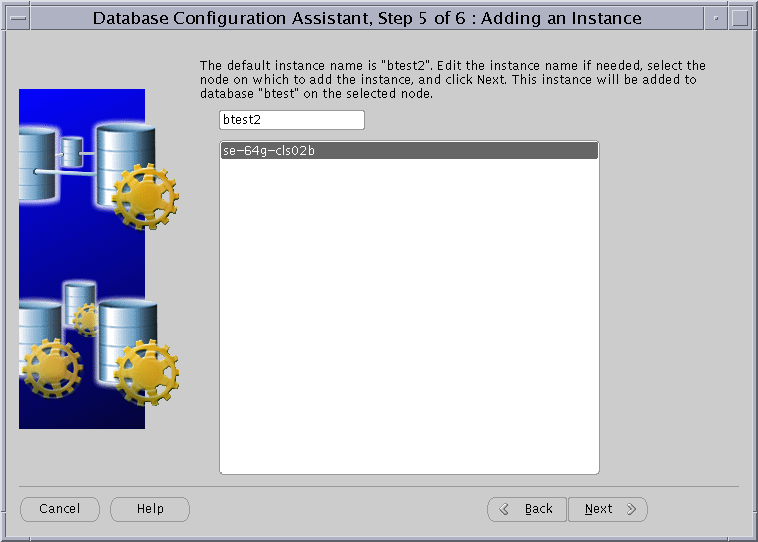
Text description of the illustration addedit.gif
Enter the instance name in the field at the top of this page if the instance name that the DBCA provides does not match your existing instance name sequence. Then select the new node name from the list and click Next.
After you click Next, the DBCA displays the Database Storage page as shown in Figure 8-7.
Figure 8-7 Database Configuration Assistant Database Storage Page
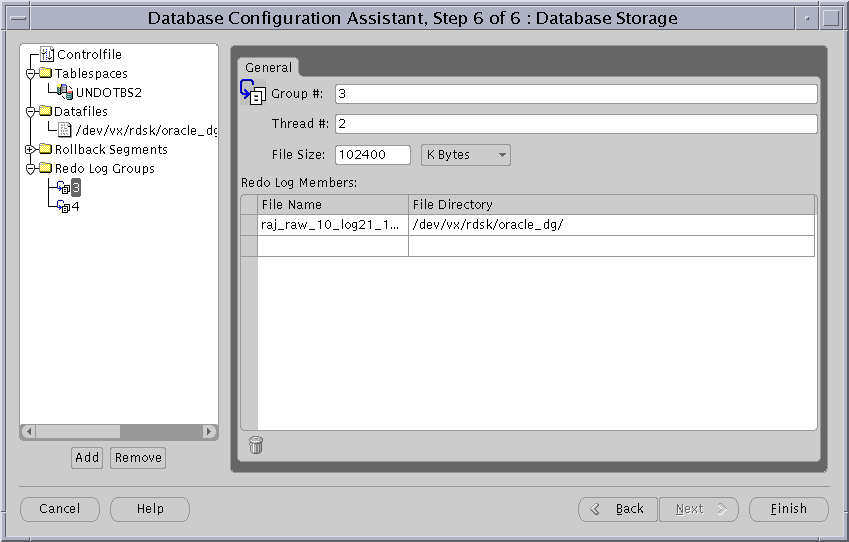
Text description of the illustration instor.gif
If your database uses automatic undo management and your platform supports a cluster file system, then skip this step unless you want to change the default undo tablespace datafile name that the DBCA provides. Otherwise, select the Tablespaces folder and expand it. Then select the undo tablespace storage object and a dialog appears on the right-hand side. Change the default datafile name to the raw device name for the tablespace. You can also change the name to the cluster file system file name if you do not want to use the default name. Oracle Corporation does not recommend that you change the storage properties for the undo tablespace.
If your database uses rollback undo management, then select the Rollback Segment folder to change the rollback segment names if you do not want to use the default rollback segment names that the DBCA provides. Oracle Corporation does not recommend that you change the storage properties for the rollback segments.
If your platform supports a cluster file system, then skip this step unless you want to change the default redo log group file names. Otherwise, select the Redo Log Groups folder and expand it. For each redo log group number you select, the DBCA displays another dialog box. For UNIX platforms, enter the raw device name that you created in the section "Create Raw Devices (Optional)" in the File Name field. On Windows NT or Windows 2000 platforms, enter the symbolic link name that you created in the section, "Create Links to Disk Partitions".
After you click Finish, the DBCA displays a Summary dialog similar to the dialog in Figure 8-8.
Figure 8-8 Database Configuration Assistant Summary Dialog
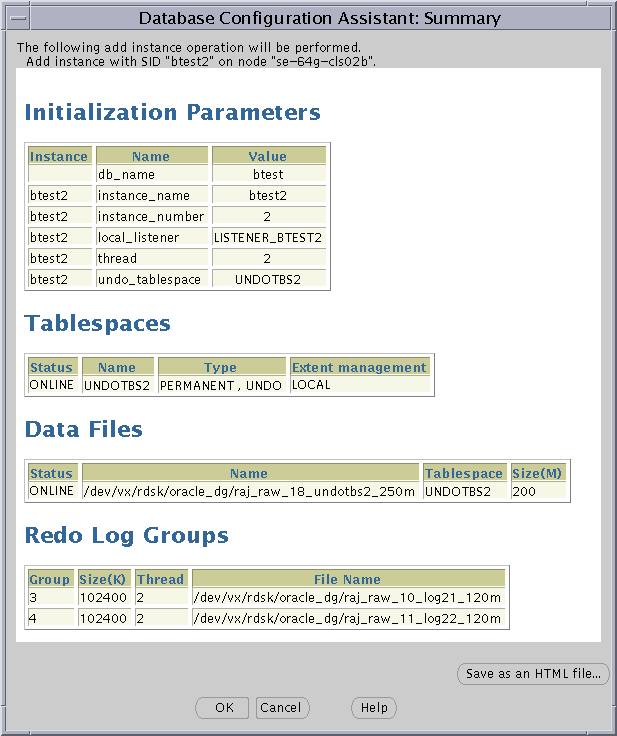
Text description of the illustration summadd.gif
If you click OK, then the DBCA displays a progress dialog that shows the DBCA performing the instance addition operation. During this operation the DBCA adds the instance and creates the instance's Oracle Net configuration. When the DBCA completes the instance addition operation, the DBCA displays a dialog asking whether you want to perform another operation. Click No to exit the DBCA, or click Yes and the DBCA displays the Operations screen shown in Figure 8-3.
If you click No and continue the instance addition operation, then at this point you have accomplished the following:
23 APPENDIX 2 ETE BONEBED DATABASE REFERENCES ALBRIGHT LB
2GLDB DATABASE DICTIONARY INTRODUCTION THE CORE OF THE LDB
4 CROSS TRANSFER DATABASE AS AT 16042015 MAGISTRATE’S PARTICULARS
Tags: database instance, new database, instance, database
- TRADE ENQUIRIES FROM CHILE ANNUAL 2017 MR ANDRO CURKOVIC
- MINISTERSTVO FINANCÍ ODBOR 12 PID MFCR3XLKTR ČJ MF1001222013121203 REFERENT
- BVMDDE STANDING COMITTEE ON PUBLIC HEALTH (SCOPH) MAIL TO
- TOWNSBURGH POWER DESCRIPTION YOU ARE MANAGING AN ELECTRICAL GRID
- 20141217 KUNGÖRELSE DNR LIU201402025 2(2) BIDRAG TILL FORSKARSTUDERANDE POSTDOKTOR
- DEPARTMENT OF VETERANS AFFAIRS PHARM104 NEBRASKA WESTERN IOWA HEALTH
- ESPECIFICACIONES TÉCNICAS 1 OBJETO ADQUISICIÓN DE EQUIPOS RADIO
- M EDIA CREDENTIALS APPLICATION 2018 RICHMOND JAZZ FESTIVAL RICHMONDJAZZFESTIVALCOM
- RS NO ADOAF00499 13 DE ENERO DE 1999 LA
- DIVISION OF SURFACE WATER SUPPLEMENT TO FORM C2 LAND
- WYMAGANIA EDUKACYJNE NA POSZCZEGÓLNE OCENY Z JĘZYKA POLSKIEGO W
- STATE OF NEBRASKA EMAIL MANAGEMENT MS OUTLOOK EXCHANGE
- SOLUCIONES REPASO LENGUA 5º REPASA LA UNIDAD
- SOLICITUD SERVICIOS FERCOM (DEVOLVER AL FAX 941 26 25
- 1 DEFINÍCION DE JOINT VENTURE ES LA PARTICIPACIÓN
- FUNDACIÓN CENTRO DE ESTUDIOS AMBIENTALES DEL MEDITERRÁNEO BASES PARA
- DOCUMENTAÇÃO OBRIGATÓRIA PARA ASSINATURA DO TERMO DE ACORDO ORIENTAÇÕES
- HTTPWWWUVESRELIEVE REVISTA ELECTRÓNICA DE INVESTIGACIÓN Y EVALUACIÓN EDUCATIVA ELECTRONIC
- 13 HUMAN RESOURCES MANUAL INSTRUCTION 3041 APPOINTMENT OF EXPERTS
- ENFERMAR DE HONOR POR LEONARDO GOROSTIZA INVENTAR “HAY EN
- STORIA “VERGINE IMMACOLATA AIUTATECI” CON QUESTA GIACULATORIA DETTA NELLA
- Statut%20opcine
- STRATEGISK HANDLEPLAN FOR LANDDISTRIKTERNE I VORDINGBORG KOMMUNE 20112013 STRATEGISK
- L APPRENDISTATO APPRENDISTATO PROFESSIONALIZZANTE O DI MESTIERE (ART 4
- CURSOS PARA RECUPERACIÓN DE PUNTOS Y PERMISO ALBEA FORMACIÓN
- COMITÉ CONSULTATIF SUR LES NOMINATIONS À LA MAGISTRATURE POLITIQUES
- RÚBRICA PARA LA EVALUACIÓN DEL TFG (TRIBUNAL) DIRECTORA (NOMBRE)
- HRVATSKA UDRUGA MLADIH POLJOPRIVREDNIKA AGRO ALAGOVIĆEVA 34A 10000 ZAGREB
- SR D FRANCISCO TEJADA PRESIDENTE DE LA GERENCIA MUNICIPAL
- 2019 VISUAL AND PERFORMING ARTS STANDARDS FOCUS GROUP REPORT
LEYENDA Y FIGURA DE SANTIAGO EN DOS HAGIOGRAFÍAS DE
ECONOMÍA DEL TRABAJO DIPLOMATURA DE RELACIONES LABORALES CALIFICACIÓN FINAL
 ESTIMADOA SEÑORA EL MOBILE WORLD CONGRESO TENDRÁ LUGAR EN
 FORMULARIO DE QUEJA POR DISCRIMINACIÓN POR RAZÓN DE SEXO
SENTENCIA NÚM 582000 DE 22 FEBRERO DE LA AUDIENCIA
CREATED BY JULIE KUNCE FIELD JD WWWJULIEFIELDCOM MODEL LIMITED
 РЕПУБЛИКА МАКЕДОНИЈА ГРАД СКОПЈЕ ЈАВНО СООБРАЌАЈНО ПРЕТПРИЈАТИЕ СКОПЈЕ ОТВОРЕНА
CAMBRIDGE PHILOSOPHICAL SOCIETY FULL NAME & TITLE DEGREE(S) HELD
 PLACEMENT INFORMATION FORM THE HOME YOT MUST BE CONSULTED
 POLICE APPLICANT PREPOLYGRAPH INTEGRITY QUESTIONNAIRE INFORMATION CONTAINED IN THIS
PROCESOS PENALES SOBRE VIOLENCIA SEXUAL EN CONFLICTO LA IMPORTANCIA
ŞCOALA GIMNAZIALĂ ”EPISCOP DIONISIE ROMANO” BUZĂU COMISIA PENTRU EVALUARE
 LE CADRE JURIDIQUE1 DU FONCTIONNEMENT DES MAISONS FAMILIALES RURALES
 19 C REPÚBLICA DE COLOMBIA CORTE SUPREMA DE JUSTICIA
ESTADO DISOLVIENDO EL CONGRESO DE DIPUTADOS Y MANDANDO RENOVAR
 NATIONAL AGRICULTURAL COOPERATIVE MARKETING FEDERATION OF INDIA LTD REGD
the Following Successful Applicants Were Awarded Grants Totalling 27700
CONVOCATÒRIA DE PERSONAL TÈCNIC DE SUPORT A LA RECERCA
 SECTION 3 SYNONYMS & RELATED TERMS OBJECTIVES
WYDATKI NA REKLAMĘ I REPREZENTACJĘ W KOSZTACH FIRMY POCZĘSTUNEK
