ELEGANCE DIGITAL FILTER COFFEE MAKER INSTRUCTIONS AND WARRANTY MODEL
ELEGANCE DIGITAL FILTER COFFEE MAKER INSTRUCTIONS AND WARRANTY MODELPRESS RELEASE UNOBTRUSIVE ELEGANCE MAISON ULLENS DESIGNER LABEL ILLUMINATED
THE ELEGANCE OF A MACROPHAGE MARIA DE SANTIS1 MASSIMO
Using your coffee maker for the first time

ELEGANCE DIGITAL FILTER COFFEE MAKER
INSTRUCTIONS AND WARRANTY
MODEL: RHFD01
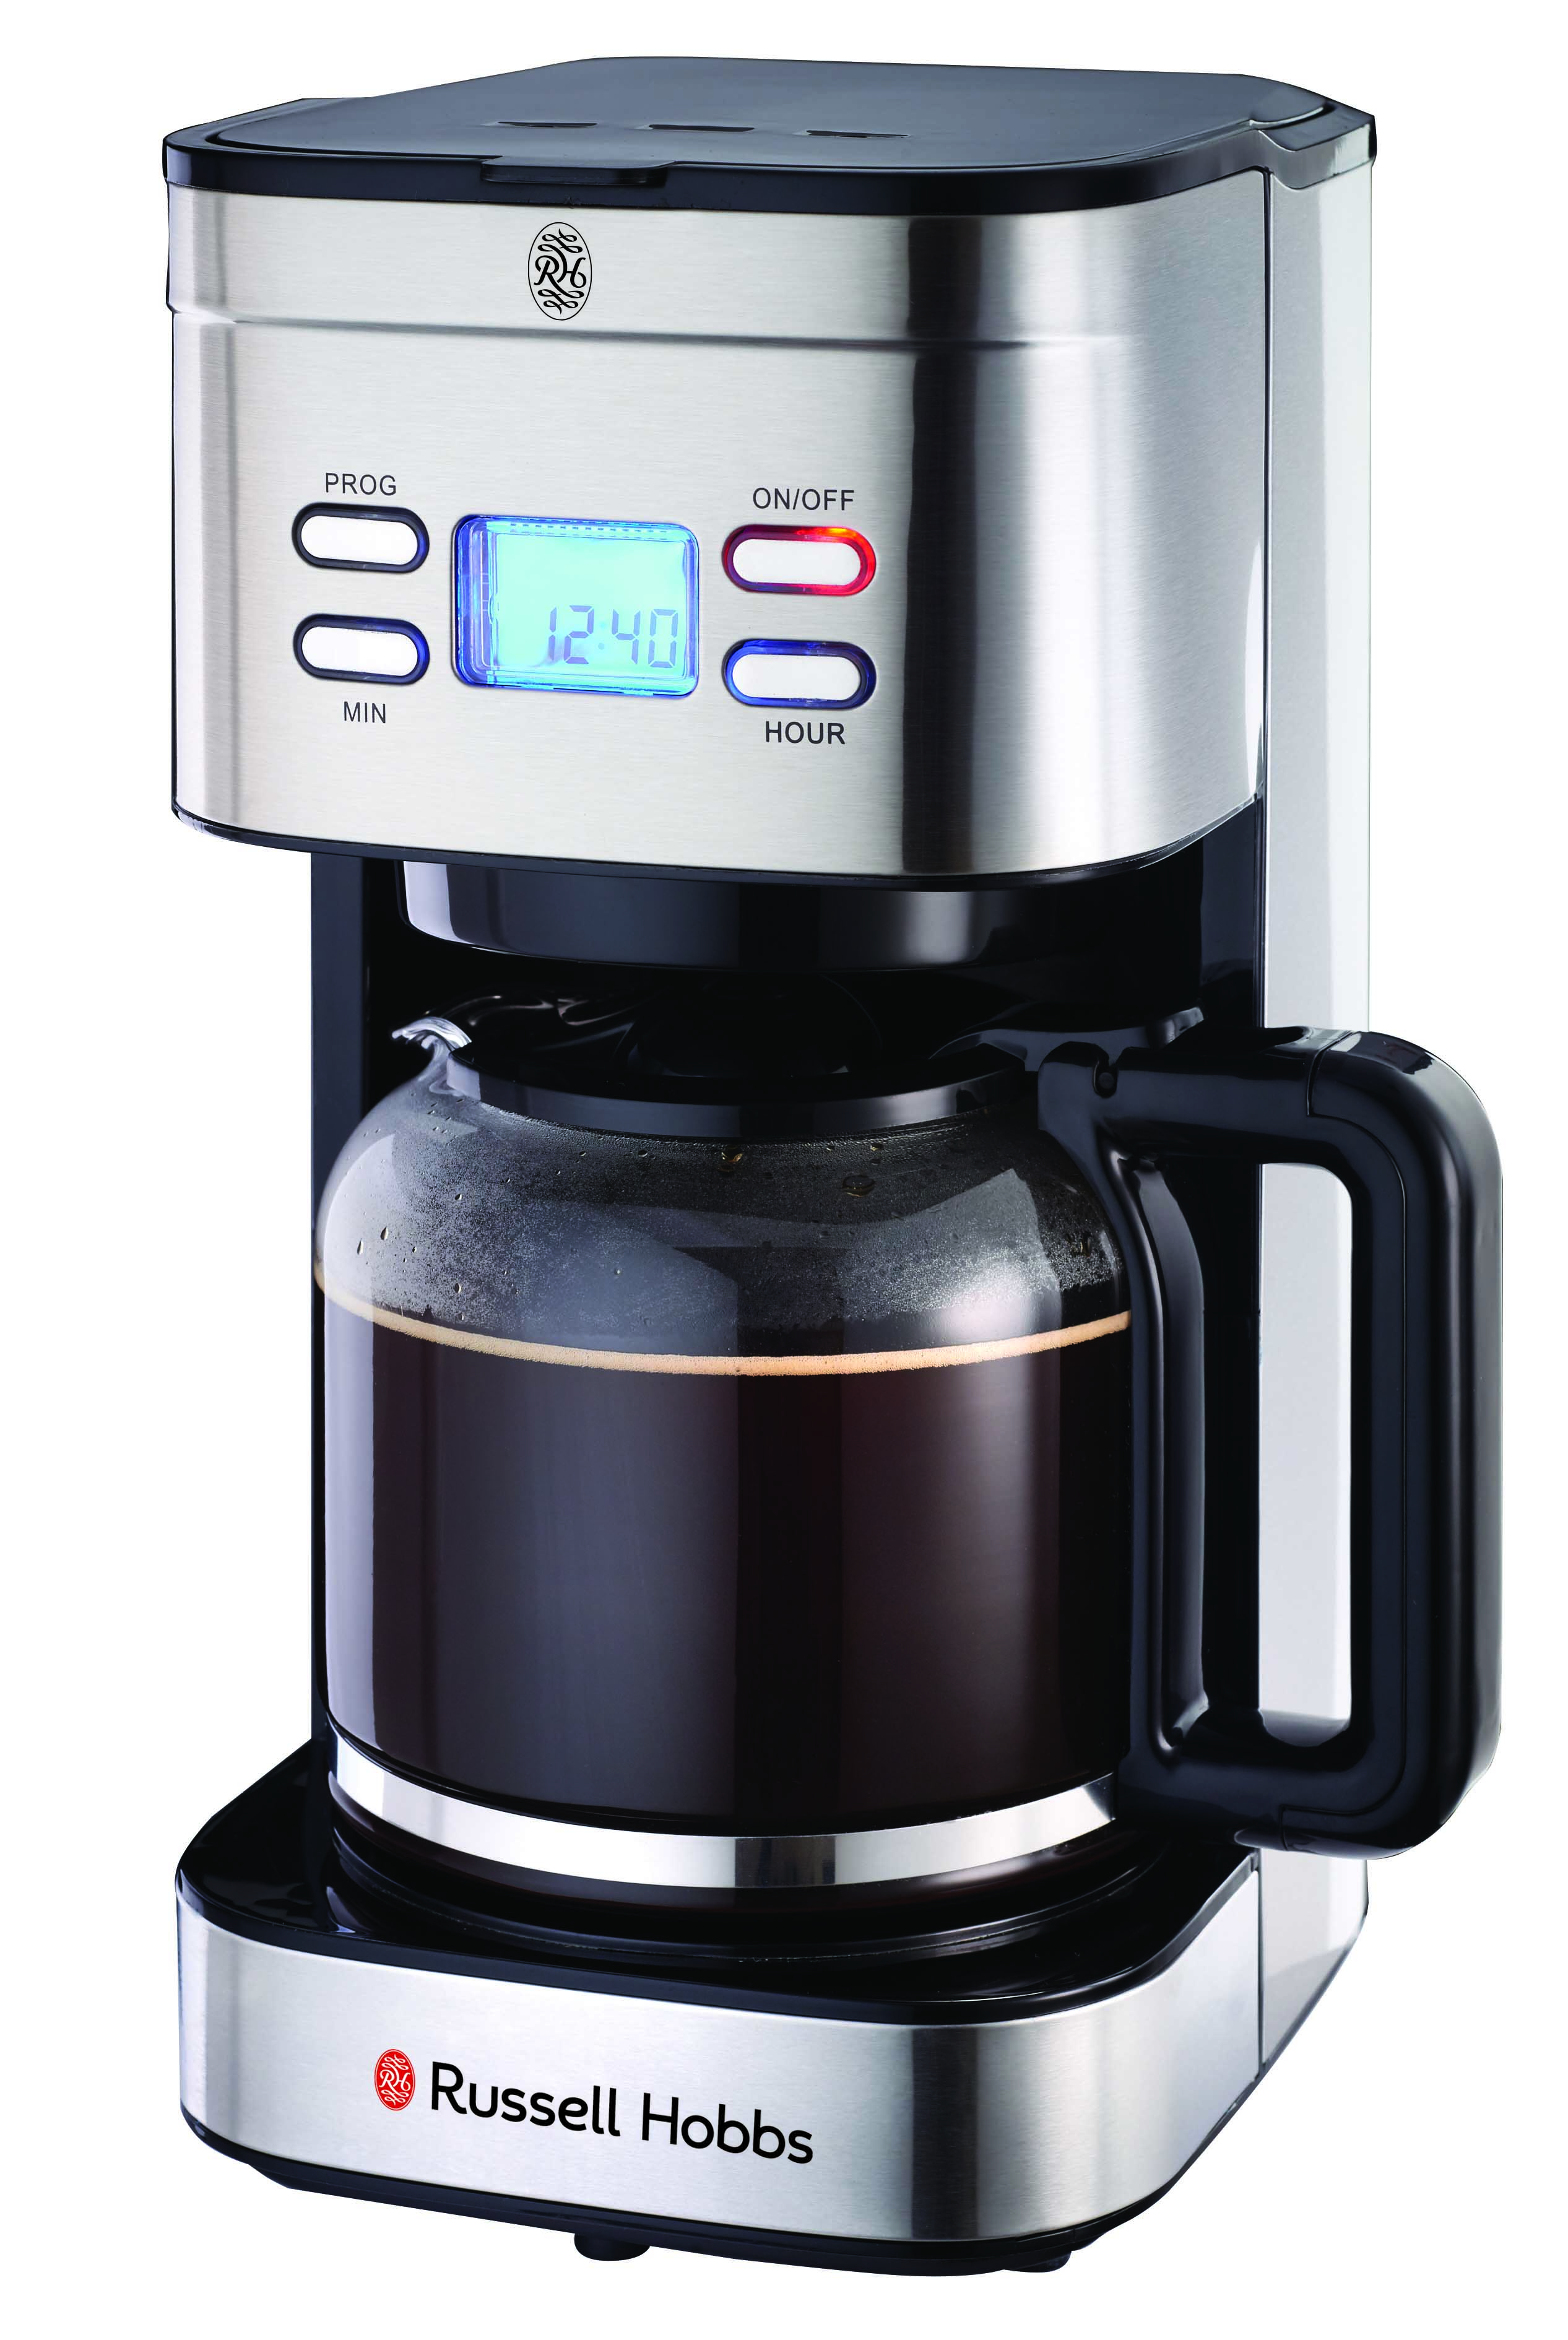
ELEGANCE DIGITAL FILTER COFFEE MAKER
Congratulations on purchasing your Russell Hobbs Elegance Digital Filter Coffee Maker. Each unit is manufactured to ensure safety and reliability. Before using this appliance for the first time, please read the instruction manual carefully and keep it for future reference.
FEATURES OF THE RUSSELL HOBBS ELEGANCE DIGITAL FILTER COFFEE MAKER
1.5L/ 10 -15 cup capacity
Digital Timer control pad with Blue LED display
Automatic Pause and Anti-drip system allows serving while the machine continues to brew
Preset/delay function
Water tank with visible level indicator
Removable filter holder for easy cleaning
Cup warming plate to keep your coffee warm after brewing
Heat resistant glass carafe with flip top lid
Includes removable permanent nylon filter & measuring scoop
900W
Suitable for ground coffee only
For domestic use only
1 year warranty plus 1 year extended warranty
IMPORTANT SAFEGUARDS
When using electrical appliances, basic safety precautions should always be followed to reduce the risk of fire, electric shock, and/or injury to persons, including the following:
1. Read all instructions.
2. Do not touch hot surfaces. Use handles or knobs. Care must be taken, as burns can occur from touching hot parts or from spilled, hot liquid.
3. To protect against electric shock, do not place the cord, plug, or appliance in water or other liquid.
4. Close supervision is necessary when any appliance is used by or near children.
5. Unplug from outlet when either the appliance or clock is not in use and also before cleaning. Allow to cool before removing or adding parts or prior to cleaning the appliance.
6. Scalding may occur if the lid is lifted during the brewing cycle. Do not open the lid until the coffeemaker has cooled completely.
7. The appliance must be operated on a flat surface away from the edge of counter to prevent accidental tipping.
8. Do not operate any appliance with a damaged cord or plug, or after the appliance malfunctions or is dropped or damaged in any manner.
9. The use of accessory attachments not recommended by the appliance manufacturer may cause injuries.
10. Do not use outdoors.
11. Do not let cord hang over edge of table or counter or touch hot surfaces, including the stove.
13. Do not place the appliance on or near a hot gas or electric burner or in a heated oven.
14. To disconnect the appliance, turn the controls to OFF; then remove plug from wall outlet.
15. WARNING! To reduce the risk of fire or electric shock, do not remove the bottom cover. No user-serviceable parts are inside. Repair should be done by authorised service personnel only.
16. Do not use appliance for other than intended use.
FOR HOUSEHOLD USE ONLY
BUTTON FUNCTIONS
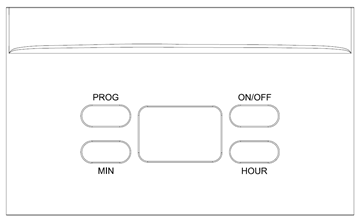
ON/OFF
Press once: Turns the appliance ON and begins the brewing process (the button will illuminate red in colour)
Press twice: The appliance will enter the preset delay mode. The brewing process will start at the desired programmed time (the button light will illuminate blue in colour)
Press three times: Turns the appliance OFF (the button light will turn off).
PROG
Press once: To view the current time on the display.
Press twice: To adjust the start time of the brewing process OR to view the start time chosen.
HOUR
Use to adjust the number of hours required
MIN
Use to adjust the amount number of minutes.
OPERATING INSTRUCTIONS
BEFORE FIRST USE
Take the appliance out of the box and take off any protective wrappings.
REMEMBER: DO NOT LEAVE PROTECTIVE PACKAGING LYING AROUND, AS IT COULD BE DANGEROUS AROUND INFANTS, CHILDREN, IMPAIRED PERSONS OR THOSE PERSONS WITH A DISABILITY AND/OR ANIMALS.
Check the contents of the appliance for completeness. In the event that the packaging contents are incomplete or if damage to the appliance is noticeable, do not operate the appliance. Return it to the supplier (retailer) immediately.
Before first use, position the coffee maker on a flat and stable surface. Ensure that it is positioned so that it cannot tip over. We recommend that you operate the coffee maker twice with only water and without coffee grounds to remove any possible manufacturing dust/ residues.
SETTING THE TIME
The appliance uses a 24-hour timer.
When the appliance is switched off, press the PROG button once. The word “CLOCK” will appear above the time on the digital display.
Press the HOUR button to adjust the amount number of required hours.
Press the MIN button to adjust the amount number of required minutes.
If no other buttons are pressed after 15 seconds have passed, the appliance will accept the inputs as correct and save the time. The word “CLOCK” will disappear from the digital display.
RINSE BEFORE FIRST USE
To ensure that you get the most from your first cup, please rinse the coffee maker with warm water as follows:
1. Fill the water reservoir/ water tank with cold water to the maximum level. The water level is displayed on the water gauge/ indicator. NOTE: You can use the glass carafe as a ‘jug’ to fill the water reservoir/ water tank. CAUTION: Do not overfill the water reservoir/ water tank! Do not fill it above the MAX level mark.
2. Put the filter in the filter holder but don’t add any ground coffee. Then, close the water tank lid.
3. Place the carafe on the drip plate.
4. Connect to the power source, 12:00 will show on the display.
5. Press the ON/OFF button once, it will illuminate in red and water will start dripping automatically after a while.
6. The appliance will shut off automatically after 35 minutes when the brewing is finished.
7. Press the ON/OFF button twice to switch the machine off.
6. Once the water has stopped dripping, you can empty the carafe and clean it thoroughly. Now you may start brewing coffee.
MAKING FILTER COFFEE
Open the water tank cover and fill the tank with cold water following the level indicators on the tank. Water should not exceed the maximum level.
Fill the removable permanent filter with ground coffee powder. Usually one cup of coffee needs a level spoon of ground coffee, but it may be adjusted according to your specific requirements. Gently shake the removable permanent filter to distribute the coffee evenly.
Now insert the filter holder and removable permanent filter back into the machine. Ensure that they are properly attached and seated.
Close the water reservoir/ water tank lid.
Place the glass carafe onto the cup warming plate.
Press the ON/OFF button once, the button will illuminate red, and coffee will start brewing automatically.
NOTE: Your appliance includes a Drip-Stop/ Anti-Drip feature. The drip-stop closes when removing the glass carafe from the cup warming plate. This feature prevents the coffee from dripping onto the cup warming plate if there is still water in the filter.
Ensure that the lid is closed on the glass carafe as it activates the drip-stop function.
If there is still water in the water reservoir/ water tank, place the glass carafe back onto the cup warming plate as soon as possible to ensure that the filter does not overflow. We recommend that you do not have the glass carafe removed from the cup warming plate for longer than 30 (thirty) seconds.
PRESET DELAY FUNCTION
The preset delay function allows you to postpone automatic coffee brewing. For example: If you do not wish to brew coffee in the machine immediately (and the time is for example: 17:15), however you would like the coffee maker to automatically start brewing 3 (three) hours later at 20:15 in the evening.
Open the water tank cover and fill the tank with cold water following the level indicators on the tank. Water should not exceed the maximum level.
Fill the removable permanent filter with ground coffee powder. Usually one cup of coffee needs a level spoon of ground coffee, but it may be adjusted according to your specific requirements. Gently shake the removable permanent filter to distribute the coffee evenly.
Now insert the filter holder and removable permanent filter back into the machine. Ensure that they are properly attached and seated.
Close the water reservoir/ water tank lid.
Place the glass carafe onto the warming hot plate.
Press the PROG button twice. The word “TIMER” will appear on the digital display.
Press the HOUR button to adjust the numberamount of required hours.
Press the MIN button to adjust the numberamount of required minutes.
If no other buttons are pressed after 15 seconds have passed, the appliance will accept the inputs as correct and save the desired preset delay. The word “TIMER” will disappear from the digital display.
Press the on/off button twice and the program light will shine blue. This means that the timer has been set.
The coffee machine will start brewing once it reaches the preset time.
NOTE:
The maximum delay which can be set is 24 (twenty-four) hours.
The appliance switches on automatically and begins brewing at the preset time. The button light will glow a blue colour.
Press the ON/OFF button once to deactivate the TIMER (preset delay) function.
If you would like to start the brewing process sooner, press the ON/OFF button twice. The button light will glow a red colour.
THE COFFEE IS READY
NOTE:
The brewing process lasts approximately 10 (ten) minutes.
When no more coffee is flowing through the filter you can remove the glass carafe.
Turn the device OFF.
Would you like to keep the remaining coffee warm? Leave the appliance turned ON until the end of the keep-warm period. If you wish to keep the coffee warm even after the keep-warm period has finished then you can pour the remaining coffee into a thermal flask.
NOTE:
The filter holder can be removed from the machine by its handle. This makes it easier to dispose of the old coffee grounds.
WARNING:
If you want to make another pot of coffee immediately, switch off the appliance first. Let it cool down with the water reservoir/ water tank lid open in order to avoid hot water splashing when refilling it with water again.
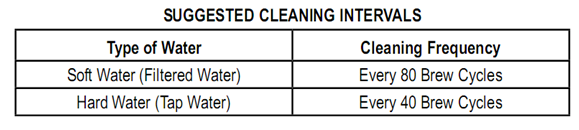
DESCALING
Mineral/
limescale deposits building up in the coffee maker will have an
adverse effect on the operation of the appliance. Your appliance
must be descaled when you begin to notice an increase in the time
required to brew or when there is excessive steaming. You may also
notice a build-up of white deposits on various parts of the coffee
maker. The frequency of cleaning depends upon the hardness of the
water used. The following table will provide you with a guideline for
suggested cleaning intervals.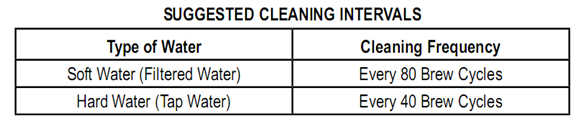
Use only commercially available appliance descaler.
Follow the recommended instructions for use.
WARNING:
Afterward descaling, we recommend that you run the machine with plain cold water (excluding ground coffee) two or three times in order to rinse out residues of the descaling agent.
Do not use any coffee powder during the descaling process.
Do not use this water for consumption.
CLEANING AND MAINTENANCE
This appliance is for household use only and is not user-serviceable.
Do not open or change any parts by yourself. Please refer to a qualified electrical service department or return to the supplier if servicing is necessary.
Always remember to unplug the unit from the electrical outlet when not in use and before cleaning. Ensure that the machine is turned OFF and wait until the appliance has cooled down.
It is much easier to clean the accessories directly after they have been used. Wash them in warm, soapy water, rinse and dry well.
Do not use a wire brush or any abrasive items to clean your appliance.
Do not use bleach, any acidic or abrasive detergents/ solvents to clean your appliance as it can be damaging to the finish.
T he
exterior of the appliance should be cleaned as necessary with a
slightly damp cloth – without any detergents or additives. Do
not let water enter the appliance or the stand.
he
exterior of the appliance should be cleaned as necessary with a
slightly damp cloth – without any detergents or additives. Do
not let water enter the appliance or the stand.
Remove spilled coffee grounds with a paper towel from the inner casing. Afterwards wipe with a damp cloth.
The glass carafe, the filter holder and removable permanent filter should be cleaned by rinsing in warm water. Use a soft brush if necessary.
Do not immerse the appliance in water or any other liquid, or hold it under running water to clean.
To remove stubborn spots/marks, wipe the surfaces with a cloth slightly dampened in soapy water or mild non-abrasive cleaner. Rinse and dry with a clean, dry, soft cloth.
TROUBLESHOOTING
|
Problem |
Possible cause |
Solution |
|
The appliance does not work. |
The appliance may not be connected to the mains power. |
Check the wall outlet with a different appliance. |
|
Insert the plug properly into the wall outlet. |
||
|
Check the fuse. |
||
|
The appliance may be defective |
Contact our service or an authorised repair center. |
|
|
Filter blockage: Coffee grounds spill over the edge of the filter. |
The drip-stop may be closed: the glass carafe is not on the cup warming plate or the lid is not on the glass carafe correctly. |
1. Switch the appliance OFF. Disconnect it from the mains power supply. 2. Put the glass carafe with lid onto the warming hot plate so that the filter is emptied. 3. Clean the appliance as described. |
|
There may be too much ground coffee powder in the filter. |
||
|
Coffee grounds in the coffee. |
There may be too much ground coffee powder in the filter. |
Use less ground coffee powder. |
|
The brewing process takes too long. |
There may be lime scale deposits in the appliance. |
Descale the appliance as described. |
|
The appliance turns OFF automatically. |
The keep-warm period is limited to maximum 35 (THIRTY FIVE) minutes after which the appliance will turn off automatically. This feature has been incorporated for increased safety and lower energy consumption. |
|
STORING THE APPLIANCE
Ensure that the unit is switched OFF. Unplug the coffee maker from the power outlet.
Clean all the parts as instructed above. Ensure that all parts are dry before storing.
Store the appliance in a clean, dry place.
Never store the appliance while it is still wet or dirty.
Never wrap the power cord around the appliance.
SERVICING THE APPLIANCE
There are no user serviceable parts in this appliance. If the unit is not operating correctly, please check the following:
• You have followed the instructions correctly
• That the unit has been wired correctly and that the wall socket is switched on.
• That the mains power supply is ON.
• That the plug is firmly in the mains socket.
If the appliance still does not work after checking the above:
Consult the retailer for possible repair or replacement. If the retailer fails to resolve the problem and you need to return the appliance, make sure that:
• The unit is packed carefully back into its original packaging.
• Proof of purchase is attached.
• A reason is provided for why it is being returned.
If the supply cord is damaged, it must be replaced by the manufacturer or an authorised service agent, in order to avoid any hazard. If service becomes necessary within the warranty period, the appliance should be returned to an approved Home of Living Brands (Pty) Limited service centre. Servicing outside the warranty period is still available, but will, however, be chargeable.
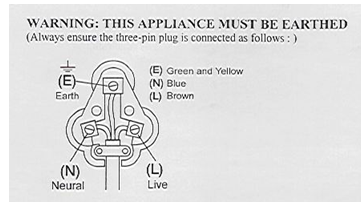
CHANGING THE PLUG
Should the need arise to change the fitted plug, follow the instructions below.
This unit is designed to operate on the stated current only. Connecting to other power sources may damage the appliance. Connect a three-pin plug as follows:
The wires in this mains lead are coloured in accordance with the following code:
Green/Yellow = Earth
Blue = Neutral
Brown = Live
PLEASE AFFIX YOUR PROOF OF PURCHASE/RECEIPT HERE
IN THE EVENT OF A CLAIM UNDER WARRANTY THIS RECEIPT MUST BE PRODUCED.
WARRANTY AND EXTENDED WARRANTY
Home of Living Brands (Pty) Limited ("Home of Living Brands ") warrants to the original purchaser of this product ("the customer") that this product will be free of defects in quality and workmanship which under normal personal, family or household use and purpose may manifest within a period of 1 (one) year from the date of purchase ("warranty period").
Home of Living Brands shall extend the warranty period for a further period of 1 (one) year (“extended warranty period”), on condition that the purchaser registers the product on the website, within 12 months from the date of purchase of the product. The website address for registration is as follows: http://russellhobbs.co.za/info-pages/warranty-info.aspx. The extended warranty period only applies to products purchased on or after 1 October 2017.
Where the customer has purchased a product and it breaks, is defective or does not work properly for the intended purpose, the customer must notify the supplier from whom the customer bought the product ("the supplier") thereof within the warranty period or if applicable, the extended warranty period. Any claim in terms of this warranty must be supported by a proof of purchase. If proof of purchase is not available, then repair, and/or service charges may be payable by the customer to the supplier.
The supplier will refund, repair or exchange the product in terms of this warranty subject to legislative requirements. This warranty shall be valid only where the customer has not broken the product himself, or used the product for something that it is not supposed to be used for. The warranty does not include and will not be construed to cover products damaged as a result of disaster, misuse, tamper, abuse or any unauthorised modification or repair of the product. Further to this, the Glass Carafe is not covered under the warranty. Any damage caused to the carafe will on the onus of the consumer.
The faulty product must be taken to the supplier's service centre to exercise the warranty.
The supplier will refund, repair or exchange the product in terms of this warranty subject to legislative requirements. This warranty shall be valid only where the customer has not broken the product themselves, or used the product for something that it is not supposed to be used for. The warranty does not include and will not be construed to cover products damaged as a result of disaster, misuse, tamper, abuse or any unauthorised modification or repair of the product.
This warranty will extend only to the product provided at the date of the purchase and not to any expendables attached or installed by the customer.
If the customer requests that the supplier repairs the product and the product breaks or fails to work properly within 3 (three) months of the repair and not as a result of misuse, tampering or modification by or on behalf of the customer, then the supplier may replace the product or pay a refund to the customer, subject to the supplier’s discretion.
The customer may be responsible for certain costs where products returned are not in the original packaging, or if the packaging is damaged. This will be deducted from any refund paid to the customer.
HOME OF LIVING BRANDS (PTY) LTD (JOHANNESBURG)
JOHANNESBURG TEL NO. (011) 490 9600
CAPE TOWN TEL NO. (021) 552 5161
DURBAN TEL NO. (031) 303 1163
www.homeoflivingbrands.co.za
Tags: coffee maker, the coffee, model, filter, elegance, warranty, coffee, instructions, digital, maker
- AGREEMENT OF COOPERATION BETWEEN [PARTNER INSTITUTION] AND THE UNIVERSITY
- FAKÜLTE VETERINER FAKÜLTESI ÖĞRETIM YIL 20142015 TARIH 30062015 BÖLÜMANABILIM
- MAGYAR TALAJTANI TÁRSASÁG TALAJSZENNYEZETTSÉGI SZAKOSZTÁLY ORSZÁGOS KÖRNYEZETEGÉSZSÉGÜGYI INTÉZET 1097
- DECEPTION ISLAND MANAGEMENT PACKAGE SUBMITTED BY
- EN OCTUBRE ESTELLALIZARRA ESTÁ DE MODA” TODAS LAS TARDES
- K ONTAKT STEVE GAUT PUBLIC RELATIONS 4048288787 SCOTT CHILDRESS
- (MODELO DE FACTURA EMITIDA POR ASOCIACIONES SIN ANIMO DE
- KULTUR INKESTA ENCUESTA CULTURA DATU OROKORRAK DATOS GENERALES
- 28092020 SAMTYKKEERKLÆRING VED INNHENTING AV PERSONOPPLYSNINGER FOR
- TO MONICA BHATIA HEAD OF THE SECRETARIAT OF THE
- VIERNES 12 18001820 CÁTEDRA DE DIVERSIDAD ANIMAL I 18251845
- POTENTIAL IMPACTS OF CLIMATE CHANGE (CAP AND TRADE) LEGISLATION
- BSCP128 APPENDIX 2 VERSION 20 1 INTRODUCTION OBJECTIVES OF
- BRITISH JOURNAL OF DERMATOLOGY WHAT IS RSS? VOLUME 160
- MODELO DE CONTRATO DE COMISIÓN PARA OPERACIONES REALIZADAS EN
- ACTE NECESARE ELIBERARE PASAPORT ELIBERAREA SAU PRESCHIMBAREA PASAPORTULUI SIMPLU
- EX EX 2 APPLICATION FOR A REALLOCATION OF DUTIES
- ANNEX D5 EVALUATION WHEEL – QUESTIONNAIRE TO STAKEHOLDERS PLEASE
- ESTRUCTURA DE LOS CURSOS DE DOCTORADO LOS CURSOS SE
- CEPA “ANTONIO GALA” PRUEBA SEGUIMIENTO DISTANCIA CURSO 20132014 PRUEBA
- CONCERNS ON RESPECT FOR FREEDOM OF EXPRESSION IN SUDAN
- ?XML VERSION10 ENCODINGUTF8? !DOCTYPE HTML PUBLIC W3CDTD XHTML 10
- UNIVERSAL PERIODIC REVIEW – CANADA – APRILMAY 2013 SUBMISSION
- QUERIDOS PADRES Y MADRES ES UN PLACER COMUNICAROS UNA
- PROGRAMA DEL COLOQUIO DE LA MAESTRÍA EN MATEMÁTICA EDUCATIVA
- ZERTIFIZIERUNGSSTELLE TQCERT FACHKUNDIGE STELLE M1 ANTRAGVERTRAG EINES NICHT BEI
- ………………………………………………… MIEJSCOWOŚĆ DATA SPORZĄDZENIA WNIOSKU ZNAK SPRAWY BWI NADAJE
- HUMAN RIGHTS HALL OF FAME 2006 INDUCTEES CHRISTINE CLARKE
- UREDBA O ZAŠTITI IMOVINE DELOVA PREDUZEĆA ČIJE JE SEDIŠTE
- OBRAZLOŽENJE PRIJEDLOGA FINANCIJSKOG PLANA ZA RAZDOBLJE 2019 2021
ANUNCIO EN EL PERFIL DE CONTRATANTE POR RESOLUCIÓN DE
 Catalytic Organometallic Carbonheteroatom Bond Formation John f Hartwig Department
OPIS FORMULARE FORMULARUL 1 – SCRISOARE DE ÎNAINTARE FORMULARUL
PROGRAMA SEMINARIO “EL RECURSO EXTRAORDINARIO Y EL RECURSO DE
THE ROLE OF THE UNITED STATES AND THE UNITED
 THE HON SIR JONATHAN COHEN APPROVED JUDGMENT NEUTRAL CITATION
ATTACHMENT 3 PRICING SCHEDULE (A&B) SCHEDULES A & B
 “LINEAMIENTOS PARA EL OTORGAMIENTO DE CONCESIONES PARA PRODUCTOS FORESTALES
 WWWHACIENDAGOCR/ADUANAS DIRECCIÓN GENERAL DE ADUANAS DIRECCIÓN DE GESTION TECNICA
 CT01 ANSWER NOW PLEASE IN THE SI (METRIC) SYSTEM
 TIPS FOR PARENTS AND EDUCATORS DEALING WITH YOUNG PEOPLE’S
 O DBOROVÝ ZVÄZ PRACOVNÍKOV ŠKOLSTVA A VEDY NA SLOVENSKU
 3 GPP2 TSGS MEETING 2003 (AUG 18~22) WWWWALKERHILLCOM CONTACT
 PROJEKTAS JONAVOS RAJONO SAVIVALDYBĖS TARYBA SPRENDIMAS DĖL GYVENAMŲJŲ PATALPŲ
1 WELFARE FACILITIES (HSI20) GUIDANCE CONTRACTORS HAVE TO PROVIDE
SUSTAINABLE FOREST PRODUCTS ALLIANCE MAJOR US AND EUROPEAN
RECENT TRANSLATIONS OF ANCIENT NEAR EASTERN TEXTS CHOOSING RELIABLE
 S TRONGPHONE Z4 WWWEVOLVEOCOM ÁTTEKINTÉS AZ ALÁBBI KÉPEN RÉSZLETES
 TEKTUŞ SİPARİŞ SİSTEMLERİ GIDA SAN VE TİC AŞ (“ŞIRKET”)
COURSE SYLLABUS FOR FEMINIST THEORIES ON POLITICS I DATA
