REVIEWING THE VOUCHER TO DETERMINE WHY IT HAS NOT
(REV 1097) RHY CERTIFICATION WORKSHEET FOR REVIEWING POLICY AND11A APPENDIX 82 OF WEED REPORTING AND REVIEWING
ASSESSMENT GUIDE FOR REVIEWING AND APPROVING ACQUISITION STRATEGY ABOUT
ASSIGNMENT B CEO VISION STATEMENT SAMPLE AFTER REVIEWING THE
AUDITORY SKILLS CHECKLIST CHILD’S NAME BIRTH DATE PERSON REVIEWING
‘ASSESSMENT FOR LEARNING – 8 SCHOOLS PROJECT’ REVIEWING TEACHING
Reviewing the Voucher to determine why it has not been paid
![]()
Reviewing the Voucher to determine why it has not been paid
When a voucher has been paid, the Reference and Payment Date will be populated on the Payments tab of the Voucher. The Payment Inquiry hyperlink will also be highlighted. (Navigate to Accounts Payable > Vouchers > Add/Update > Regular Entry and Find an Existing Value. Click on the Payments tab to review these fields.) If the Reference and Payment Date are blank, check to see if the payment was offset.
1. On the Payments tab,
If the Gross Amount has a zero dollar amount, look at the Handling code.
If the Handling code reads OC, OF, RO, or TO, the payment has been processed, but was offset (intercepted and paid) to one or more authorized collecting entities. To verify this, click on the “View All” link to see all payment schedules for this voucher. Note that a voucher payment could be fully or partially offset. If this is so, the first payment schedule will be to the Vendor for a reduced amount. (Look at all payment schedules.)
If this is the case, the voucher was paid and no further review is required.


If you have verified that the voucher has not been paid, review the following steps to confirm that it is ready to be paid by system standards:
Navigate to the Summary page: Accounts Payable > Vouchers > Add/Update > Regular Entry > and confirm that the voucher has the following statuses:
Match Status will be ‘No Match’, if no committing document is attached to the Voucher or ‘Matched’ if attached to a Purchase Order.
Approval Status will be ‘Approved’.
Header Budget Status will be ‘Valid’.


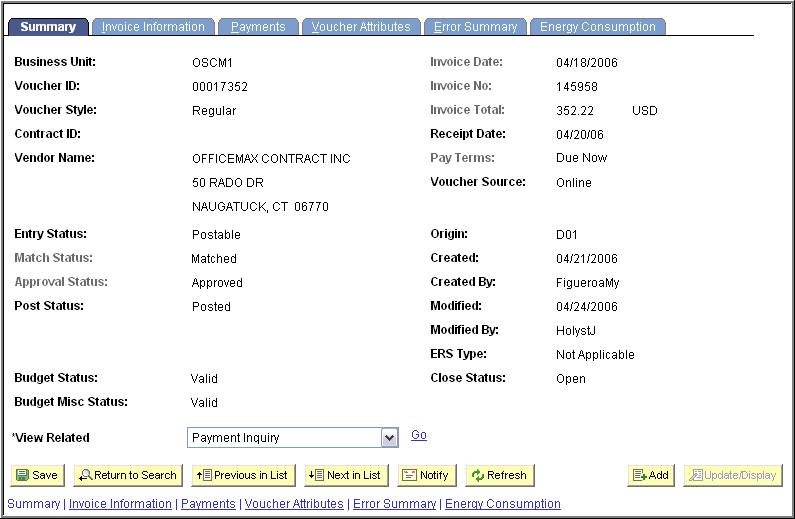
If any of these statuses are not set to the appropriate values, further action needs to take place for Matching, Approval, or Budget Checking. If these statuses are all fulfilled, go to Step 3 to check the Payment Criteria on the Voucher.
Go to the Payments tab on the Voucher and confirm the following:
The Payment Hold checkbox must not be selected for the payment to be processed. If this is selected, unselect the checkbox to continue processing. (Be sure to investigate why a payment is on hold prior to changing this checkbox.)
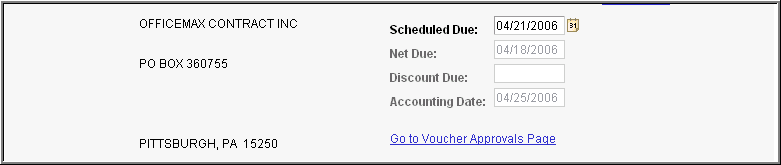
Review the Scheduled Due date to confirm that it is scheduled to be paid on the correct date. This date is calculated by the Payment Terms on the Invoice Information page using the Invoice Date as the basis date. You can manually override the calculated date and enter the correct Scheduled Due date. The voucher will not be selected for payment until the day before the Scheduled Due date. A Scheduled Due date in the past will always be picked up for payment, but it should be dated in the current fiscal year.


If these fields do not need to be updated, go to Step 4 to check the vendor status.
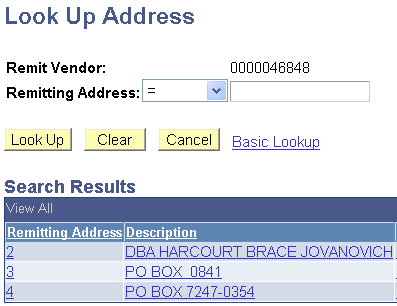
Note the Remit-To vendor identification number, location, and address on the Payments tab, then go to the Invoice Information tab and note the Accounting Date. Navigate to the Vendor Information page: Vendors > Vendor Information > Add/Update > Vendors and Find an Existing Value to check the vendor status.
If the vendor has a Regular Persistence, confirm that the Status is ‘Approved’. If the Vendor has a One-Time Persistence, confirm that the Status is ‘Inactive’.


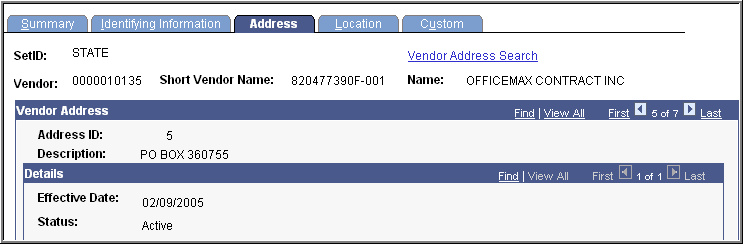
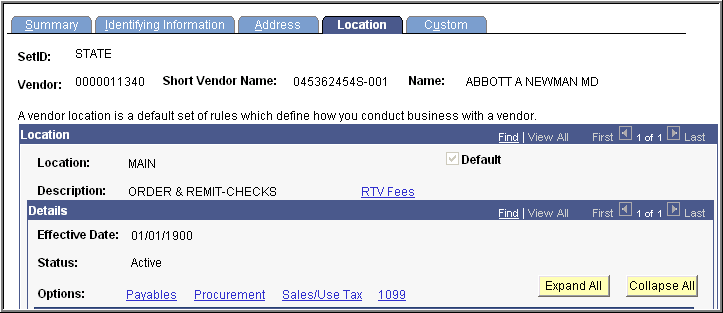
Click on the Address tab and confirm that the Remitting address that shows on the voucher Payments tab has an ‘Active’ Status in the Address Detail and that the Effective Date is earlier than the Accounting Date on the voucher. (The Vendor address used must have been ‘Active’ when that voucher was processed.)

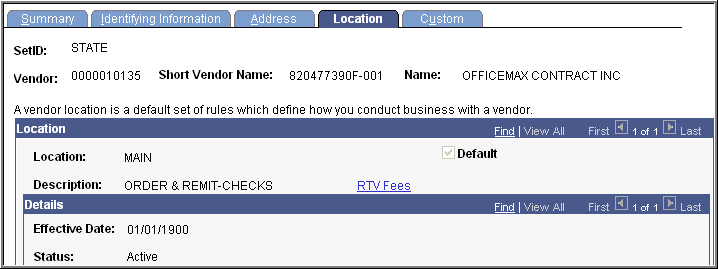
Click on the Location tab and confirm that the Location referenced on the voucher has an ‘Active’ Status and that the Effective Date is earlier than the Accounting Date on the voucher. (The Location used must also have been ‘Active’ when that voucher was processed.)

5. If these statuses need to be updated on the vendor, review the vendor conversations area for messages from OSC regarding this vendor. If nothing indicates why the vendor is not approved or why the location or address are inactive, or if the effective date is too new, contact OSC to update the fields and confirm that payments to this vendor should be processed.
6. Another reason for a voucher not getting paid could be that there is an adjustment voucher (credit) to that vendor that is waiting to be applied. If the credit amount is for more than the debit amount on the Regular voucher, it will not “Pay.”
7. If a voucher has been created in a Control Group, and the Control Group has not progressed to “Verified” status, the voucher is able to proceed through budget check, but will not be picked up by the Pay Cycle for payment. When troubleshooting a voucher for not paying, check on the Invoice Information page to verify that it is in a Control Group. Then, navigate to Control Groups and check to see that it is not “Verified.” Have the Control Group Processor verify and, on the Account page, select “Post Group.” This will post all vouchers in that Control Group and the voucher in question should be picked up by the next Pay Cycle.
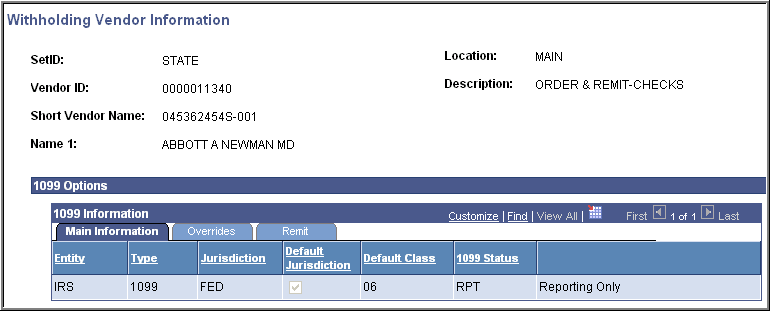
8. When vouchers are created for withholding vendors, the Withholding link will appear in the center section of the Invoice Information page.

Click on this 1099 link and verify that the appropriate withholding details (type and class) are connected to this expenditure and are defined for this vendor. Incorrect withholding information could result in your voucher not being paid as well as inaccurate Vendor reporting. Consult the Job Aids titled, “Entering 1099 Information” and “Determining Withholding” on the Core-CT Website for detailed instructions.

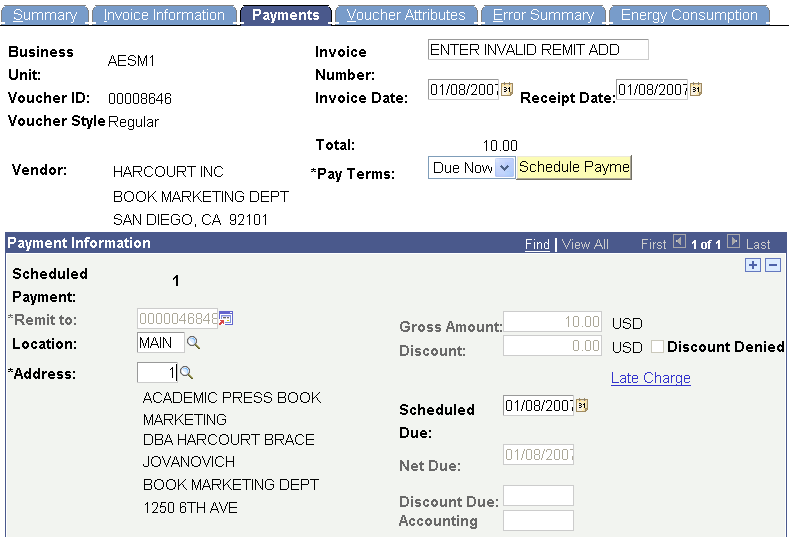
One of the typical reasons that a voucher will sit unpaid in Accounts Payable is that the remit-to address is not valid. A quick way for Approvers to check for this is on the approval page at the bottom in Details. The fields should be filled in. If they aren’t, this address needs to be dealt with before the voucher will be paid. You can also see this on the invoice information page of the voucher. See the screenshot below this one.
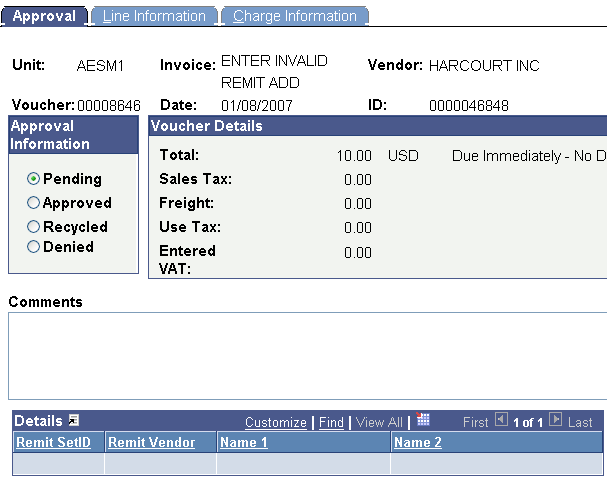

The problem here is that the voucher was created when remit-Address 1 was valid on the vendor information. After creation, the address was changed to ‘Inactive’ status on the vendor. When the Approver attempts to approve the voucher, he sees that the remit vendor details are blank, and should not approve the voucher. He is able to perform the function, but should investigate the error first. Approving the voucher at this point would not allow it to proceed to payment.

To ensure that your voucher is included in the next Pay Cycle, confirm that the Vendor and voucher are completed to the above specifications. As this investigative process can be confusing, please contact the Help Desk if you cannot resolve these errors on your own.
BEFORE READING – PREVIEWING PARTNERSMALL GROUP VOCABULARY PREVIEW WHAT?
BOOKING FORM TOOLBOX TALK NO 4 – REVIEWING A
BRAINSTORMING GRID FOR REVIEWING A DANCE PERFORMANCE TO PROVE
Tags: determine why, reviewing, voucher, determine
- PRZEDMIOTOWY SYSTEM OCENIANIA Z EDUKACJI DLA BEZPIECZEŃSTWA DLA LICEUM
- MARTA VACA REBOLLO NP 26558 TEI 04INTERFACETCSTTXTE10001 INVERSIÓN DE
- UNIVERSIDAD DE BURGOS FORMULARIO DE SOLICITUD DE USO DE
- Prof dr Friedrich w Busch und Lehrende der
- 49 HOVEDPLAN FOR VANN – HAMAR KOMMUNE INNHOLDSFORTEGNELSE 1
- NODAL NINJA 3 HANDBUCH 18 DEZEMBER 2021 AUS DEM
- Gizartekohesiorako Dirulaguntza Eskaera Solicitud de Subvención de Cohesión Social
- G SEGELL I DATA D’ENTRADA PLANTES I INSTAL·LACIONS FRIGORÍFIQUES
- TEMELJEM ODREDBE ÈLANKA 49 ZAKONA O PRODAJI STANOVA NA
- [OPENDJ7726] EVALUATION SETUP FAILS WITH NO USERS CREATED 20210105
- GLOBAL WARMING IN LATVIA IN THE LAST FEW YEARS
- F FOTO COLOR FORMULARIO 1 ORMULARIO DE POSTULACIÓN “BECAS
- MINISTERIO DE DUCACION ANEXO I DEL PLIEGO DE CONDICIONES
- OGŁOSZENIE O PRZETARGU PISEMNYM NA SPRZEDAŻ CZYTNIKÓW KART BANKOWYCH
- SAMPLE BUDGET PAGE – ORGANIZATIONAL EVENT FINANCIAL INFORMATION
- JAIL POLICIES POLICY USE OF FORCE THIS
- ANTRAG AUF MITGLIEDSCHAFT IM 1 BOULE UND PÉTANQUECLUB
- SUBPOENA GUIDE FOR ISSUING PARTIES PURPOSE THE DEPARTMENT
- Solicitud de Beca Programa de Pasantias 2013 Para Técnicos
- Entidad Pública Instituto de Desarrollo Económico del Principado de
- MARIO ALFREDO HERNÁNDEZ SÁNCHEZ (CIUDAD DE MÉXICO 1978)
- AGUILERA JUÁREZ DANIEL JESÚS ALCÁNTARA ORTEGA DANIEL ALCÁZAR SÁNCHEZPALENCIA
- G OVERNO DO ESTADO DE SÃO PAULO SECRETARIA
- SOLI CONTRO TUTTI DIRETTO DA AIDORU 6 – 7
- UPORABA DO 31 1 2019 ROK IN NAČIN PREDLOŽITVE
- PARTIDO SOCIALISTA OBRERO ESPAÑOL GRUPO MUNICIPAL SOCIALISTA AYUNTAMIENTO DE
- HUMAN RESOURCES BRANCH ADVICE NO 0213 25 JUNE
- UMOWA NR OG 35791 8 ZAWARTA W CHORZOWIE W
- NADIE DEJA DINERO A QUIEN NO TIENE TRABAJO EN
- DESCRIPTION DE L’ACTIVITÉ 43 L’ATMOSPHÈRE STELLAIRE EST
 1 PROJEKT FINANSOWANY ZE ŚRODKÓW EFRR W RAMACH REGIONALNEGO
DNIA ……………………… SYGNATURA SPRAWY ………… WYKAZ MAJĄTKU DŁUŻNIKA W
JAVNO PODJETJE VODOVODKANALIZACIJA DOO VODOVODNA C 90 1000 LJUBLJANA
 4 FORMULARIO DE ASIGNACION DE FRECUENCIA(S) EN MICROONDAS
 ZEPO AND THE FILMS ABOUT THE SPANISH CIVIL WAR
 TEXTOS SOBRE EL RECONOCIMIENTO DE LA VALÍA CIENTÍFICA DE
96892DOC PORFINVIERNESES ACUSTICAS CON SAXO DO—LAM—FA—DO—SOL (BIS) DO
 1) SOLICITUD Nº SBBC 2) FECHA SOLICITUD DE CERTIFICACION
TEMPLATE FOR PUBLIC NOTIFICATION [PROJECT NAME] [DEVELOPER NAME] [ADDRESS]
2015 – EXECUÇÃO PENAL – LIVRAMENTO CONDICIONAL – PRÁTICA
PRAVILNIK O UVJETIMA KRITERIJIMA I POSTUPKU DODJELE STIPENDIJA REDOVITIM
OGÓLNOPOLSKA KONFERENCJA BIBLIOTEK AKADEMII I UNIWERSYTETÓW MUZYCZNYCH 2526 PAŹDZIERNIKA
SODOBNI PRIKRITI PREISKOVALNI UKREPI DRUGIČ FORENZIČNI RAČUNALNIŠKI PROGRAMI PRIMOŽ
 MONIKA GABRYŚ PATRYCJA BALCER KATARZYNA NAJDOWSKA MAREK KAMZOL SPIS
 E NRIQUE VALDEARCOS GUERRERO HISTORIA DEL ARTE PARLAMENTO DE
3 MONITORING OF RADIOACTIVELY CONTAMINATED SCRAP METAL IN LATVIA
PAGE 2 OF 7 SKS70017Q0074A001 1 CONTRACT ID CODE
AGENDA ITEM NO 7 HOUSING SUBCOMMITTEE 8 OCTOBER
 DISCUSSION DIAMOND ENCOURAGE LEARNERS TO TALK ABOUT A TOPIC
WTWGTCPW80 PAGE 21 WORLD TRADE ORGANIZATION RESTRICTED WTWGTCPW80 18
