21 HOW TO RUN AND TRACE A PROGRAM IN
EVOSCAN MAPTRACER TUTORIAL CONTENTS 1 EVOSCAN14ROČNÍK 1111 – 13112010 VÝSTAVIŠTĚ ČBUDĚJOVICE REGISTRACE VÝSTAVNÍ PLOCHY
188290807 PROBLEMATIKA REGISTRACE EVROPSKÝCH A ZAHRANIČNÍCH SUBJEKTŮ K
21 HOW TO RUN AND TRACE A PROGRAM IN
22ND JUNE 2011 PROJECT AFTER TRACES OF TOTALITY MARIE
3 THE USE OF TRACE ELEMENTS IN IGNEOUS PETROLOGY
How to run and trace a program in Eclipse version 3
How to run and trace a program in Eclipse version 3.3
A. Download and install JDK 6 Update 4 for windows from: http://java.sun.com/javase/downloads/index.jsp
B. Download Eclipse Eclipse Classic 3.3.1.1 from http://www.eclipse.org/downloads/. The name of the file is: eclipse-SDK-3.3.1.1-win32.zip. Unzip the file (I unzipped it into C:\Program Files), and put its short-cut icon on your desktop.
Since you will have several projects, make a folder on your drive say “Projects”. Now in “Projects” make a folder called “Project1”. In the following I am making a project file.
Note: To read each of following pictures more clearly click on the lower right corner and drag it.
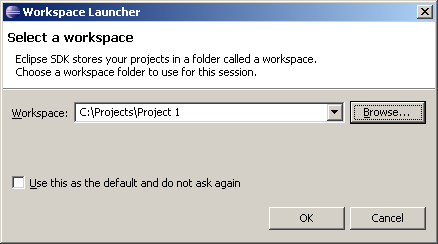
1. Double-click on the eclipse icon on the desktop (or in C:\Program Files\eclipse). Click on Browse and find the folder Project1. You see the following figure:
2. Click OK to get:
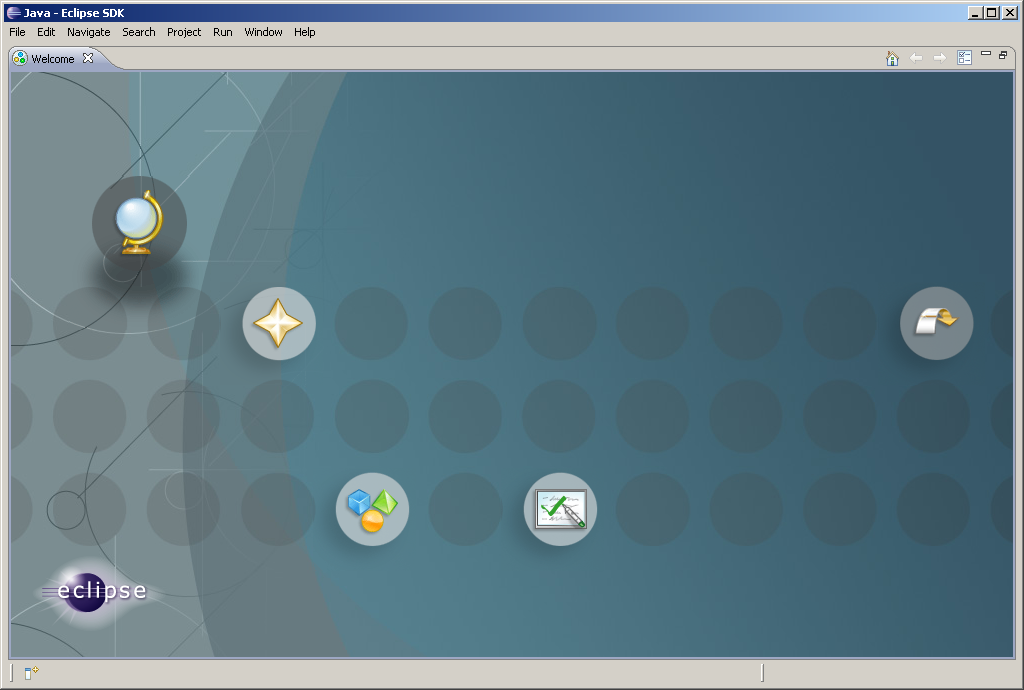
3.
on the upper left corner click on
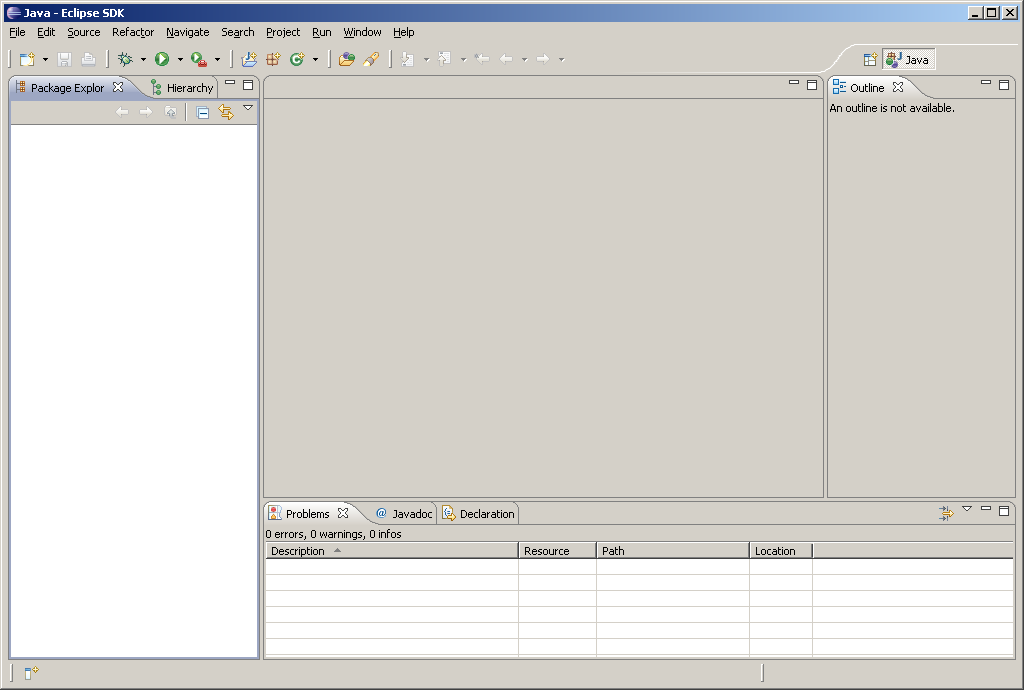
![]() to close the Welcome to Eclipse to get (You can bring this window
back from the help icon):
to close the Welcome to Eclipse to get (You can bring this window
back from the help icon):
4. We now create a project file. Click on File New Java Project to display the New Project wizard:
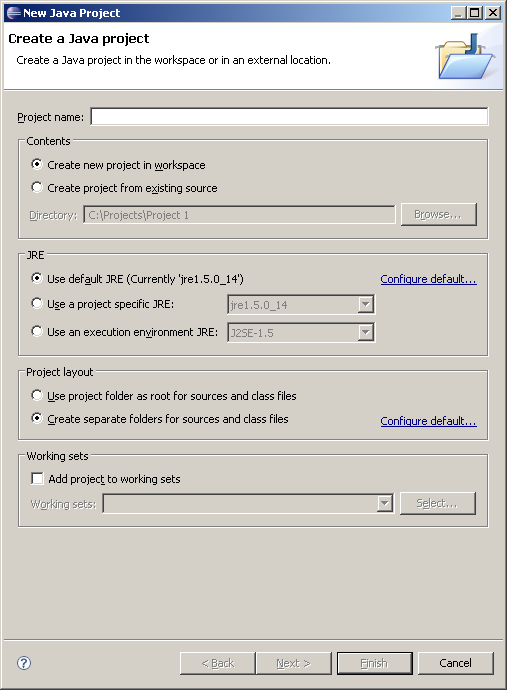
5. Type myProject1 (no space between my, Project, and 1) for the Project name field:
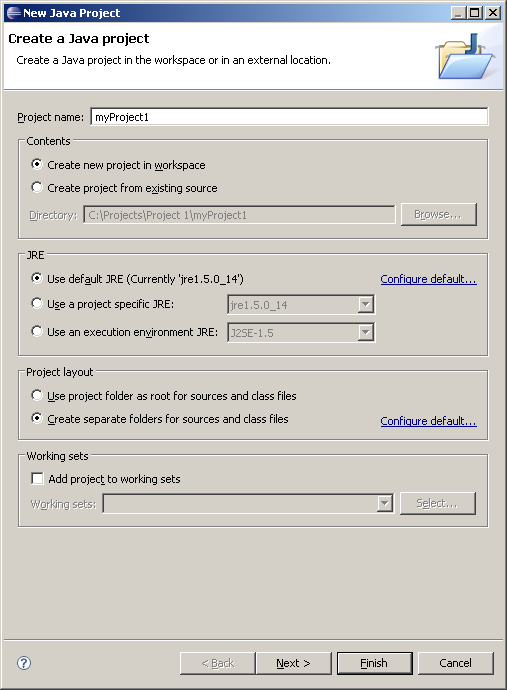
6. Make sure your radio buttons are checked according to the above picture. Click Finish to create the project. You should see:
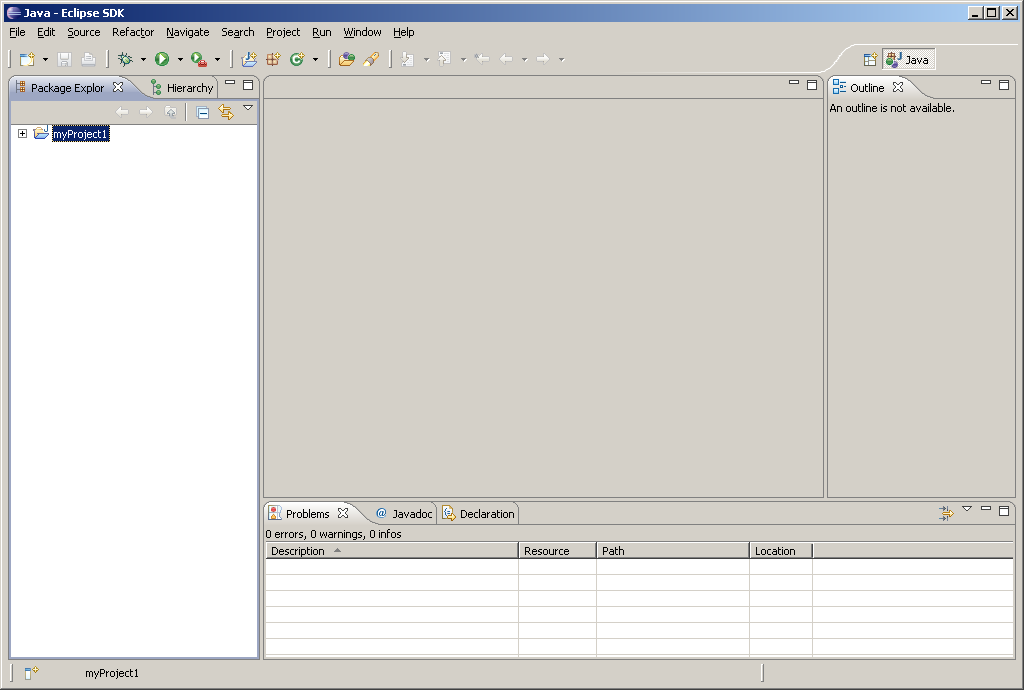
7. We now create the first program. On the upper corner click on File New Class:
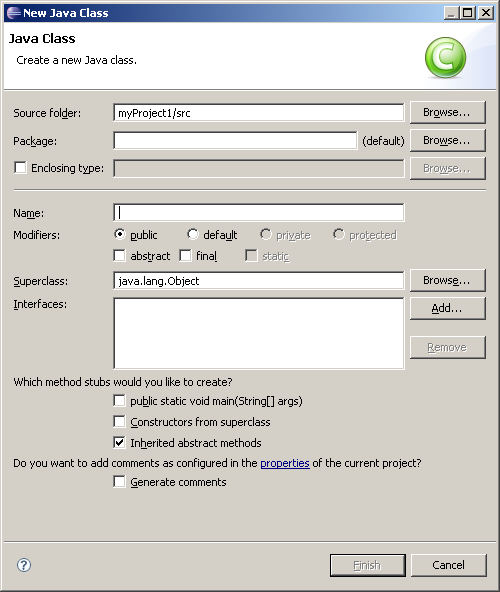
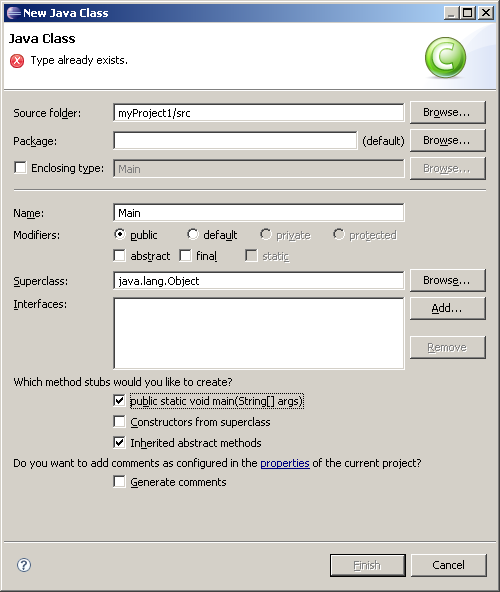
8. In window labeled Name enter Main, make the check boxes as follows:

9. Click on Finish button to get:
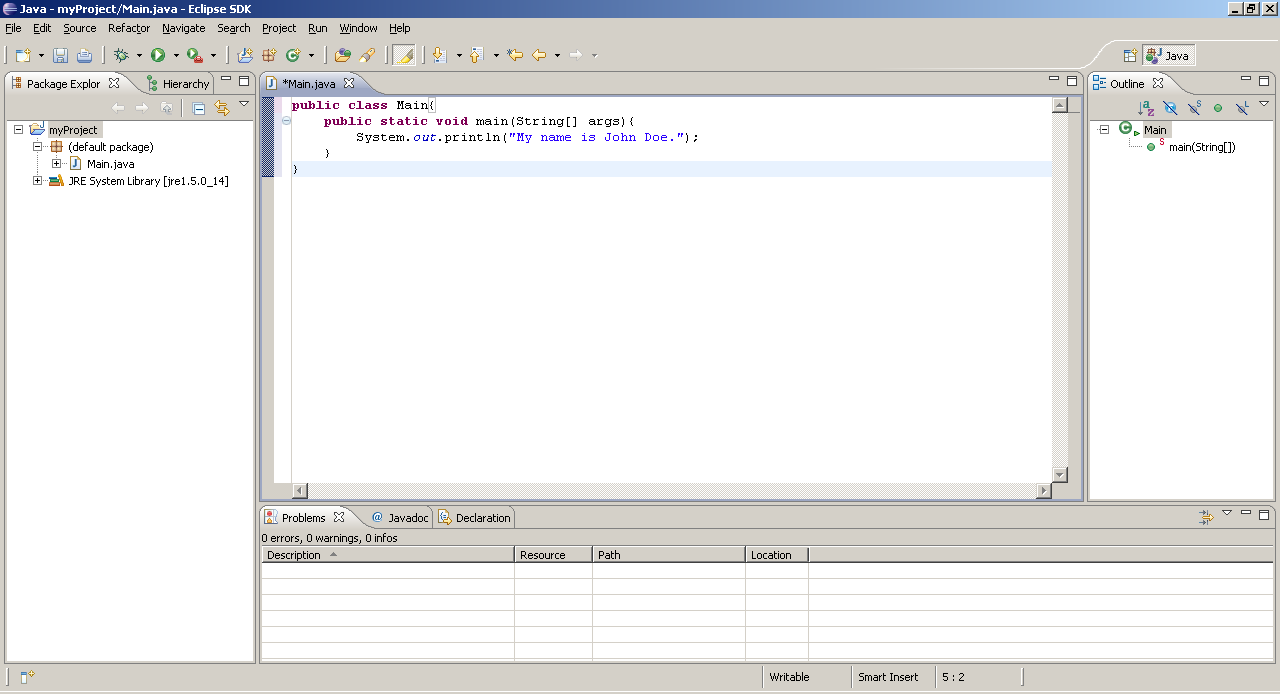
10. Delete the comments (they are useless) and enter the following instruction:
System.out.println("My name is John Doe.");
Make sure you entered a semicolon at the end of the instruction. You should have the following in the editor:
Click
on
![]() on the menu bar to save your program.
on the menu bar to save your program.
11. You do not need to compile the program. As you type the program Eclipse compiles it. When a java program is compiled creates a file with extension class. Take a look at folder C:\Projects\Project 1\myProject to see there is a file Main.java and Main.class. The Eclipse compiler translates every java file to a class file. The content of Main.class is called byte codes. The java interpreter executes this file and displays output of your program. In case you have errors in your program Eclipse dynamically checks the syntax errors. To run the program on the menu bar click on Run Run As to see:
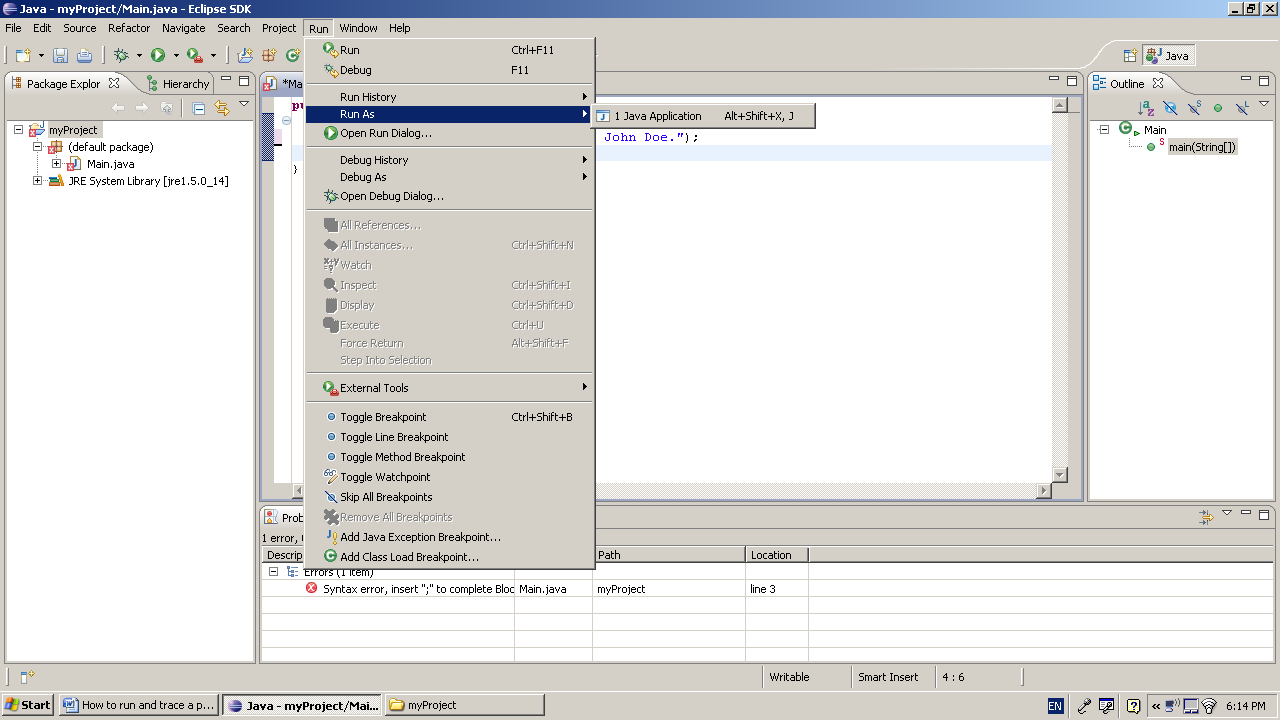
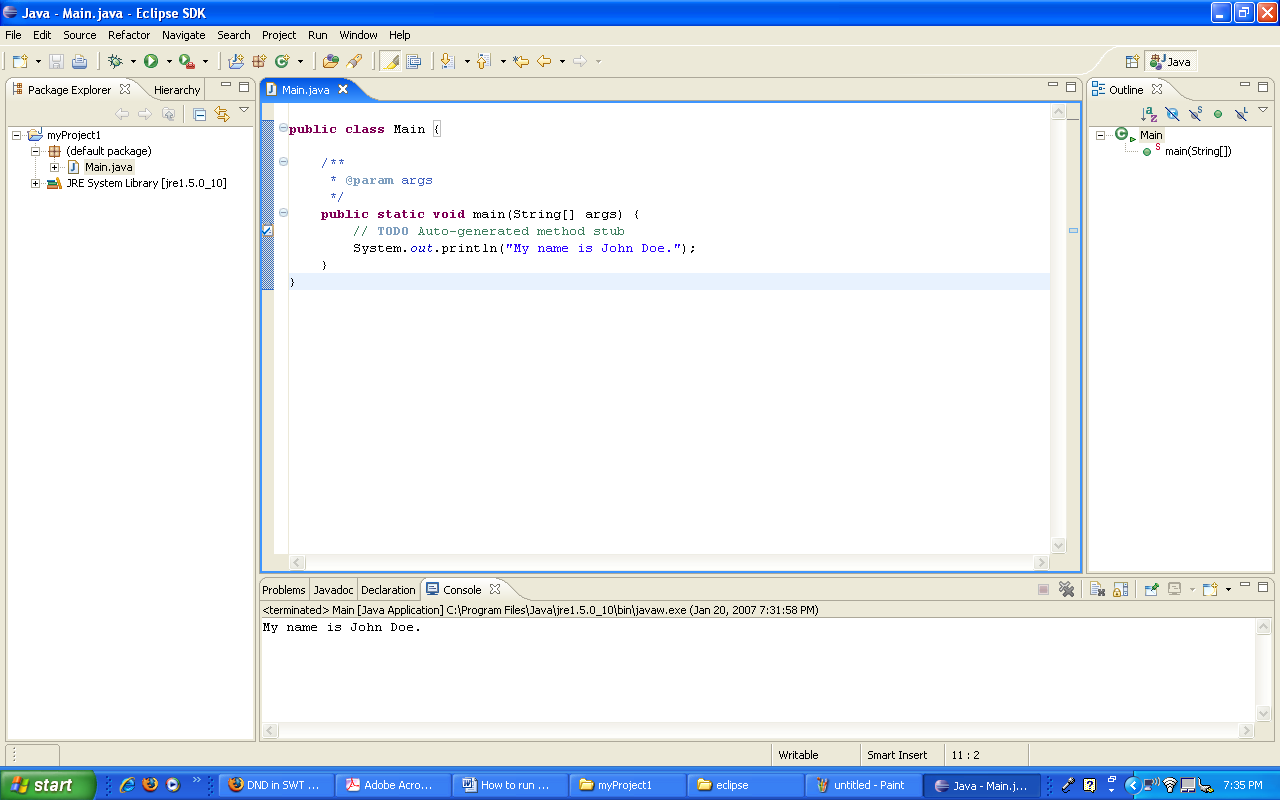
12. Click on 1 java Application to see the output of the program (My name is John Doe.) in the lower window:
Note:
Once you run the program you do not need to run it this way. You can
click on
![]() on the menu bar.
on the menu bar.
13. Click on File Exit to exit from eclipse.
As you are going through the course, you program will consists of several classes (java files). In the following subject we first make a program with two classes and then debug it.
A program with more than one class Eclipse
1. Create a second folder name Project2 in the folder Projects. Click on the icon Eclipse to activate it.
2. Make a project folder named myProject2, by following steps 1-6, but for the folder Project2.

3. Follow steps 7 to 9 to make the first class (java file). Name this java file Main as you did before. Main.java is your first class (java file).
4. We now create the second class. On the upper left corner click on File New Class. Type Second for the name of the class and uncheck the check box labeled public static void main(String[] args). You should have:
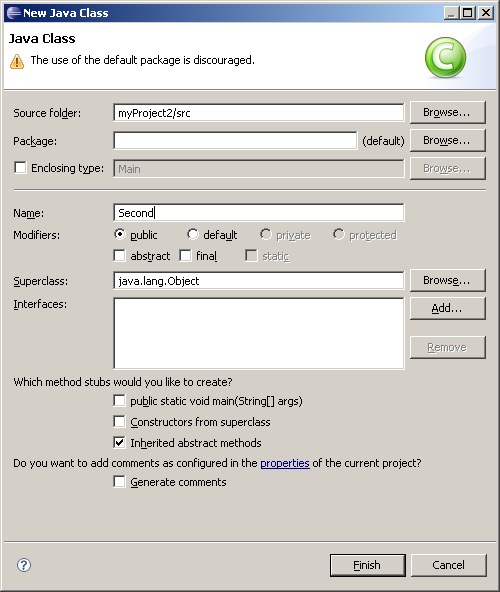
Click on Finish to get:
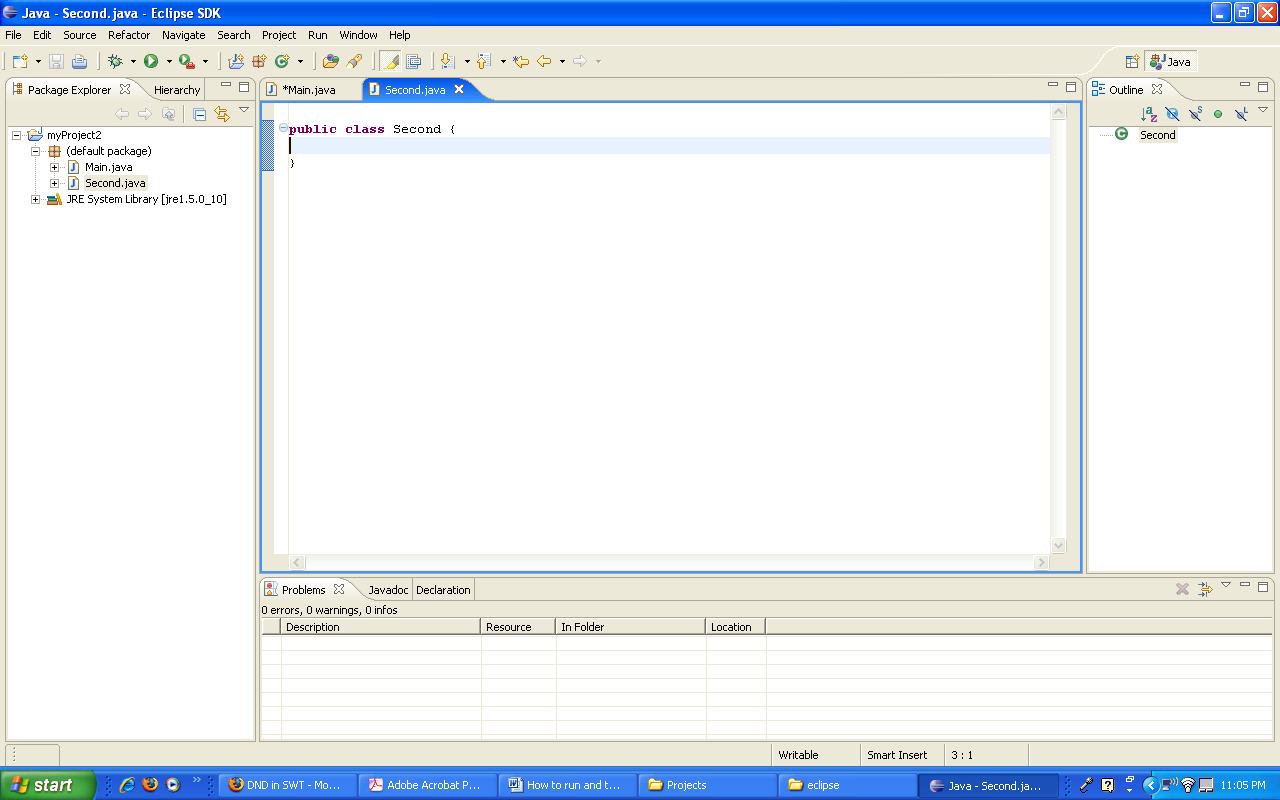
You now have two empty classes. I am going to make a method for the second class with some code that you will learn them later. The purpose of this lecture is to learn how to make a program and how to trace it. You will learn java through the semester (this sentence is for students who do not know java at all).
Note: Its is customary to type the name of a class starting with upper case letter and type the name of a method (like main) in lower case letters.
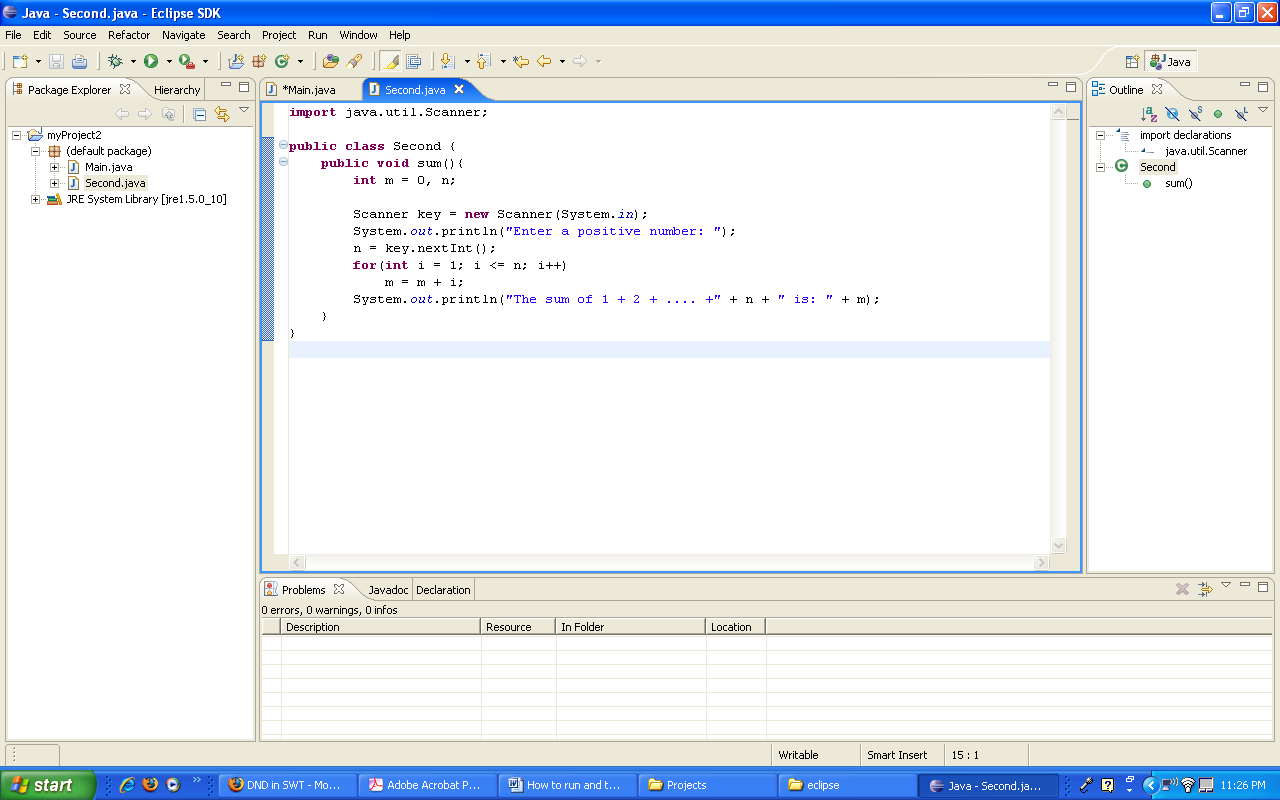
5. Replace the content of the second class by the following:
import java.util.Scanner;
public class Second {
public void sum(){
int m = 0, n;
Scanner key = new Scanner(System.in);
System.out.println("Enter a positive number: ");
n = key.nextInt();
for(int i = 1; i <= n; i++)
m = m + i;
System.out.println("The sum of 1 + 2 + .... + " + n + " is: " + m);
}
}
Your editor should look like:
Note: Indentation is important. We use tab key for indentation. As your classes get bigger and bigger indentation of the lines make your program:
More readable.
Easier to trace and debug.
Therefore from the beginning indent all lines of your classes. If you do not indent your classes from the beginning changing you habit to impose indentation is not easy.
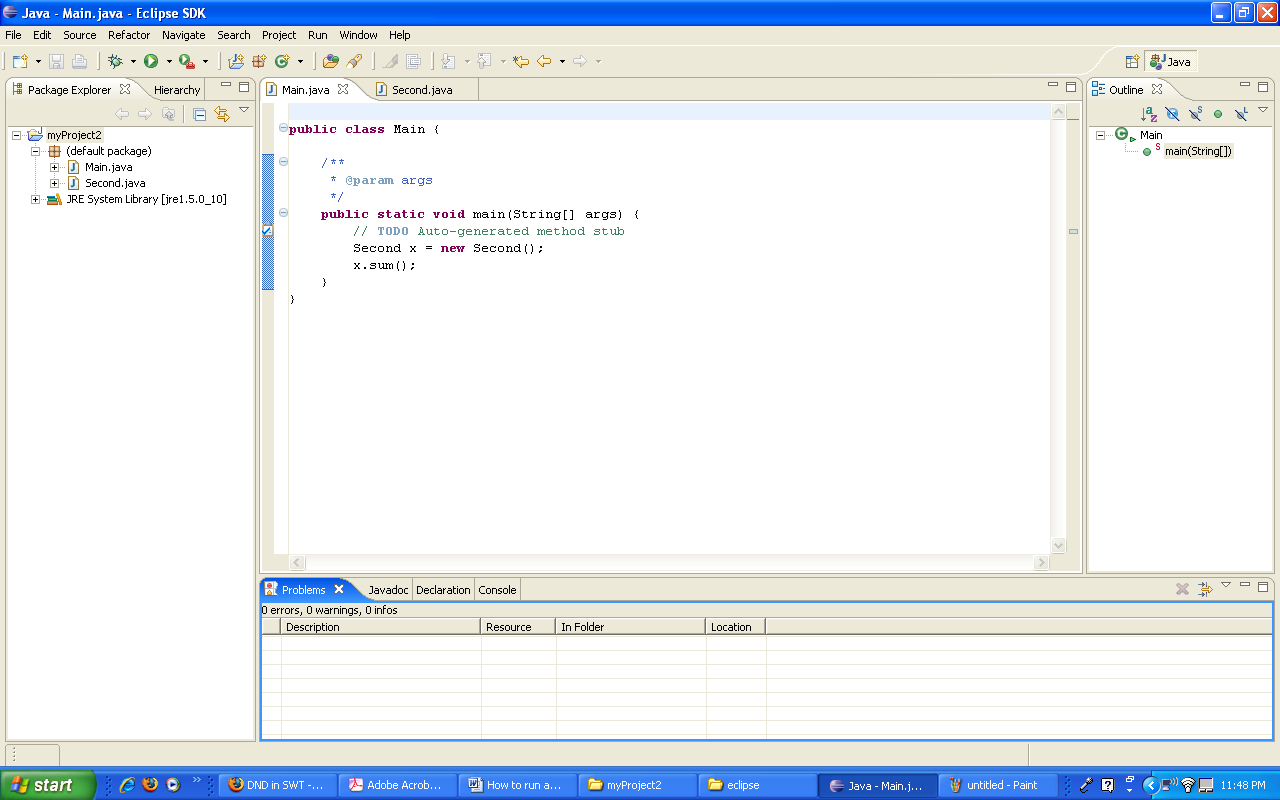
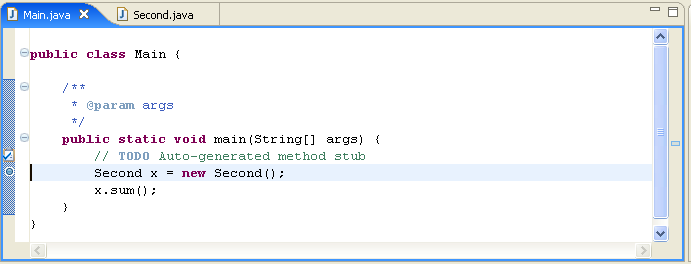
6.
Click on main on the menu bar
![]() to bring the class Main.java on the screen. Add the following code to
method main (copy and paste):
to bring the class Main.java on the screen. Add the following code to
method main (copy and paste):
Second x = new Second();
x.sum();
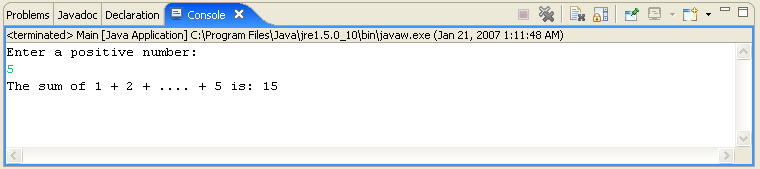
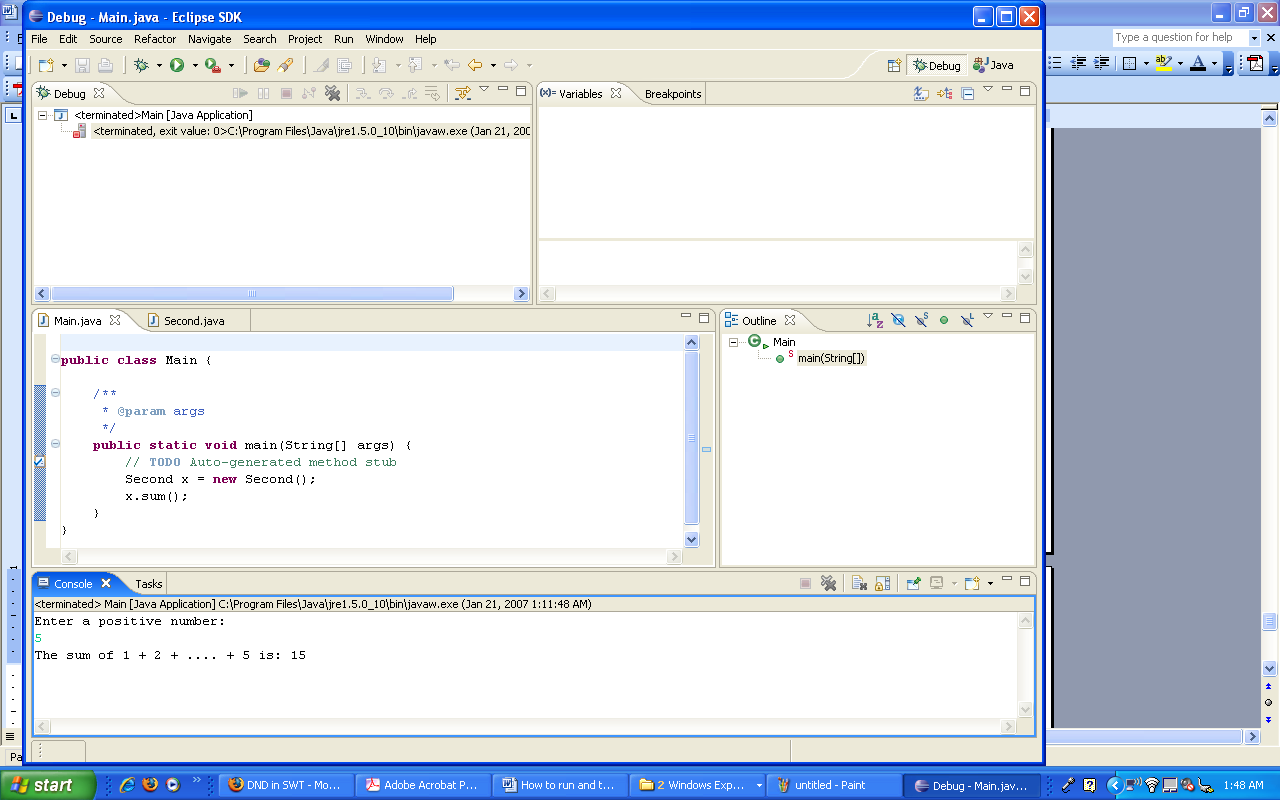
7. Like the first project run this project.:
The
console icon
![]() in the lower window is high lighted and the message Enter
a positive number: shows up.
Enter a number (like 5) and hit Enter key. The output of the program
shows up.
in the lower window is high lighted and the message Enter
a positive number: shows up.
Enter a number (like 5) and hit Enter key. The output of the program
shows up.
Tracing a java program
There are times you make a program, run it but you do not get the desired answer. In this situation you need to trace your program and look at the value of your variable. First we trace the program instruction by instruction.
1. Click on Window Open Perspective Debug to get:
Temporary make this picture bigger to see the purpose of each window.
2. In the class Main on the margin of the first instruction right-click:
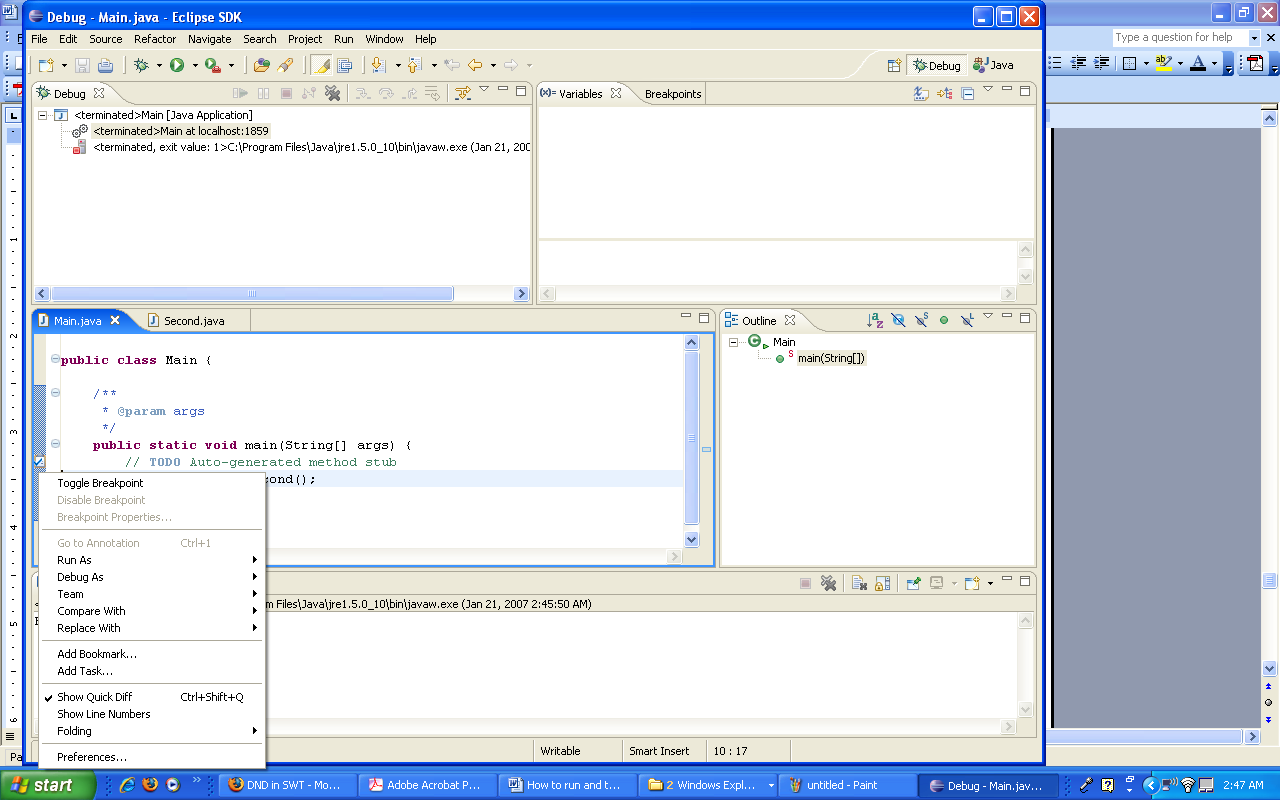
3. Select Toggle Brakepoint. You should see a small circle on the margin:
4.
on the menu bar click on Run (not on
![]() )
to see the following window. Click on Debug As and select 1 Java
Application. Click on Run and look at the window:
)
to see the following window. Click on Debug As and select 1 Java
Application. Click on Run and look at the window:
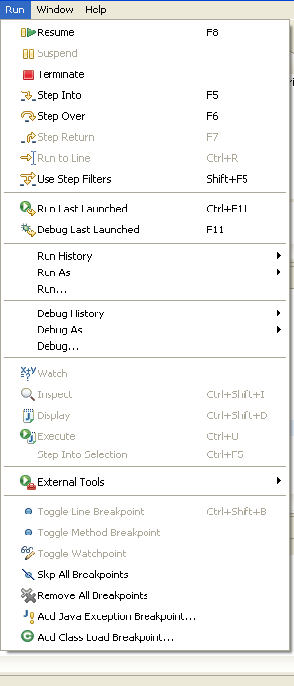
Let us take look at some of the items in this window:
Resume resumes the execution of a paused program.
Suspend temporarily stops execution of a program.
Terminate ends the current debugging session.
Step Into executes a single statement or steps into a method.
Step Over executes a single statement. If the statement contains a call to a method, the entire method is executed without stepping through it.
Step Return executes all the statements in the current method and returns to its caller.
Run to Line runs the program, starting from the current execution point, and pauses and places the execution point on the line of code containing the cursor, or at a breakpoint.
Note: I know some of the terms such as method, call a method, return to a caller is not clear. Be patient, I will explain these terms and more through the semester (this paragraph is for the students who are new to Java).
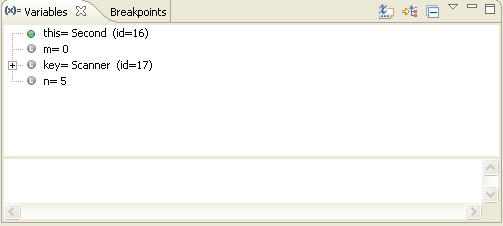
5. Hit F5 (Step Into) several times and look at the top-right window to see the value of the variables. Once you passed the instruction n = key.nextInt(); enter a number (like 5) in the lower window.
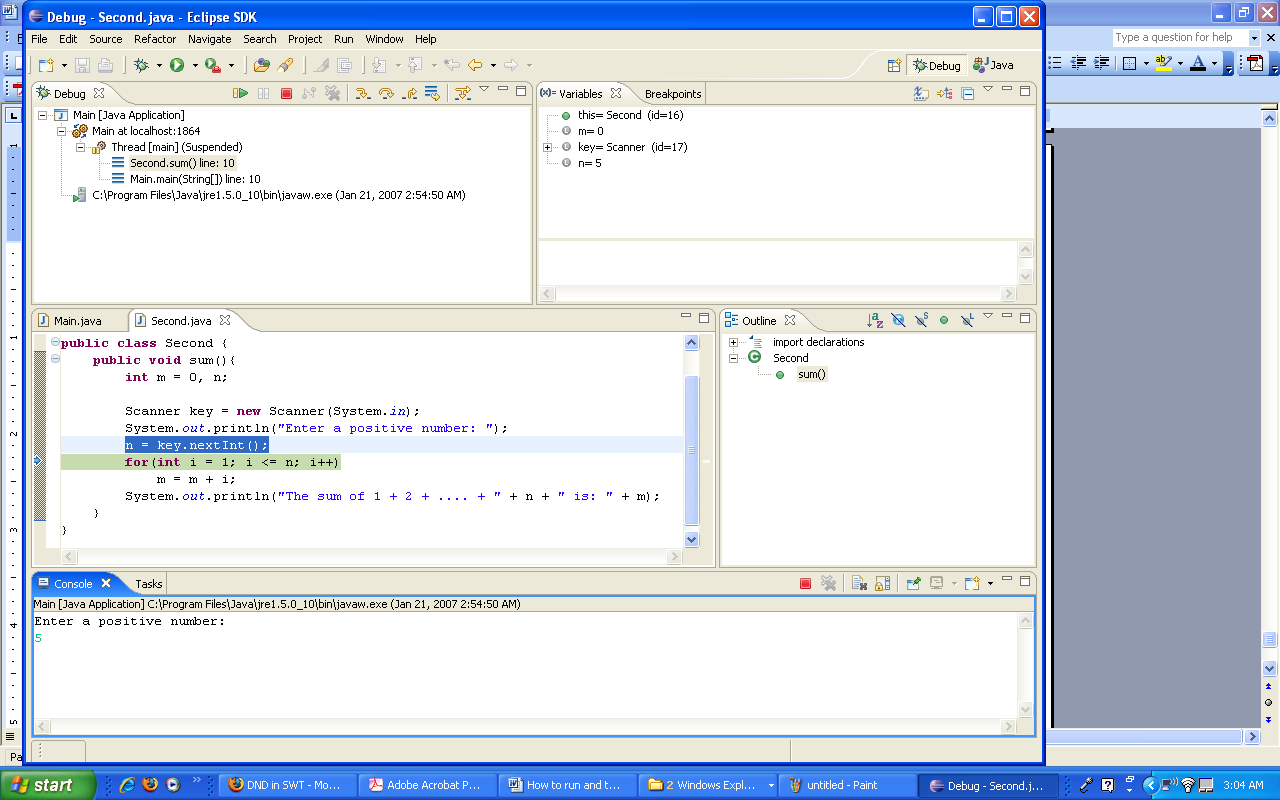
Note: Enlarge this picture to see the lines more clearly.
Look at the Variables window to see the value of the variables. The second and fourth line are understandable. At this stage the value of the variables m and n are 0 and 5 respectively. Keep hitting F5 and watch the value of the variable.
Eventually the execution of program is terminated and you see:
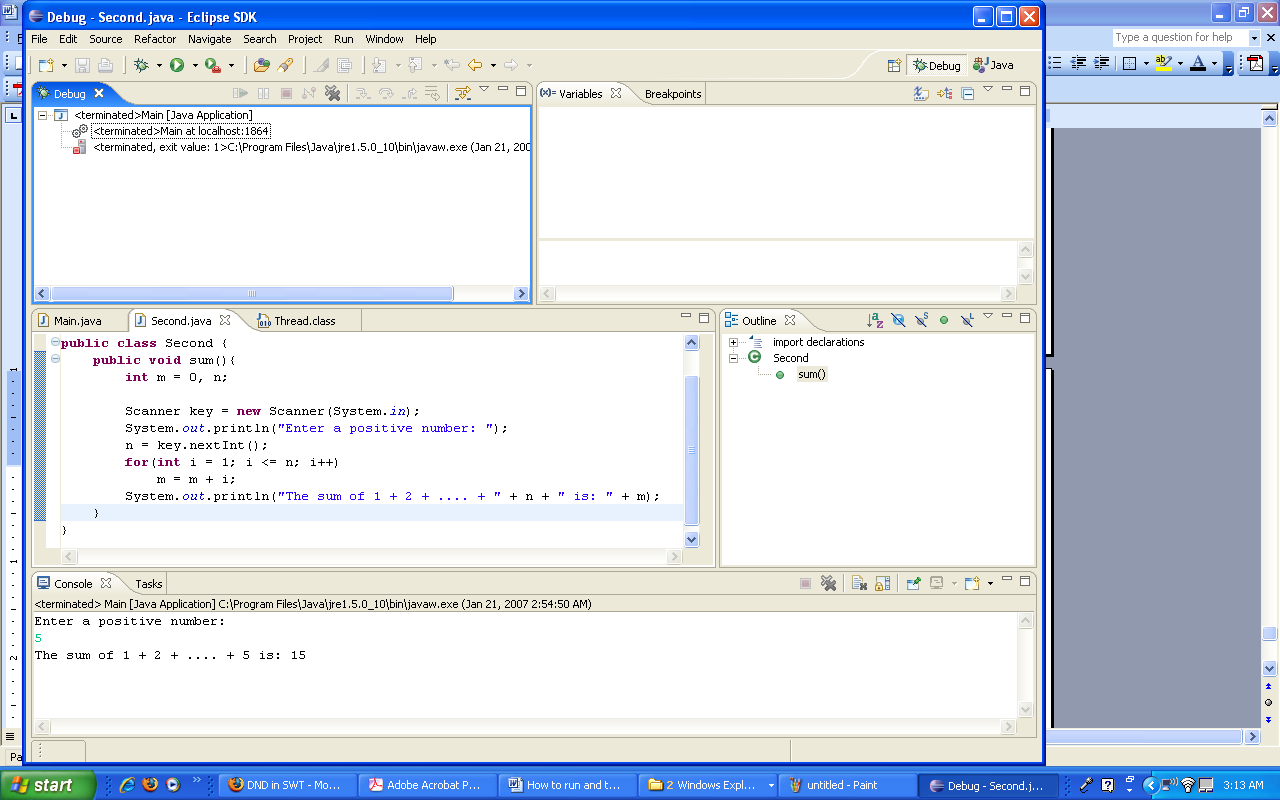
If the program does not terminate at this stage click on the small red-icon on the menu bar.
You saw one application of a breakpoint. Another application of breakpoint is for the time you are sure part of the program is correct. In this situation make a breakpoint after this part.
Note: To remove a breakpoint point to it, right-click, and select Toggle Breakpoint.
6.
Click on Main.java icon
![]() to activate the Main class and remove its break point.
to activate the Main class and remove its break point.
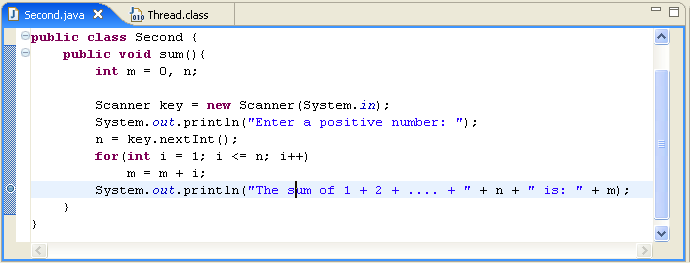
7. In class Second make a break point on the margin of the instruction:
System.out.println("The sum of 1 + 2 + .... + " + n + " is: " + m); the window for Second.java look like:
8. on the menu bar click on Run and click on Debug Last Lunched (or hit F11) and enter 5 to see:
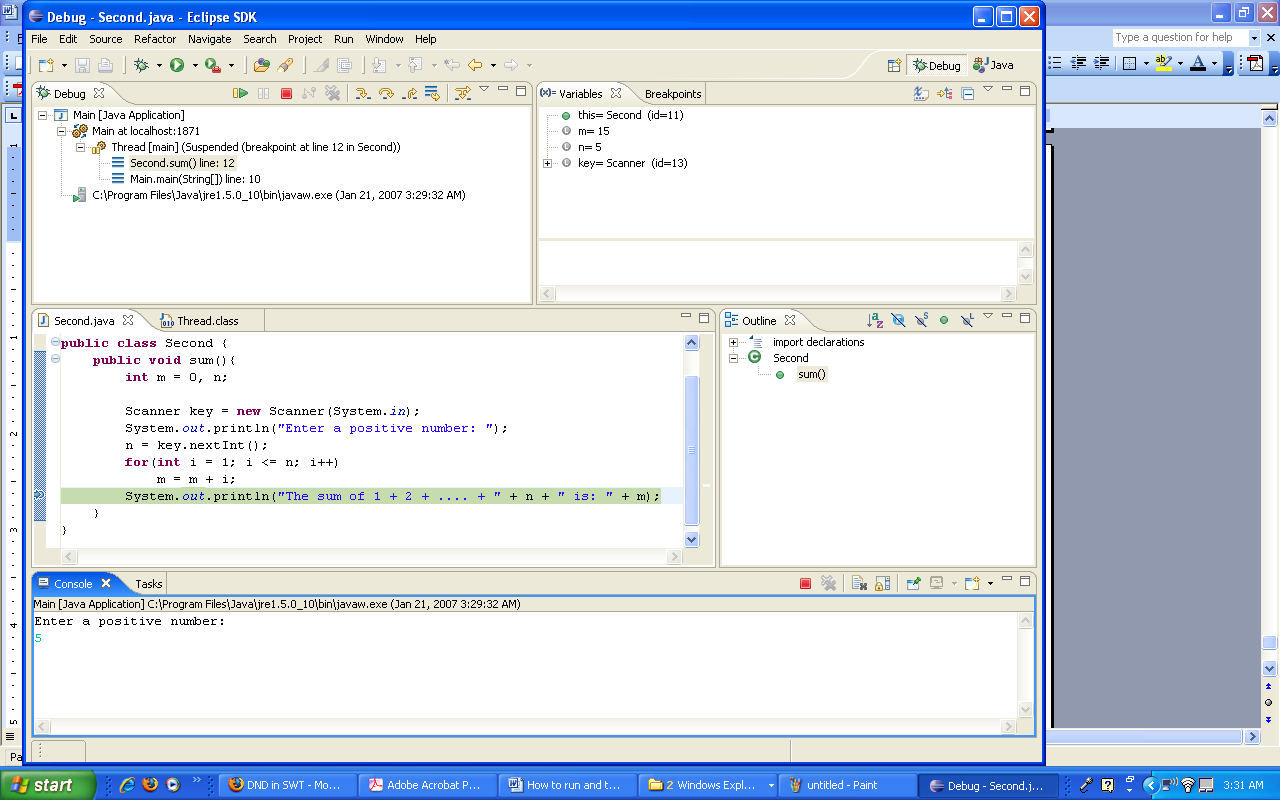
Note that the execution of the program stopped on the breakpoint. See the value of the variables.
9. on the menu bar click on the small red icon to terminate the execution of the program.
A NGKET PELACAKAN LULUSAN (TRACER STUDY) AKADEMI KEPERAWATAN HUSADA
ABSTRAK PENGARUH KUALITAS LAYANAN SISTEM PELACAKAN ONLINE (WEB TRACE
BASPRG005PL SPECYFIKACJA TECHNICZNA STEROWNIK STREFOWY TRACER ZN523 1
Tags: program in, the program, program, trace
- [CLICK HERE AND TYPE TITLE] [[CLICK HERE AND TYPE
- CSD 424 [12115] NAME ADDRESS TELEPHONE NO & ID
- II FORO INTERNACIONAL SOBRE DERECHOS HUMANOS OBSERVARORI DESC EL
- HOUNSFIELD SURGERY PATIENT PARTICIPATION GROUP MINUTES OF MEETING HELD
- SIGNIFICATION DES CODES UTILISÉS POUR LA REPRÉSENTATION DES OBJECTIFS
- THESE ARE THE FUNCTIONS THEY
- 21 NAVADNA NEDELJA 27 AVGUST 2006 – LETO XXIII
- ATENCIÓN INICIAL AL POLITRAUMATIZADO EN EL SERVICIO DE URGENCIAS
- PRAWO MIĘDZYNARODOWE PUBLICZNE (30H) SEMESTR ZIMOWY 20092010 WYKŁAD 3
- KONCENTRACJA UWAGI U DZIECI JEDNYM Z WARUNKÓW POWODZENIA DZIECI
- 10 BAB I PENDAHULUAN A LATAR BELAKANG KEPALA SEKOLAH
- FORM A1 MECBURİ HİZMET YÜKÜMLÜLERİNİN EŞ DURUM FORMU (TALEP
- TỈNH UỶ VĨNH PHÚC SỐ 02 NQTU Đ
- CONVOCATORIA PARA JEFE DE UNIDADES DE ADMINISTRACIÓN ACADÉMICA (UNADA)
- [EXASOL2828] EMBEDDED LUA INTERPRETER UPDATED TO VERSION 54 CREATED
- IMPORTERS OF METAL SCRAP IN INDIA MADHU SUDAN METALS
- CONVENIO DE REVISIÓN INTEGRAL DE FECHA 12 DE FEBRERO
- PREGÓN DIA DEL MUNICIPIO DE SASAMÓN 2008 VILLANDIEGO 20
- A TRAIL OF TEARS THE INDIAN REMOVAL ACT US
- 10 PRIEMONĖS „BENDRADARBIAVIMAS“ VEIKLOS SRITIES „ BENDRADARBIAVIMAS ĮGYVENDINANT VIETOS
- DDª CON NIF EN CALIDAD DE TITULAR
- PRIJEDLOG HRVATSKI JEZIK NA TEMELJU ČLANKA 19 STAVAK
- PROPUESTA METODOLÓGICA DE LAS X JORNADAS DE INFORMÁTICA SANITARIA
- ZAVOD ZA VJEŠTAČENJE PROFESIONALNU REHABILITACIJU I ZAPOŠLJAVANJE OSOBA S
- ÖRÖMHÍR EVANGÉLIKUS KERESZTYÉN ÓVODA 8200 VESZPRÉM ARADI VÉRTANÚK ÚTJA
- MISSION STATEMENTS EASTERN HIGH SCHOOL MISSION EASTERN HIGH SCHOOL
- PAVYZDYS VYDYTOJAMSADMINISTRATORIAMS DEKLARACIJĄ APIE SVEIKATOS BŪKLĘ NEBUVIMĄ PAREIGOS IZOLIUOTIS
- ACTA DE CONSTITUCION DE LA VEEDURIA CIUDADANA DE LOS
- FMD CONFINED SPACE ENTRY FORM THIS FORM MUST BE
- 2 SOMOGY MEGYEI TERÜLETI VÁLASZTÁSI BIZOTTSÁG 7400 KAPOSVÁR FŐ
 ADDPOP0019 REV 10 ACCELERATOR DIVISION DEPARTMENTAL PROCEDURE ACCELERATION OPERATIONS
HIGH RESOLUTION SYNCHROTRON POWDER DIFFRACTION DATA WERE COLLECTED USING
 ZÁKLADNÍ ŠKOLA OSTRAVAZÁBŘEH KPT VAJDY 1A PŘÍSPĚVKOVÁ ORGANIZACE MINIMÁLNÍ
 HƯỚNG DẪN TRANG TRÍ KHU VỰC BỎ PHIẾU ĐÓNG
KOCAELİ TİCARET ODASI BAŞKANLIĞI’NA TICARI AMAÇLA TAŞINMA EŞYASI TAŞIMACILIĞI
ÚNICA INSTANCIA N° 35691 LUIS ALFREDO RAMOS BOTERO CORTE
CERERE PRIVIND EMITEREA ORDINULUI DE PROTECTIE IDATE PRIVIND
POMŮCKA PRO SBOROVÉ PRACOVNÍKY STRÁNKA 5 Z 5 PŘEDKLÁDANÁ
 CALIDAD DE LOS DATOS ESPACIALES SIG AMBIENTAL DE
 EK 43 KAPSAMLI TEMİNAT VEYA TEMİNATTAN VAZGEÇME KULLANMA
UNASUR ¿CAMBIO DE NOMBRE O DE RUMBO? POR ALFREDO
 A PPLICATION FORM FOR STARTING A CAMPUS CLUB ALL
READING RAGE TOURNAMENT RULES REGISTRATION AND CREDENTIALS HEADQUARTERS READING
EXEMPLU DE APLICARE A METODEI DE EVALUARE A RISCURILOR
 PEIEP 6º L PRUEBA DE EVALUACIÓN INICIAL DE LENGUAJE
WEST OAK SURGERY PATIENT PARTICIPATION GROUP CODE OF CONDUCT
(I) FUNCTIONS AND DUTIES (II)POWER OF OFFICERS & DUTIES
THE HONORABLE HARRY REID THE HONORABLE MAX BAUCUS THE
11 DODAVATELSKOODBĚRATELSKÉ VZTAHY 1) VÝZNAM DOV 2) UZAVÍRÁNÍ DOV
CHAPTER 4 – ARRAYS CHAPTER 4 ARRAYS TRUEFALSE
